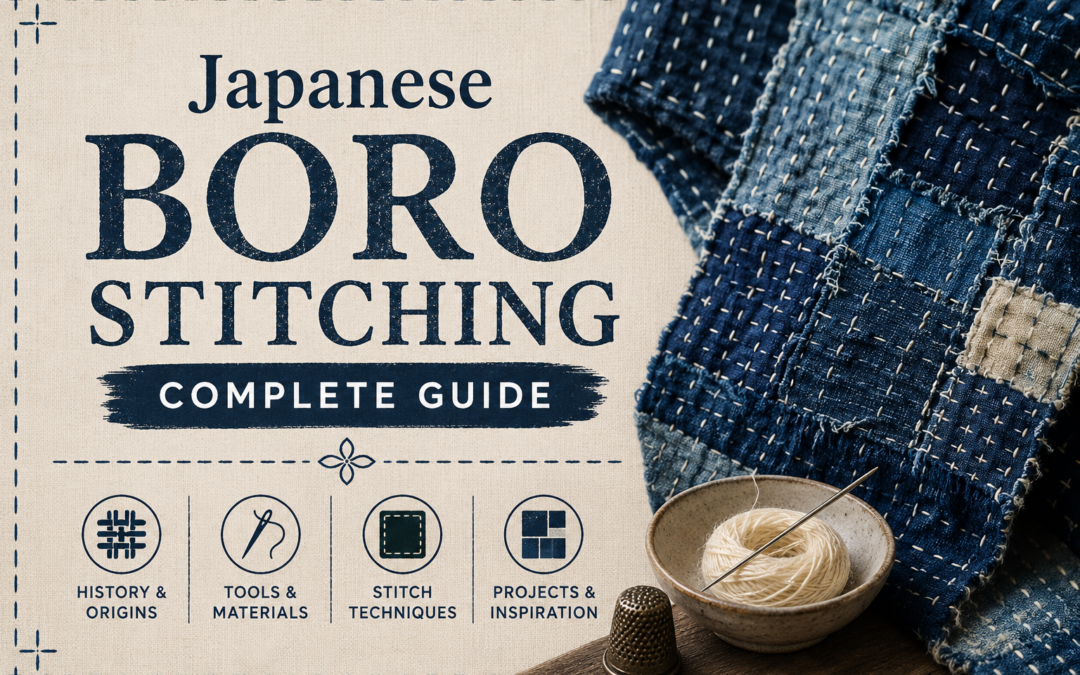
What Is Japanese Boro Stitching?
Japanese Boro stitching is a traditional textile repair method from Japan that transforms worn fabric into stronger, layered cloth through repeated hand stitching and patching. The word “Boro” means ragged or tattered, but its meaning goes much deeper than simple repair. It reflects a philosophy of using fabric fully, respecting materials, and extending the life of clothing through intentional mending.
Boro developed from necessity rather than decoration. In rural Japan, fabric was expensive and difficult to replace, so families patched garments repeatedly over generations. Each patch became part of the textile’s story. Over time, this created highly textured, layered fabrics that are now admired for both their functionality and beauty.
Today, Boro stitching is valued in modern slow fashion, visible mending, and textile art. People use it to repair denim, jackets, bags, and home textiles while preserving a handmade look.
Key ideas behind Boro:
- layered fabric reinforcement
- visible stitching
- textile preservation
- sustainable repair
- handmade uniqueness
Unlike modern repairs that try to hide damage, Boro celebrates it. The repair becomes part of the design. This makes every piece one of a kind.
For beginners, understanding Boro starts with one principle: repair with purpose, not perfection.
The History of Japanese Boro Stitching
The roots of Japanese Boro stitching go back to rural northern Japan during the Edo period. At that time, cotton was scarce and expensive, especially in farming villages. Families relied heavily on hemp and other rough fabrics for clothing, and every textile had to last as long as possible.
When cotton became more available, people began layering cotton patches over damaged areas. Instead of throwing away worn garments, they repaired them again and again. This created thick, durable, insulated clothing suitable for harsh winters.
Boro was especially common among farming families because resources were limited. Clothing was passed from parents to children, patched over decades, and reinforced repeatedly. Some garments contained fabric from multiple generations.
Historical Boro practices included:
- patching knees and elbows
- reinforcing workwear
- layering for warmth
- preserving family textiles
- reusing every scrap
What began as economic survival became a cultural textile identity. Today, collectors and textile historians study antique Boro garments because they reveal social history, material scarcity, and practical craftsmanship.
Modern Boro still follows these historical values:
- waste nothing
- repair intentionally
- strengthen weak areas
- honor textile longevity
The history of Boro explains why it remains powerful in today’s sustainable fashion movement.
What Makes Boro Different From Sashiko?
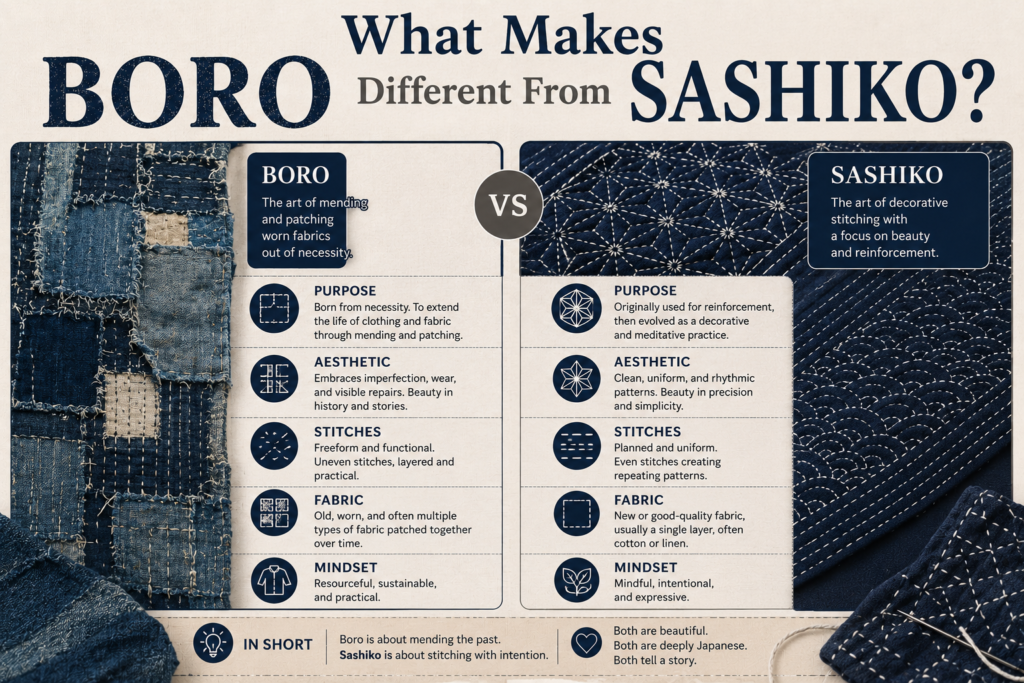
Many beginners confuse Boro with Sashiko, but they are not the same. While both involve Japanese stitching traditions, their purpose and structure differ significantly.
Boro is primarily about patching and layering fabric to extend life. Sashiko is primarily a stitching technique often used for reinforcement or decoration. Boro uses Sashiko stitches, but Sashiko can exist without Boro. We recommend you have a read of our Boro vs Sashiko expert analysis for a better understanding of the matter.
Think of it this way: Boro is the repair system, while Sashiko is one stitching method inside that system.
Main differences:
- Boro = fabric patching system
- Sashiko = stitch technique
- Boro emphasizes layering
- Sashiko emphasizes stitch patterns
- Boro often looks irregular
- Sashiko often looks symmetrical
Boro pieces are usually more textured because they contain multiple layers of fabric. Sashiko can be decorative and highly geometric.
Choosing between them depends on your goal:
Choose Boro if you want:
- repair
- visible mending
- patchwork texture
Choose Sashiko if you want:
- decorative stitching
- cleaner geometry
- structured patterns
Understanding this difference helps beginners choose the right approach before starting.
Essential Materials for Japanese Boro Stitching
Starting Boro stitching does not require expensive tools, but choosing the right materials affects durability and appearance. Traditional Boro relied on whatever materials were available, but modern beginners should choose carefully for better results.
The most important material is fabric. Boro works best with natural fibers because they age, soften, and layer well.
Essential tools include:
- cotton fabric
- linen fabric
- denim scraps
- sashiko thread
- embroidery needle
- sharp fabric scissors
- fabric clips
- chalk marker
- thimble
Fabric choice matters because weak fabric can tear under repeated stitching. Medium-weight cotton or denim is ideal for beginners.
Thread choice matters too. Thick cotton thread creates visible structure and holds layers securely.
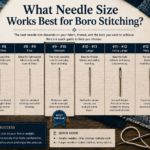
Needles should be:
- long enough for running stitches
- strong enough for thick layers
- smooth through dense cloth
Helpful optional materials:
- embroidery hoop
- iron
- fabric stabilizer
- measuring ruler
Good materials improve:
- stitch control
- durability
- fabric stability
- final appearance
Boro is simple by nature, but material quality determines how strong the finished textile becomes.
Beginners often fail because they use thin synthetic fabric. Start with strong natural cloth.
Refer to the full best boro supplies starter list for a full detailed overview on the required items and accessories.
Best Thread Types for Strength vs Appearance
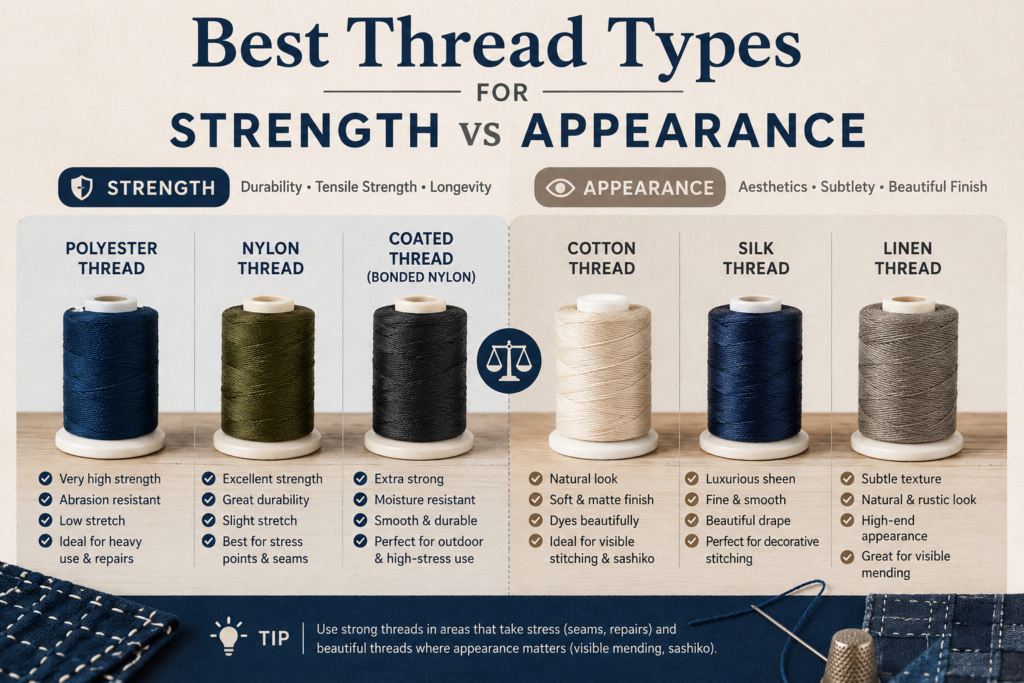
Thread selection changes how Boro behaves over time. Many beginners focus only on fabric, but thread is what holds the entire repair together. The wrong thread can snap, shrink unevenly, or cut into fabric under tension. In Boro, thread is structural, not just decorative.
Traditional Boro often used strong cotton thread because it moved naturally with cotton fabric. Today, stitchers can choose from several thread types depending on whether strength or visual texture matters most. A repair-focused project needs durability. A decorative project may prioritize visual contrast.
Best thread options:
- sashiko thread → best for authenticity
- embroidery floss → best for decorative texture
- quilting thread → strong and smooth
- pearl cotton → bold visible stitches
- standard cotton thread → lightweight repairs
Choose thread for strength when:
- repairing jeans
- reinforcing knees
- fixing bags
- working on jackets
Choose thread for appearance when:
- making wall art
- decorative patchwork
- visible design stitching
Avoid:
- weak polyester blends
- elastic thread
- ultra-thin sewing thread
Good Boro thread should survive friction, washing, and movement.
Best Fabrics for Authentic Boro Stitching
Fabric selection is one of the most important decisions in Boro stitching. Traditional Boro relied heavily on indigo-dyed cotton because it was durable, breathable, and repairable. Today, many fabrics can work, but not all perform equally.
The best Boro fabrics have strength, flexibility, and natural aging characteristics.
Top fabric choices:
- indigo cotton
- denim
- linen
- hemp
- canvas
Indigo cotton remains the most authentic choice because it reflects traditional Japanese Boro aesthetics. Its fading over time creates beautiful contrast between old and new patches.
Denim is highly popular for modern Boro because:
- strong weave
- easy patch visibility
- durable stitching base
Linen works well because it softens over time while staying strong. Hemp offers excellent durability but can feel rough for beginners.
Avoid these fabrics:
- polyester blends
- stretchy knit fabrics
- silk
- ultra-thin cotton
These create problems like:
- unstable stitching
- fabric distortion
- weak patch attachment
Fabric weight matters too.
Best weight range:
- medium weight
- heavyweight for jackets
- lighter weight for decorative pieces
Choosing proper fabric improves project lifespan significantly. Good Boro begins with strong textile foundations.
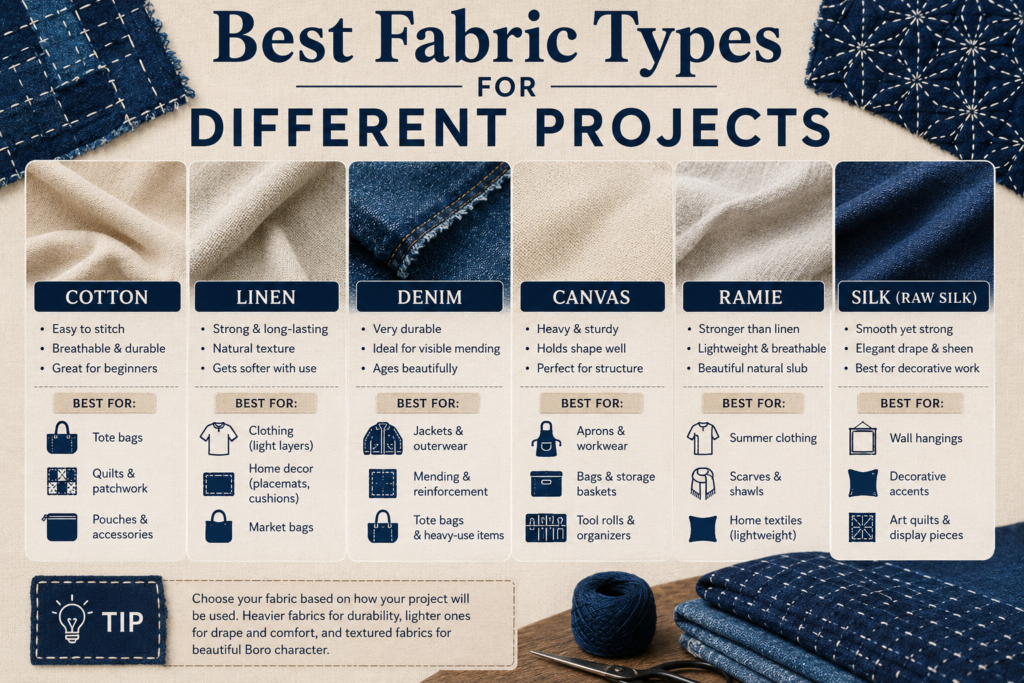
Best Fabric Types for Different Projects
Choosing fabric for Boro should depend on the purpose of the project, not just tradition. Many beginners buy beautiful indigo cotton and use it everywhere, but fabric performance changes depending on stress, flexibility, and wear patterns. A denim knee repair needs stronger structural support than a decorative table runner. Matching fabric to project type improves both durability and stitching control.
Think about how the finished piece will be used. Clothing repairs deal with movement, friction, and washing. Decorative Boro pieces deal more with visual layering and texture. This changes the ideal fabric weight, patch thickness, and stitch density. The best Boro decisions are practical first and aesthetic second.
Best fabric by project type:
- denim → jeans repairs
- canvas → bags and utility items
- linen → decorative textiles
- cotton → beginner samplers
- hemp → heavy reinforcement work
Decision framework:
Choose heavier fabric when:
- the area takes pressure
- frequent washing is expected
- the garment stretches during wear
Choose lighter fabric when:
- visual layering matters more
- flexibility is important
- the base cloth is thin
A good rule: patch fabric should match or slightly support the base fabric—not overpower it.
How to Start Japanese Boro Stitching (Step-by-Step)
Starting Boro is easier than most beginners expect. The goal is not perfection. The goal is functional reinforcement through layered repair.
Begin with a damaged fabric piece or create a practice piece using scrap cloth.
Step 1: Prepare the base fabric
Clean and flatten the fabric before stitching. This helps accurate patch placement.
Step 2: Select patch fabric
Choose fabric slightly larger than the damaged area.
Step 3: Position the patch
Place it under or over the damaged section depending on style preference.
Step 4: Secure temporarily
Use clips or pins.
Step 5: Stitch with running stitches
Work slowly across the patch.
Basic beginner workflow:
- inspect damage
- trim loose fibers
- align patch
- stitch evenly
- reinforce edges
Important beginner rules:
- don’t pull thread too tight
- keep stitch spacing balanced
- leave room for movement
Good Boro stitching should feel stable, not stiff.
First project ideas:
- jeans repair
- pocket reinforcement
- tote bag patching
The first project teaches:
- tension control
- patch placement
- layering awareness
Starting small builds confidence quickly.
For more in-depth expert guidance, we recommend you check out the full article on how to do japanese boro stitching, the beginners way.
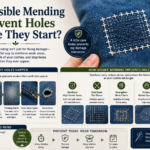
Where Should the Patch Go? Under, Over, or Between?
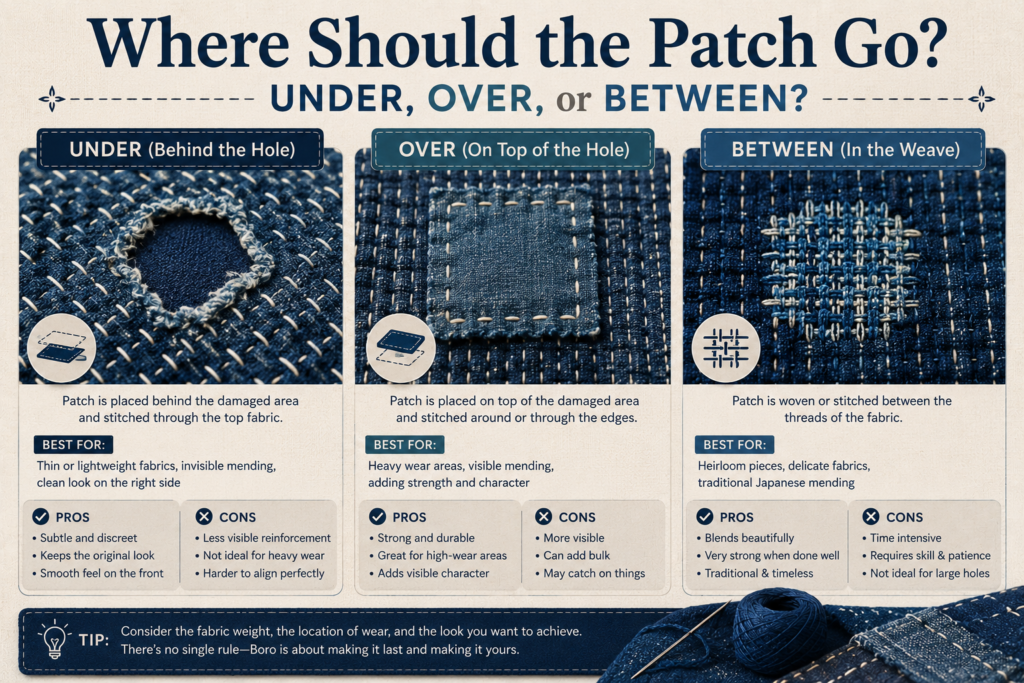
Patch placement changes both durability and appearance. Beginners often patch randomly, but smart patch placement improves repair strength significantly. The three main patch positions are underneath, on top, or layered between fabrics.
An under-patch is the strongest for damaged fabric because it supports the weak area from below while preserving the original textile surface. Top patches are more visible and easier to stitch. Sandwich patches are used for heavily damaged areas where strength matters most.
Patch placement options:
- under-patch → strongest structural support
- top-patch → best visible design effect
- sandwich patch → maximum reinforcement
Use under-patches when:
- fabric is torn
- holes are open
- strength matters most
Use top-patches when:
- aesthetics matter
- you want visible contrast
- the base fabric is stable
Use sandwich layering when:
- the damage is severe
- stress is repeated
- the area flexes heavily
Patch logic matters because weak placement causes faster failure. Good Boro repair starts with understanding where support is actually needed.
Basic Japanese Boro Stitching Techniques
Boro stitching uses simple techniques, but mastering them improves both appearance and strength. Most Boro work depends on the running stitch because it allows flexibility while securing multiple layers.
The running stitch is the foundation. It moves in a straight rhythm across the fabric and holds patches firmly.
Core Boro techniques:
- running stitch
- layered patching
- edge reinforcement
- overlap stitching
- grid stitching
Running stitch technique:
- enter and exit evenly
- maintain spacing
- avoid uneven tension
Layering technique involves stacking fabric sections strategically. This strengthens weak areas and adds texture.
Edge reinforcement is important because patch corners often fray first.
Good edge reinforcement:
- prevents lifting
- reduces fraying
- improves durability
Overlap stitching is useful when combining multiple small scraps.
Benefits of overlap:
- stronger repair
- artistic texture
- material efficiency
Technique priorities for beginners:
- consistency over speed
- tension over perfection
- stability over decoration
The stronger the stitch structure, the longer the Boro piece lasts.
Good technique creates both beauty and function.
Have a read on the different japanese boro stitching patterns for beginners in order to enrich yourself with the beautiful world of boro.
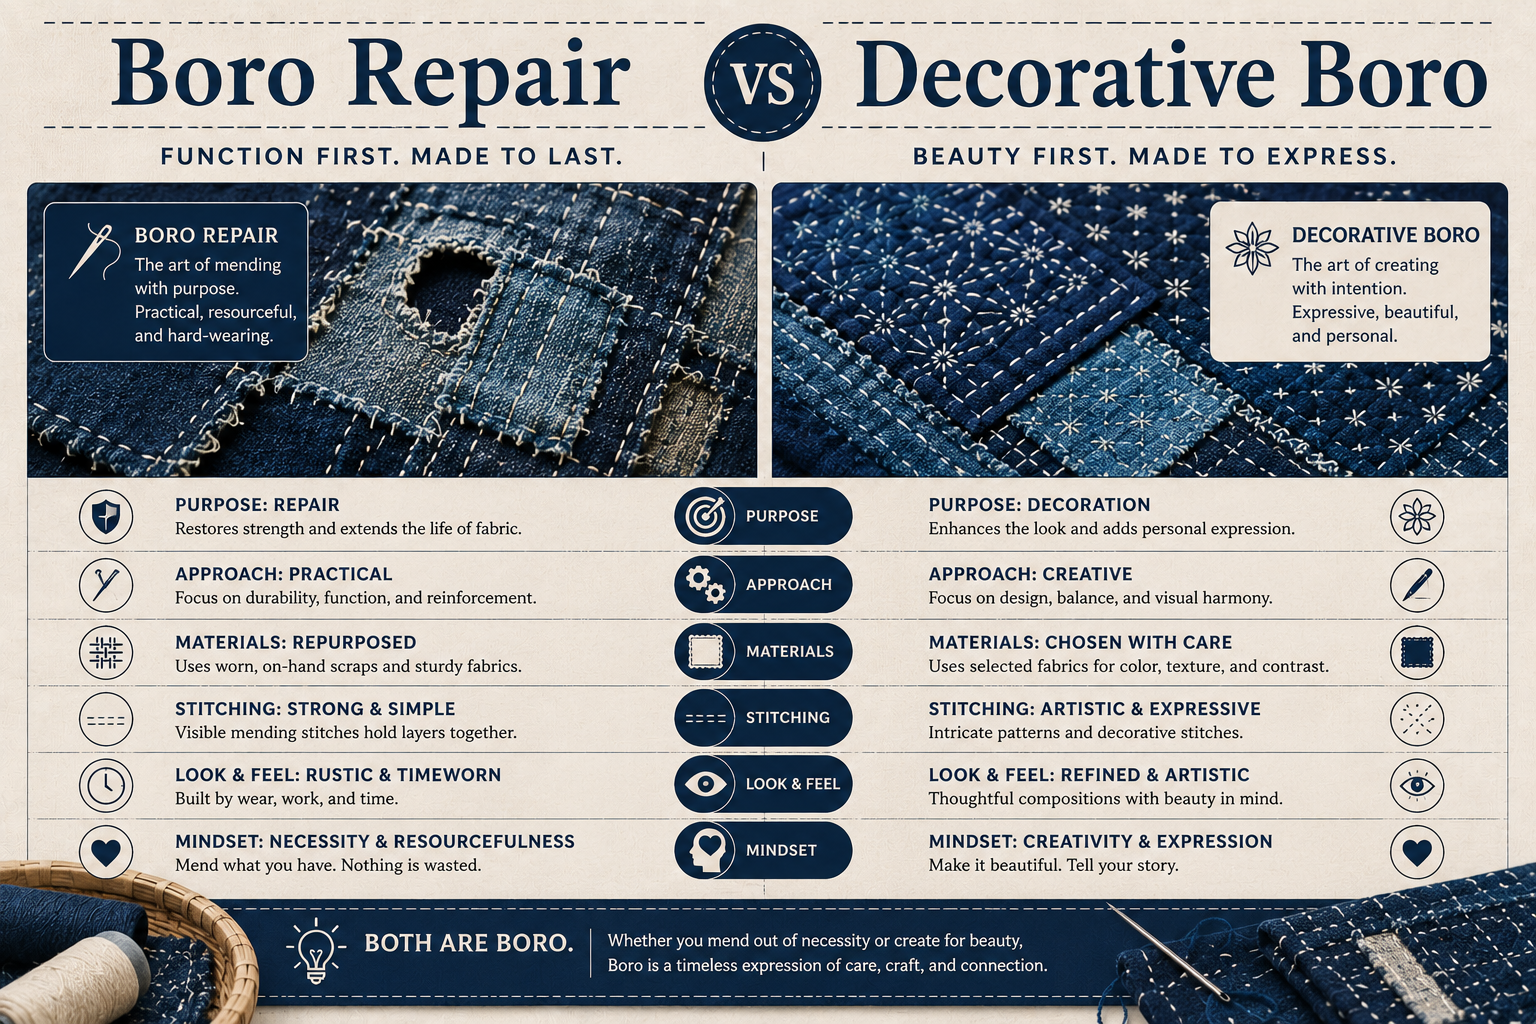
Boro Repair vs Decorative Boro
Not all Boro is made for the same purpose. Some Boro is purely functional repair, while some is created for artistic expression. Knowing the difference helps beginners choose better materials, better stitches, and better layouts.
Repair Boro focuses on strengthening damaged fabric. Decorative Boro focuses on texture, visual contrast, and artistic layering. Both use similar techniques, but their priorities differ. Repair Boro values durability first. Decorative Boro values appearance first.
Repair Boro usually includes:
- stronger thread
- tighter reinforcement
- simpler stitch lines
- structural patching
Decorative Boro usually includes:
- visible color contrast
- layered textures
- artistic patch placement
- more complex patterns
Choose repair Boro when:
- fixing workwear
- repairing denim
- strengthening weak cloth
Choose decorative Boro when:
- making art pieces
- customizing fashion
- creating statement textiles
Mixing both approaches is possible, but beginners should know their primary goal before starting. The purpose determines the build.
Common Boro Stitch Patterns
Boro stitching patterns are usually functional first and decorative second. Unlike highly structured embroidery, Boro patterns often follow the needs of the repair area.
Still, some patterns appear repeatedly because they distribute tension effectively.
Common Boro patterns include:
- grid pattern
- parallel lines
- wave lines
- cross reinforcement
- random stitch flow
Grid stitching is one of the strongest because it spreads pressure evenly across the patch.
Parallel line stitching works best for:
- denim repairs
- long tears
- edge reinforcement
Wave patterns add flexibility and movement, making them useful for softer fabrics.
Cross reinforcement is useful in high-stress areas:
- knees
- elbows
- pockets
Random stitching creates an organic handmade look and is often preferred for artistic Boro.
Pattern selection depends on:
- fabric type
- repair location
- flexibility needed
- aesthetic preference
Beginners should start with:
- straight lines
- simple grids
- consistent spacing
Complicated patterns often reduce stitching quality.
In Boro, practical pattern choice creates stronger long-term repair.
How Long Does Boro Stitching Actually Take?
Boro stitching is slow by design. It is handwork, and the time required depends on patch size, stitch density, and fabric thickness. Many beginners underestimate how long a project takes and lose motivation midway.
Small Boro repairs can be finished quickly, but larger layered pieces can take many hours. The goal is not speed. The goal is quality reinforcement and balanced stitching. Slow work usually produces stronger repairs.
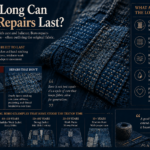
Average project times:
- small patch repair → 20–40 minutes
- pocket repair → 1–2 hours
- jeans knee repair → 2–4 hours
- tote bag panel → 3–6 hours
- jacket back panel → 8–20 hours
Factors that increase time:
- thicker fabric
- multiple layers
- tighter stitch spacing
- larger patch areas
Ways to reduce time:
- use simple grid patterns
- prepare patches in advance
- mark stitch lines first
Time planning helps prevent frustration. Boro is a process-based craft. Expecting speed often leads to rushed stitching and weaker repairs.
Beginner Mistakes in Japanese Boro Stitching
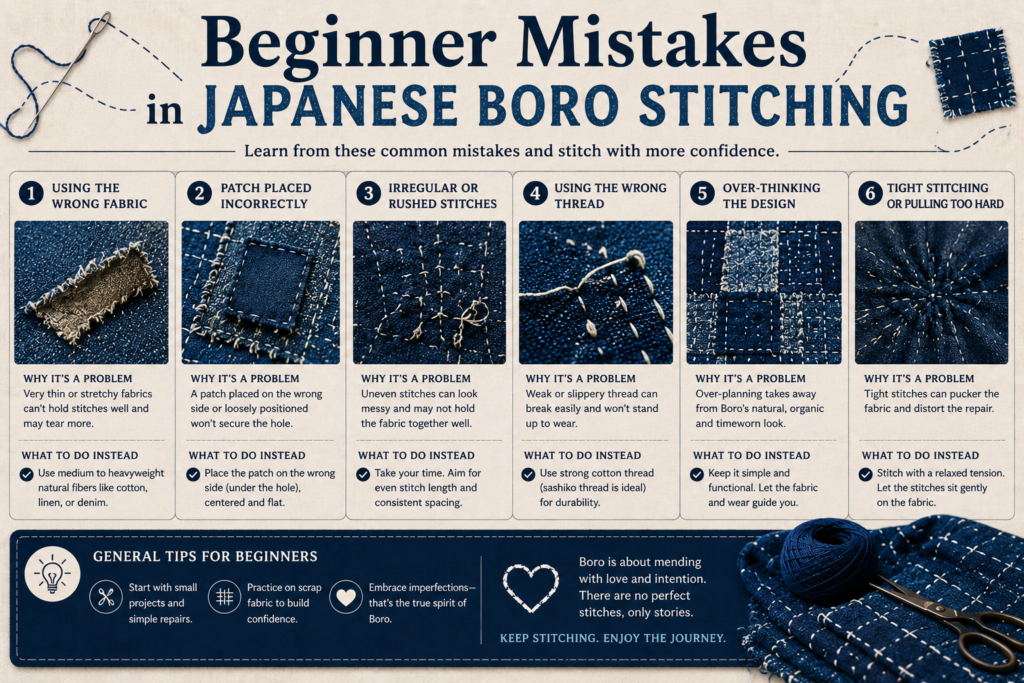
Most beginner mistakes come from misunderstanding Boro’s purpose. It is not decorative embroidery first—it is structural repair first.
One major mistake is choosing weak patch fabric. Thin fabric fails quickly under tension.
Common beginner mistakes:
- wrong fabric choice
- over-tight stitches
- uneven spacing
- poor patch sizing
- weak thread choice
Tight stitching causes puckering, which weakens the repair.
Uneven spacing creates stress concentration, causing early tearing.
Small patches are another issue. They need enough overlap to anchor properly.
Good patch sizing:
- cover damage fully
- extend beyond weak area
- allow multiple stitch rows
Using decorative thread instead of strong thread often causes breakage.
Avoid:
- thin sewing thread
- elastic thread
- synthetic weak thread
Another mistake is rushing.
Boro requires:
- patience
- rhythm
- observation
Fixing mistakes early saves the textile.
Beginner success depends on:
- strong fabric
- strong thread
- controlled stitching
- proper layering
Good Boro improves with experience, not speed.
If you have any other mistakes that you made and it is not listed here or perhaps you want further clarity, our complete guide on common beginner japanese boro mistakes is right place to go.
How to Wash and Maintain Boro Textiles
Boro textiles need thoughtful care because they contain multiple stitched layers and often use natural fibers. Washing incorrectly can shrink patches unevenly, loosen stitches, or cause indigo bleeding.
Hand washing is the safest method for most Boro work. It reduces stress on stitched areas and protects layered edges. Machine washing can work, but only for stronger pieces like denim repairs if done gently.
Best washing practices:
- cold water only
- mild detergent
- low agitation
- air dry flat
Avoid:
- bleach
- hot water
- aggressive spin cycles
- machine drying
Indigo fabric care tips:
- wash separately first
- expect some bleeding
- avoid direct sunlight drying
Maintenance checks:
- inspect loose stitches
- reinforce weak edges
- trim fraying threads
Boro repairs age naturally. Small wear changes are normal. The goal is ongoing reinforcement, not permanent perfection. Good maintenance extends Boro life dramatically.
Modern Fashion Uses of Japanese Boro Stitching
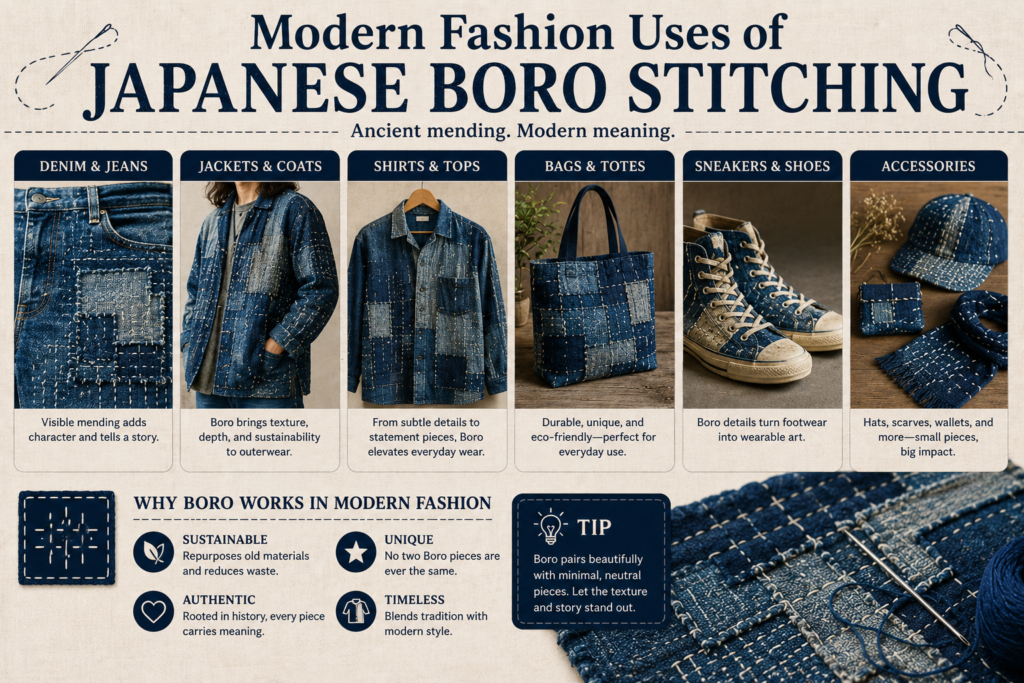
Boro has moved far beyond traditional repairs. Today it is used in fashion, design, and textile art worldwide. Its visual texture and sustainability make it highly attractive in modern clothing culture.
Designers use Boro to create garments with history, depth, and handmade character.
Popular fashion uses:
- denim jackets
- jeans repairs
- tote bags
- shirts
- scarves
Boro is especially popular in denim because fading and patching create strong visual contrast.
Fashion advantages of Boro:
- unique appearance
- sustainable repair
- stronger garments
- personalized design
Luxury brands have adopted Boro-inspired designs because consumers increasingly value craftsmanship.
Home textile uses include:
- pillow covers
- wall hangings
- table runners
Boro works well in interiors because texture adds warmth and authenticity.
Why modern consumers love Boro:
- anti-fast-fashion philosophy
- visible craftsmanship
- artistic individuality
Each Boro piece carries repair history. That makes it different from mass-produced fashion.
Modern Boro combines:
- tradition
- sustainability
- creativity
- durability
This is why Boro continues growing globally.
How Durable Is Boro Compared to Other Repair Methods?
Boro is one of the strongest fabric repair systems because it uses layered reinforcement rather than surface-only repair. Unlike iron-on patches or simple machine stitching, Boro creates distributed structural strength across multiple stitch lines.
Iron-on patches are quick, but adhesive weakens over time. Machine patching is fast but often creates rigid stress points. Boro spreads tension through hand stitching, making repairs more flexible and resilient.
Repair durability comparison:
- Boro → strongest long-term flexibility
- machine patching → fast but rigid
- iron-on patch → weakest long-term
- invisible mending → visually clean but weaker
Best use cases for Boro:
- denim wear zones
- bag handles
- elbows
- knees
- repeated friction areas
Why Boro lasts:
- layered strength
- distributed stitch pressure
- flexible movement
- stronger edge control
Boro is slower, but it often outlasts faster repair systems. That makes it ideal for people who want longevity instead of temporary fixes.
Is Boro Stitching Sustainable?
Boro stitching is one of the most sustainable textile practices in the world. Its entire philosophy is based on extending textile life rather than replacing it.
In modern fashion, clothing waste is a major environmental problem. Boro directly reduces this waste by repairing instead of discarding.
Sustainability benefits:
- reduces textile waste
- extends garment lifespan
- reduces new fabric demand
- encourages slow fashion
Boro supports circular fashion because it keeps materials in use longer.
Instead of buying new clothes, people can repair:
- jeans
- jackets
- shirts
- bags
This reduces manufacturing pressure and lowers environmental impact.
Boro also changes consumer behavior.
It encourages:sashiko
- patience
- repair culture
- material respect
Visible mending creates emotional attachment to clothing. People keep repaired items longer.
Compared to replacing garments:
Boro saves:
- money
- materials
- production energy
In sustainability terms, Boro is powerful because it combines practical repair with cultural values.
It proves that old textiles still have value.
That philosophy makes Boro highly relevant in modern sustainable living.
How to Identify Authentic Vintage Boro Textiles
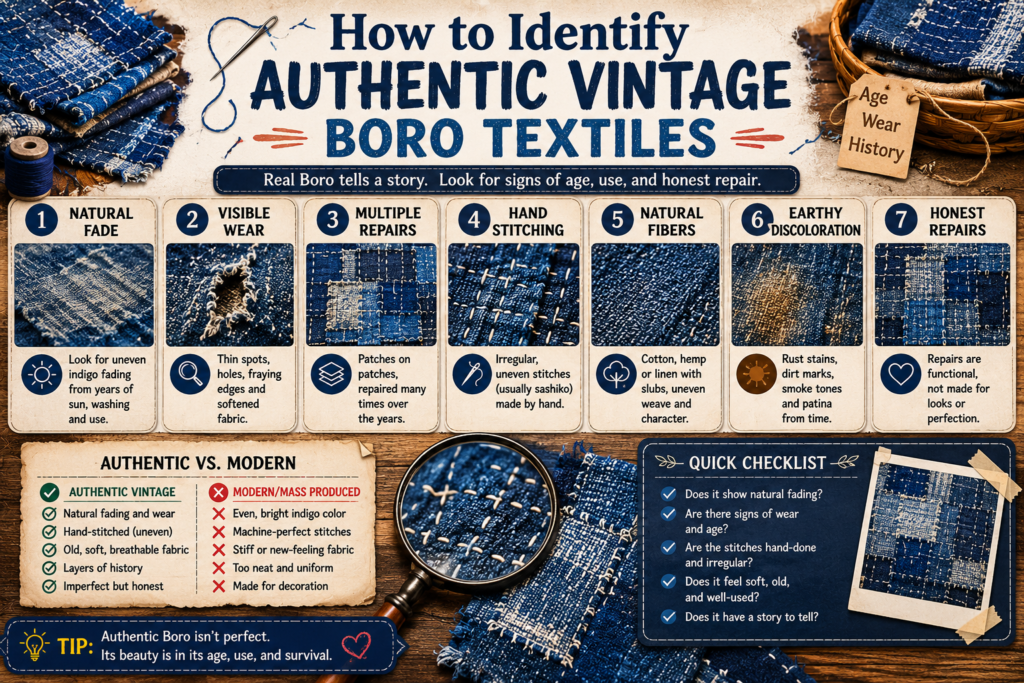
Authentic vintage Boro has qualities that modern imitation pieces often cannot replicate. Because traditional Boro developed through repeated family repairs over many years, genuine pieces show natural layering history and irregular wear patterns.
Collectors value vintage Boro because each patch reflects practical use rather than planned design. This creates depth that modern decorative Boro often lacks. Knowing how to identify authenticity helps buyers avoid overpriced reproductions.
Signs of authentic vintage Boro:
- uneven hand stitching
- irregular patch shapes
- layered wear marks
- indigo fading variation
- mixed fabric aging
What to inspect:
- stitch tension consistency
- fabric softness
- edge wear
- patch layering depth
Warning signs of imitation:
- perfectly even stitching
- artificial distressing
- uniform fading
- machine-perfect alignment
Real Boro usually looks imperfect because it was made through necessity, not for sale. That imperfection is part of its historical value.
Understanding authenticity improves buying decisions and strengthens appreciation for Boro’s history.
Best Beginner Projects for Japanese Boro Stitching
Starting with simple projects helps beginners learn without ruining valuable fabric. Good beginner projects focus on small surfaces and manageable stitching areas.
The best beginner Boro projects teach patch control, tension control, and layering.
Best starter projects:
- denim pocket repair
- tote bag patch
- fabric coaster
- small wallet
- patch sampler
A patch sampler is the best practice tool because it allows experimentation without pressure.
Good learning focus:
- stitch spacing
- patch alignment
- tension balance
Denim pockets are ideal because they have natural wear zones.
Why pockets work:
- small area
- easy access
- visible results
Tote bags are excellent for visible practice because they use durable fabric.
Avoid starting with:
- full jackets
- large blankets
- complex layered garments
Large projects create beginner fatigue.
Start small, repeat often.
Project progression:
- sampler
- bag
- jeans
- jacket
This progression builds skill logically.
The best Boro learning method is repetition. Small projects build confidence faster than ambitious ones.
Master the basics first, and larger Boro work becomes much easier.
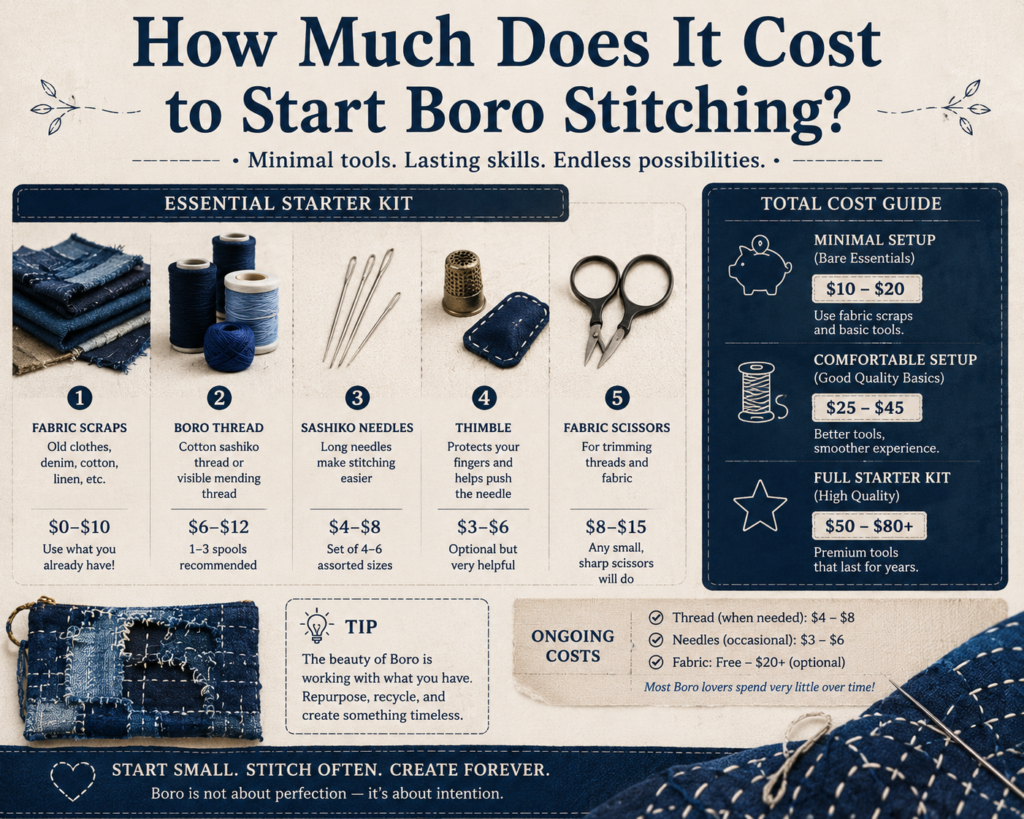
How Much Does It Cost to Start Boro Stitching?
Boro stitching is one of the lowest-cost textile crafts to begin because it often uses recycled fabric. Most beginners can start with basic tools and fabric scraps instead of buying expensive kits.
The main cost comes from quality thread and needles. Good tools improve stitching comfort and durability, but the overall entry cost remains low compared to many sewing crafts.
Basic beginner budget:
- sashiko needle → low cost
- sashiko thread → low to medium cost
- fabric scraps → often free
- scissors → one-time investment
- thimble → optional but useful
Estimated starter range:
- budget setup → $15–25
- standard setup → $25–50
- premium setup → $50+
Ways to save money:
- reuse old jeans
- recycle cotton shirts
- repurpose linen scraps
Where to invest:
- stronger needles
- better thread
- sharper scissors
Where to save:
- patch fabric
- practice cloth
- beginner samples
Boro is accessible because it rewards creativity more than expensive tools. That makes it ideal for beginners entering visible mending or textile repair.
FAQs:
What is Japanese Boro stitching?
Japanese Boro stitching is a traditional repair method from Japan that uses layered patches and visible hand stitching to strengthen worn fabric.
Is Boro stitching the same as Sashiko?
No. Sashiko Stitching is the stitch technique, while Boro is the repaired textile created through patching and reinforcement.
What fabric works best for Boro stitching?
Cotton and denim are the best beginner fabrics because they are durable, flexible, and easy to stitch.
What thread should I use for Boro stitching?
Sashiko thread, linen thread, and strong cotton thread are the best choices for durable Boro repairs.
Is Boro stitching beginner-friendly?
Yes. Beginners can start with simple patch repairs using running stitches and small fabric pieces.
Why is Boro stitching important?
Boro preserves textiles, reduces waste, and reflects traditional Japanese repair culture.
Can I use old clothes for Boro stitching?
Yes. Recycled clothing like old jeans and shirts are excellent materials for Boro patchwork.
Why is Boro stitching sustainable?
Boro extends garment life and reduces textile waste by repairing instead of replacing fabric.