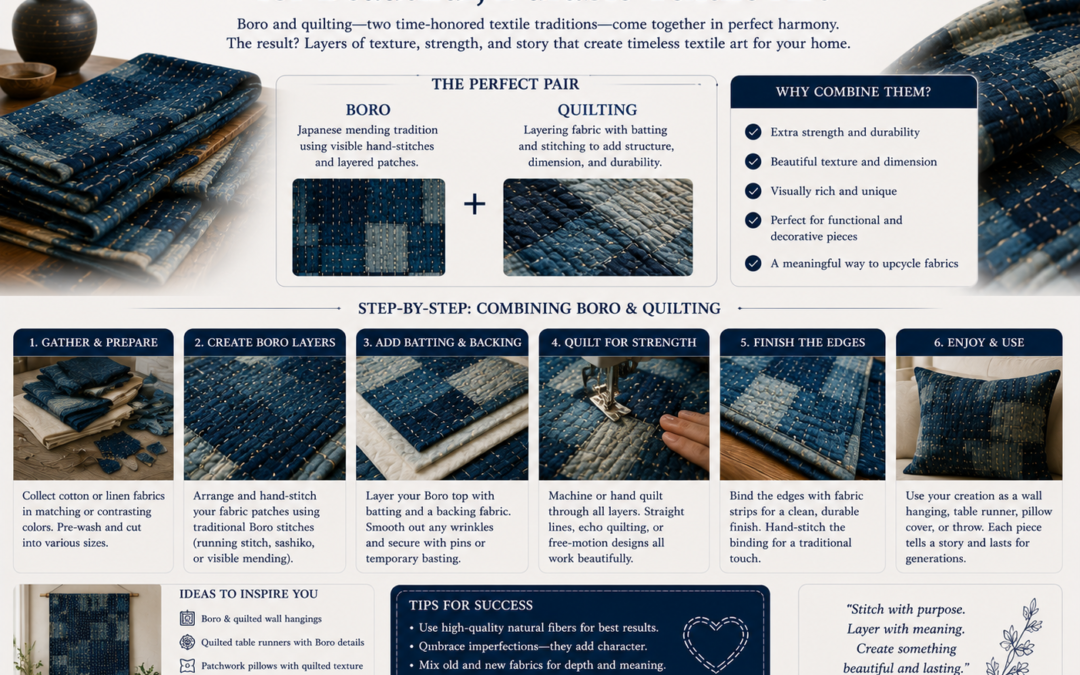
Boro and quilting are often treated as separate textile traditions, but they work remarkably well together. Traditional Japanese boro developed as a practical method of extending the life of fabric through patches and visible stitching, while quilting evolved as a method of joining layers into warm, durable textiles. When combined, they create projects that are visually rich, structurally strong, and highly personal.
The appeal of combining boro and quilting lies in the balance between function and artistry. Quilting provides stability, shape, and insulation through layered construction, while boro contributes character, texture, visible repairs, and sustainable fabric reuse. The result can be anything from a modern quilt and wall hanging to a jacket, tote bag, or cushion cover.
This guide explores how these two techniques work together, which materials perform best, and how to avoid common mistakes that lead to bulky or unstable projects.
What Makes Boro and Quilting Techniques Compatible?
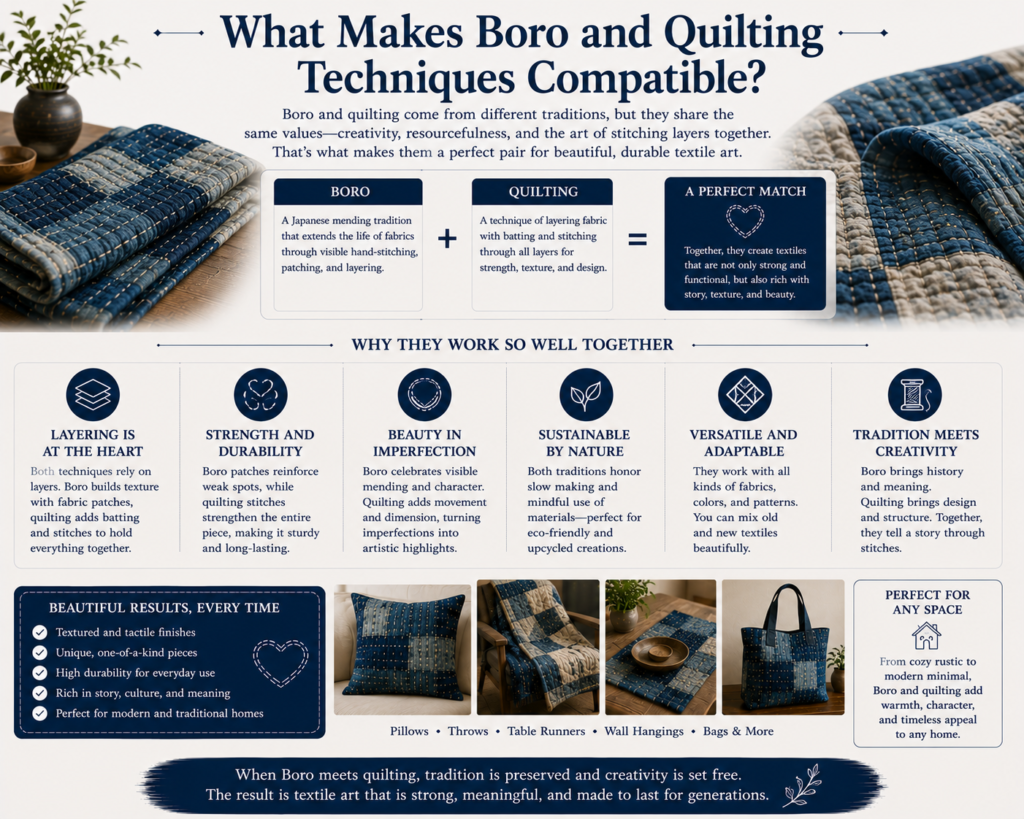
Boro and quilting share a common foundation: both rely on layering fabric and securing those layers with stitching. Because of this similarity, the transition from one technique to the other is surprisingly natural. Quilting focuses on creating a stable textile by joining layers, while boro focuses on reinforcing fabric through visible patchwork and hand stitching. Together they form a complementary system rather than competing methods.
One reason these techniques work so well together is that both celebrate the beauty of stitches. Traditional quilting often uses decorative stitch patterns to create texture and visual interest, while boro embraces visible running stitches as part of the design. Neither technique attempts to hide construction methods. Instead, the stitching becomes part of the finished aesthetic.
Combining them also increases durability. Quilting stabilizes large fabric areas, while boro reinforces specific stress points through patching and additional stitching. This layered approach spreads wear across multiple fabric surfaces rather than concentrating it in one area.
Benefits of combining boro and quilting include:
- Greater fabric strength and longevity
- More opportunities for creative design
- Better use of scrap fabrics
- Enhanced texture and visual depth
- Sustainable reuse of old textiles
- Easier future repairs and modifications
Many modern textile artists combine both approaches because they offer a balance between structure and freedom. Quilting provides the framework, while boro adds individuality and storytelling through patches, fabric history, and visible stitching.
What Is the Difference Between Traditional Boro and Quilting?
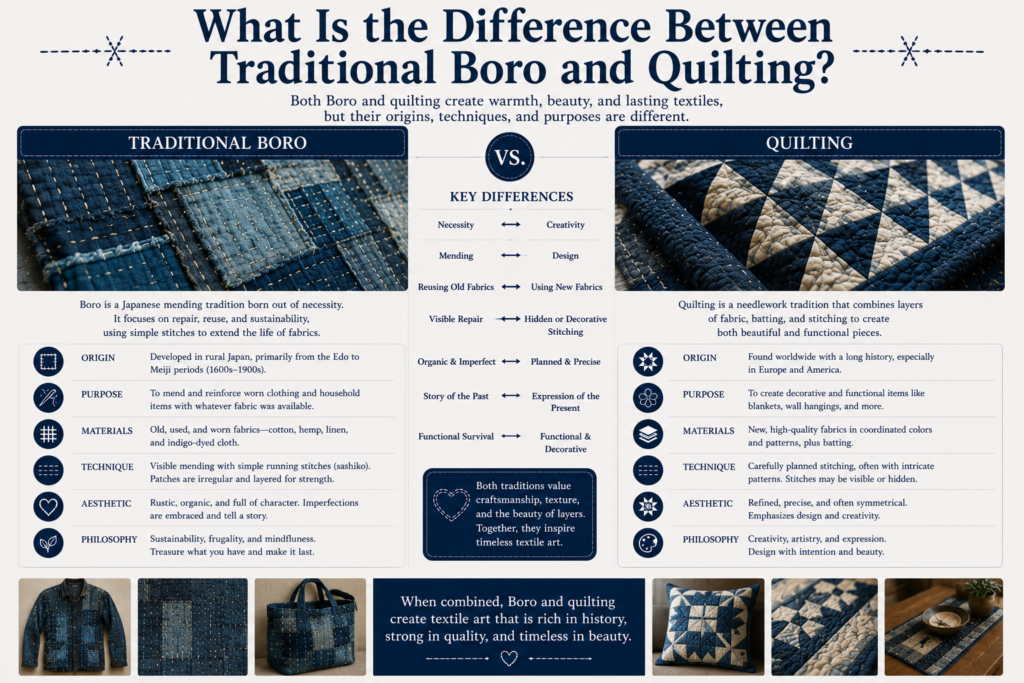
Although they share similarities, boro and quilting originated for different reasons. Traditional boro emerged in rural Japan where fabric was scarce and valuable. Families repeatedly patched garments and household textiles, extending their useful life through layers of reinforcement and hand stitching. The goal was practical survival rather than decoration.
Quilting developed differently. In many cultures, quilting focused on joining layers of fabric with batting to create warmth, insulation, and structure. While decorative quilting traditions eventually emerged, the basic purpose remained constructing a complete textile from multiple layers.
The biggest difference lies in intent. Boro often begins with an existing textile that requires reinforcement or repair. Quilting usually begins with the creation of a new textile. When these methods combine, projects benefit from both philosophies.
Traditional boro characteristics include:
- Visible repair work
- Layered reinforcement patches
- Recycled fabrics
- Running stitch construction
- Emphasis on longevity
Traditional quilting characteristics include:
- Quilt sandwich construction
- Batting layers
- Structured pattern layouts
- Decorative quilting motifs
- Finished textile creation
Modern makers frequently blur these boundaries. A quilt may incorporate extensive boro patching, while a repaired garment may include quilted sections for stability. Understanding the origins of each technique helps create projects that respect both traditions while exploring new creative possibilities.
Which Fabrics Work Best When Combining Boro and Quilting?
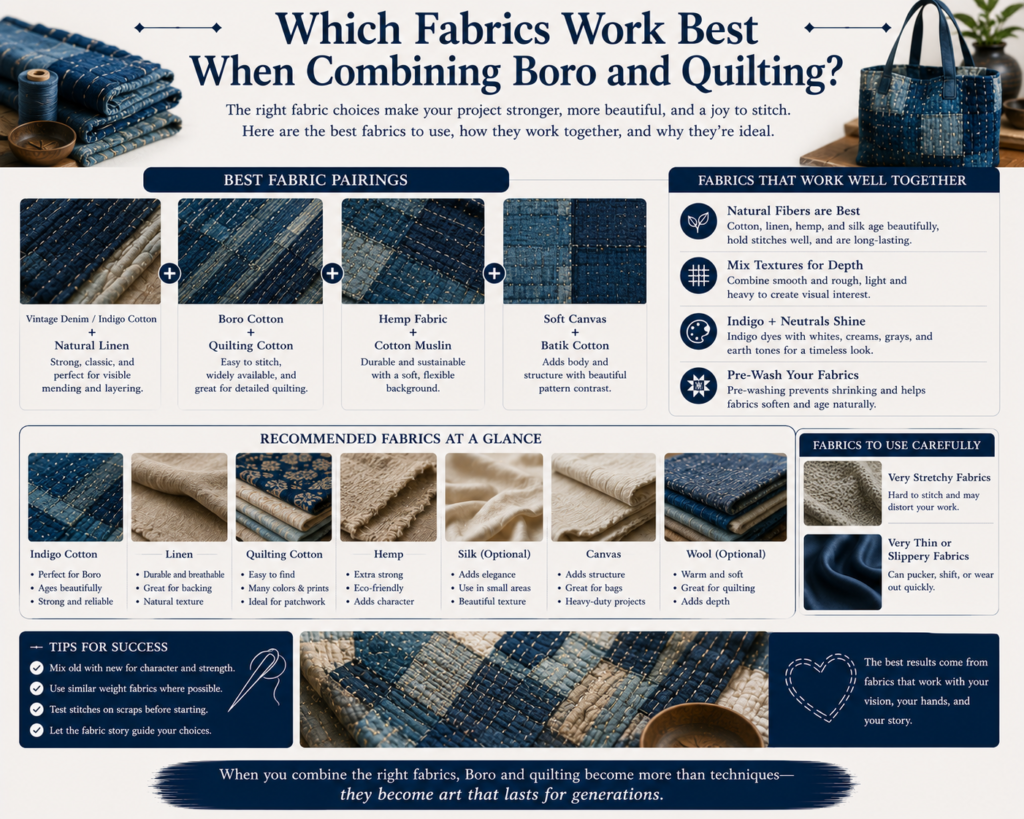
Fabric selection strongly influences the success of a boro quilting project. Since both techniques depend on multiple layers and extensive stitching, fabrics should behave similarly under tension and wear. Natural fibers typically perform best because they age consistently and accept dense stitching without excessive distortion.
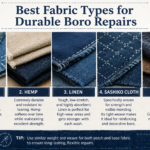
Cotton remains the most versatile option. Traditional indigo cotton fabrics, quilting cottons, denim, and canvas all work exceptionally well. Linen can also be successful, particularly for decorative pieces, although it tends to fray more aggressively along cut edges.
When combining different fabrics, pay attention to weight. Extremely lightweight materials paired with heavy denim can create uneven stress across the project. Similar fabric weights generally produce more balanced results and improve long-term durability.
Recommended fabrics include:
- Indigo cotton
- Quilting cotton
- Lightweight denim
- Medium-weight denim
- Linen
- Canvas
- Reclaimed cotton shirts
Fabrics to use cautiously:
- Stretch knits
- Polyester blends
- Silk
- Satin
- Very loose weaves
Pre-washing is equally important. Different fabrics shrink at different rates, and uneven shrinkage can distort quilting lines and patch placement after laundering. Washing materials before construction helps stabilize them and reduces surprises later.
Successful boro quilts often combine a limited palette of compatible fabrics rather than dozens of unrelated materials. This creates visual harmony while maintaining structural consistency throughout the project.
Should Boro Patches Be Added Before or After Quilting?
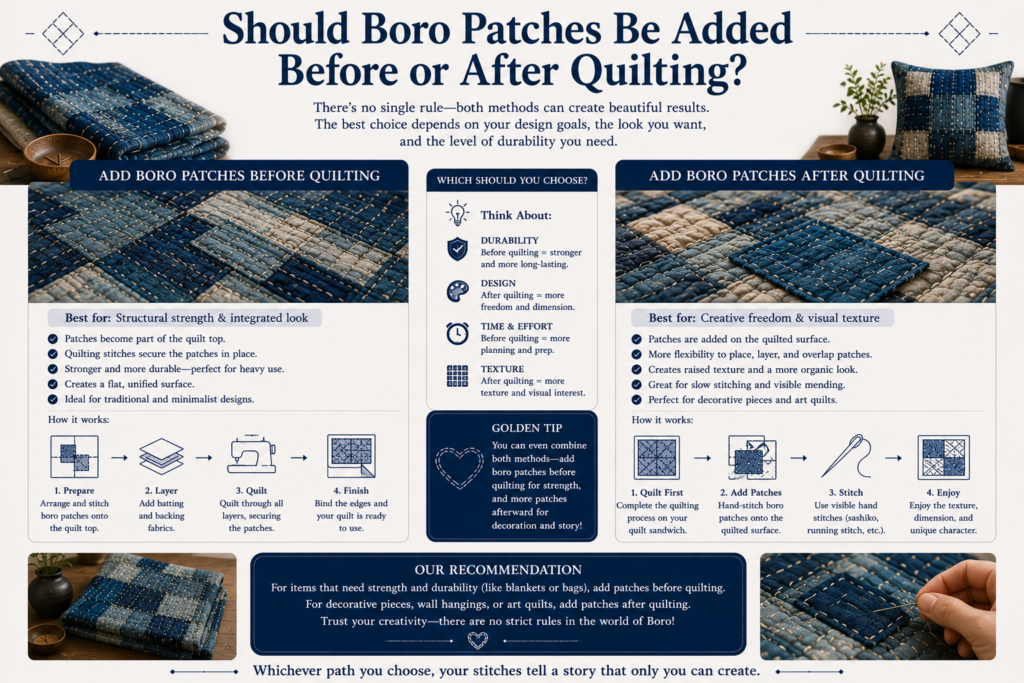
Most experienced makers add boro patches before the final quilting process. This approach allows quilting stitches to stabilize both the base fabric and the patches simultaneously. The result is a more cohesive structure with fewer shifting layers over time.
Adding patches beforehand also simplifies design planning. Once patch placement is finalized, quilting patterns can be arranged around those elements. This creates stronger visual integration between the patchwork and quilting rather than making them appear as separate additions.
However, post-quilting patching still has value. Some artists intentionally add patches after quilting to create a repaired appearance or emphasize the visible mending aspect of boro. This approach is especially useful when repairing an already finished quilt.
Advantages of adding patches before quilting:
- Better overall stability
- Reduced layer shifting
- Cleaner construction
- Improved design integration
- Greater long-term durability
Advantages of adding patches after quilting:
- Authentic repair appearance
- Easier project modifications
- More flexibility during design development
- Opportunity for future visible mending
For beginners, patching before quilting is usually the easiest path. The quilting process helps lock everything together and reduces the risk of uneven patch edges lifting during use.
Regardless of timing, patches should be secured carefully before final stitching begins. Temporary basting stitches, pins, or fabric clips can prevent shifting and maintain accurate placement throughout construction.
What Is the Best Step-by-Step Workflow for Combining Boro and Quilting?
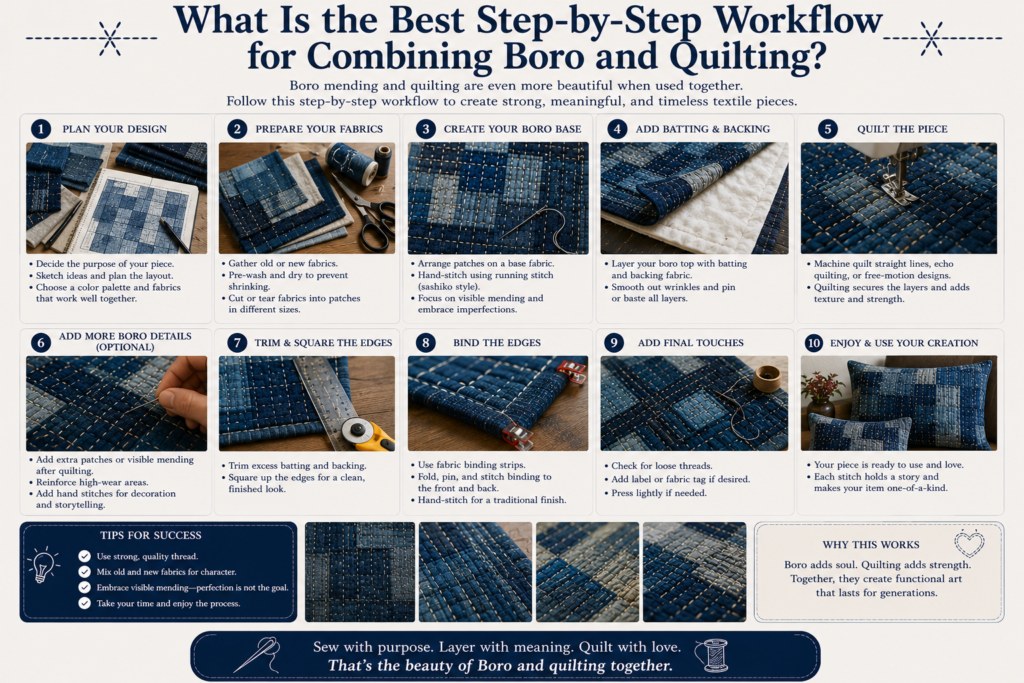
The most successful boro quilting projects follow a clear construction sequence. Many beginners struggle because they add patches, batting, or quilting stitches in the wrong order, creating unnecessary bulk and uneven stitch tension. Following a logical workflow helps maintain flexibility while ensuring every layer remains secure.
A practical approach begins with selecting compatible fabrics and preparing patches before assembling the quilt. Once the patch layout is finalized, the quilt sandwich can be built and quilted. Decorative sashiko or boro stitching is often added near the end, allowing the visible stitches to remain prominent rather than becoming buried beneath additional construction.
Recommended workflow:
- Select and pre-wash fabrics
- Prepare and organize boro patches
- Design the quilt top layout
- Secure patches with temporary stitching
- Assemble quilt sandwich
- Complete structural quilting
- Add decorative boro stitching
- Finish edges and binding
- Inspect for loose threads and repairs
Following this sequence reduces distortion, improves durability, and creates a cleaner balance between quilting structure and visible mending aesthetics.
How Does Batting Affect Boro Stitching?
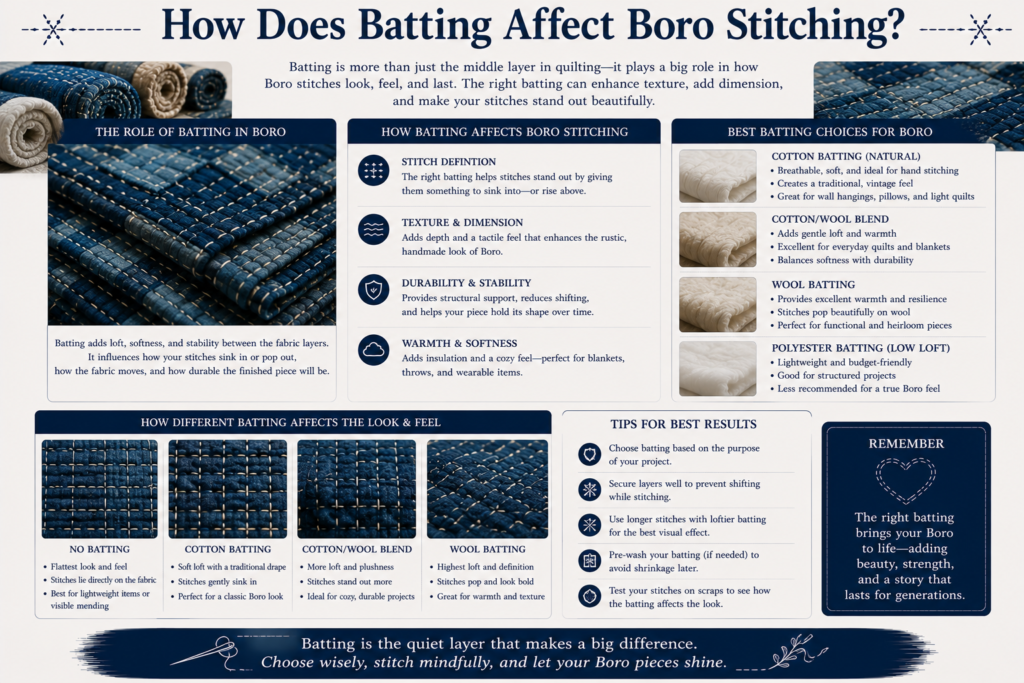
Batting plays a significant role in how boro quilting behaves. Since quilting typically includes a layer of batting between the quilt top and backing, stitch length, needle selection, and fabric handling all change compared to traditional boro stitching on a single textile layer.
Thin batting generally works best when extensive boro stitching is planned. Thick batting creates greater resistance and can make hand stitching more difficult. It also increases project bulk, especially when multiple reinforcement patches are added.
Cotton batting is a popular choice because it remains relatively stable and complements natural fiber fabrics. Wool batting adds warmth and loft but can create more resistance during dense stitching. Polyester batting may work for decorative projects, although many boro artists prefer natural materials.
Important batting considerations include:
- Loft thickness
- Needle penetration resistance
- Weight distribution
- Fabric drape
- Stitch visibility
Excessively thick batting can make boro stitching look crowded because stitches compress the layers and create puckering. Thinner battings generally allow stitches to sit more naturally on the surface.
Testing a small sample before beginning a large project is highly recommended. A practice swatch reveals how fabrics, patches, batting, and stitches interact, helping prevent problems that might otherwise appear only after many hours of work.
.
Can Hand Quilting and Boro Stitching Be Used Together?
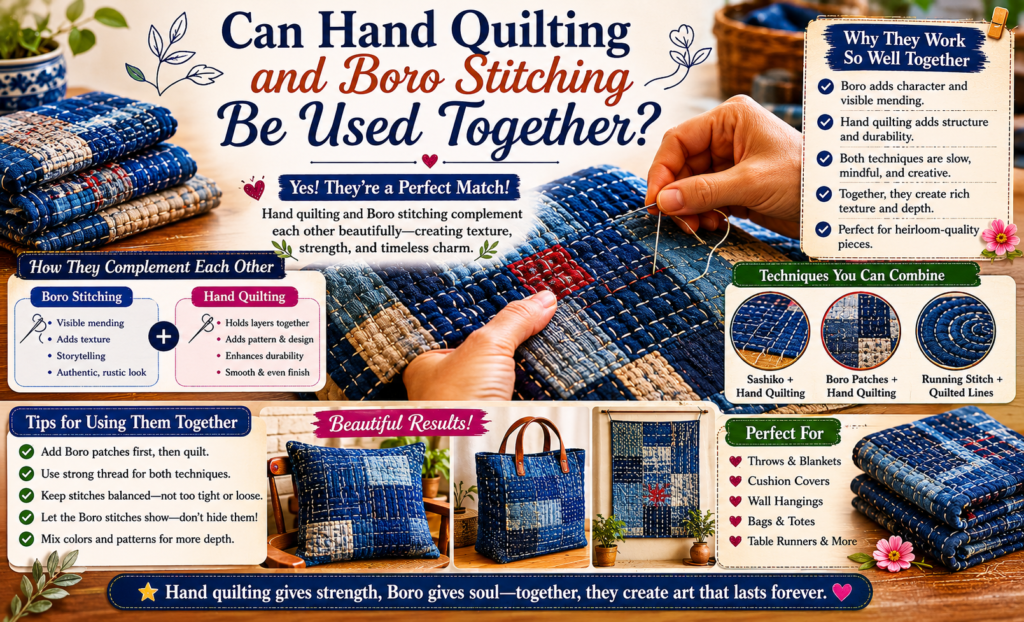
Hand quilting and boro stitching are an excellent match because both celebrate the beauty of visible handwork. Rather than hiding stitches, both traditions treat stitching as a defining design element. This shared philosophy creates a natural connection between the techniques.
Many makers intentionally use similar running stitch patterns throughout a project so the quilting and boro areas feel unified. Sashiko-inspired stitches can blend seamlessly into hand quilting lines, creating continuity across the entire textile surface.
Hand stitching also provides greater control around irregular patch shapes. Machine quilting often follows predictable paths, while hand stitching allows subtle adjustments that respond to fabric layers, patch edges, and design details.
Benefits of combining hand quilting with boro include:
- Consistent visual texture
- Greater design flexibility
- Stronger handmade character
- Easier navigation around patches
- Enhanced storytelling through stitches
The pace of hand stitching encourages thoughtful decisions. Makers often adjust patch placement, stitch density, or design direction as they work. This gradual evolution mirrors the historical spirit of boro, where textiles developed over time rather than being completed in a single session.
Projects created entirely by hand often possess a distinctive warmth and individuality that is difficult to replicate through machine methods alone.
Which Threads Work Best for Boro Quilting Projects?
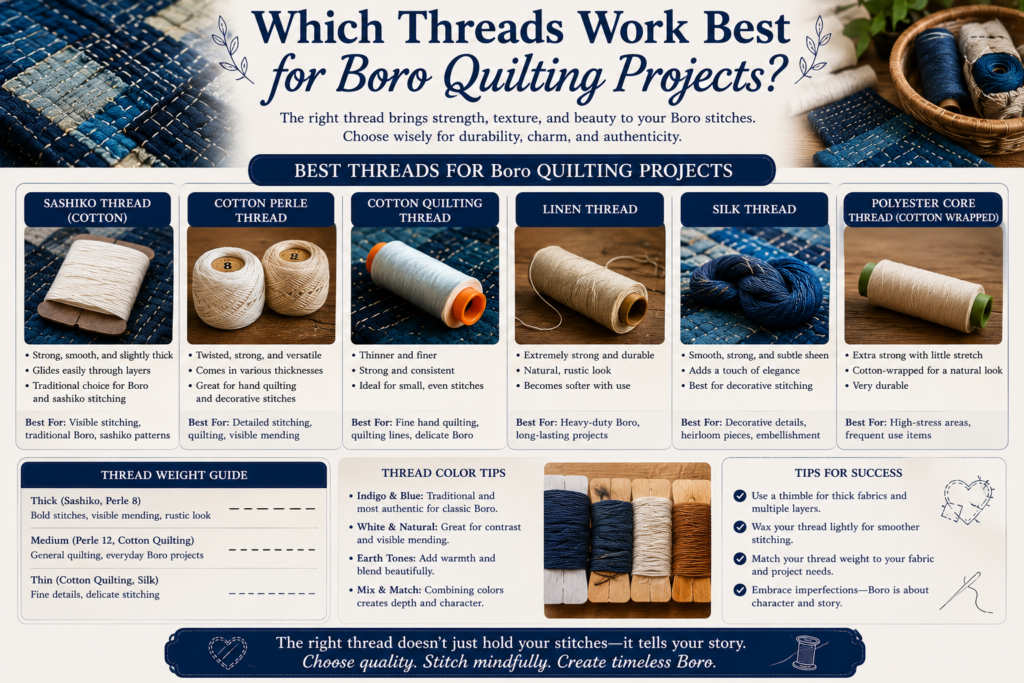
Thread selection influences both the appearance and durability of a boro quilt. Different thread types create different visual effects, and some perform better in heavily used textiles than others. Choosing thread based on the project’s purpose often produces better results than using a single thread type everywhere.
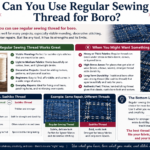
Traditional sashiko thread remains a popular choice because of its matte finish and visible texture. Quilting thread offers excellent strength for structural stitching, while pearl cotton and embroidery floss create more decorative surface detail. Many textile artists combine multiple thread types within a single project to achieve different effects.
Common thread options include:
- Sashiko thread for traditional appearance
- Quilting thread for structural stability
- Pearl cotton for bold decorative stitching
- Embroidery floss for artistic accents
- Polyester thread for heavy-use areas
The best thread choice depends on whether the stitching is intended primarily for reinforcement, decoration, or a combination of both.
What Needles Should You Use for Boro Quilting?
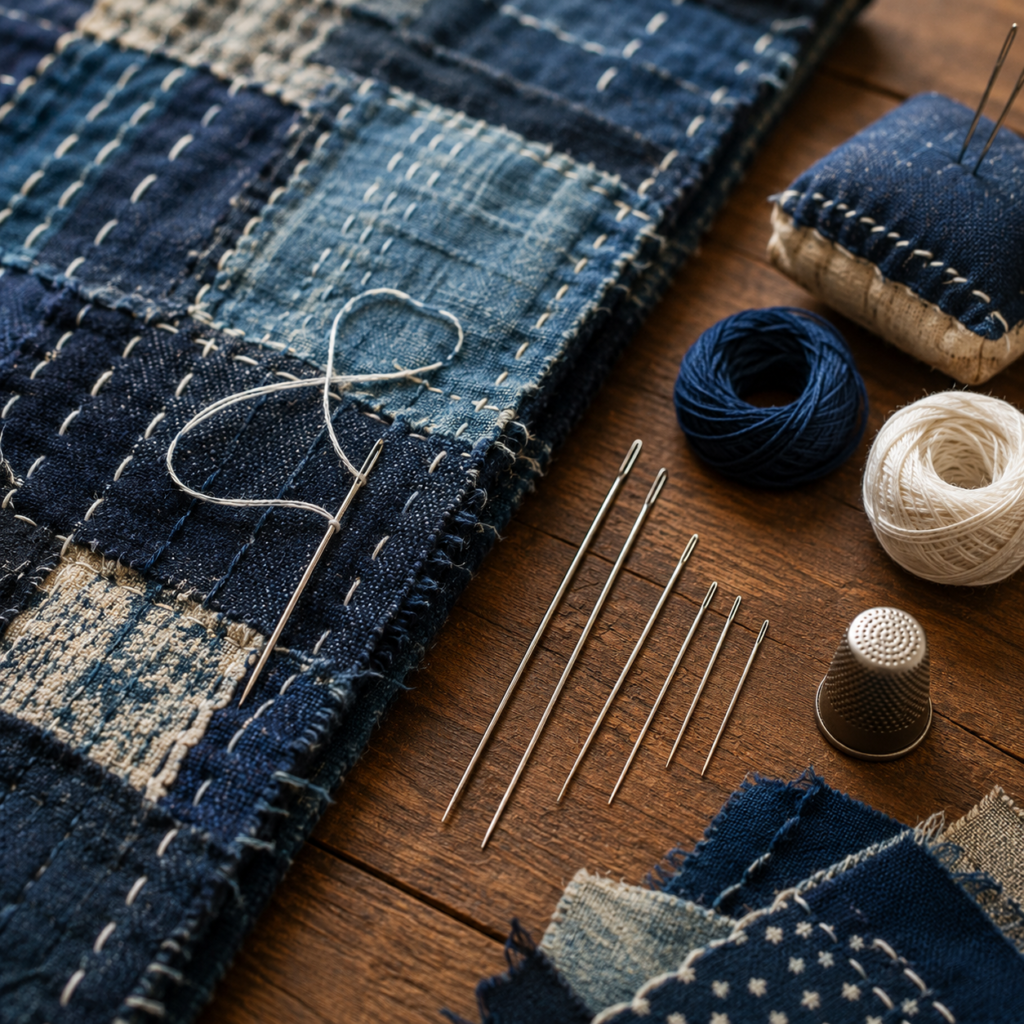
Needle choice has a significant impact on stitching comfort and stitch quality. Because boro quilting often involves multiple layers of fabric, batting, and reinforcement patches, standard sewing needles may not always perform efficiently. A needle that is too short or too thin can make stitching slow and uncomfortable.
Sashiko needles are commonly preferred because their length allows multiple running stitches to be loaded onto the needle before pulling the thread through. Quilting needles work well for denser fabrics, while milliner needles provide versatility for decorative hand stitching.
Helpful needle options include:
- Sashiko needles for traditional running stitches
- Quilting needles for layered construction
- Milliner needles for decorative stitching
- Longer needles for faster stitch loading
- Stronger needles for denim and canvas
Matching needle size to fabric thickness improves control and reduces hand fatigue during longer stitching sessions.
Can Machine Quilting Be Combined with Boro Techniques?
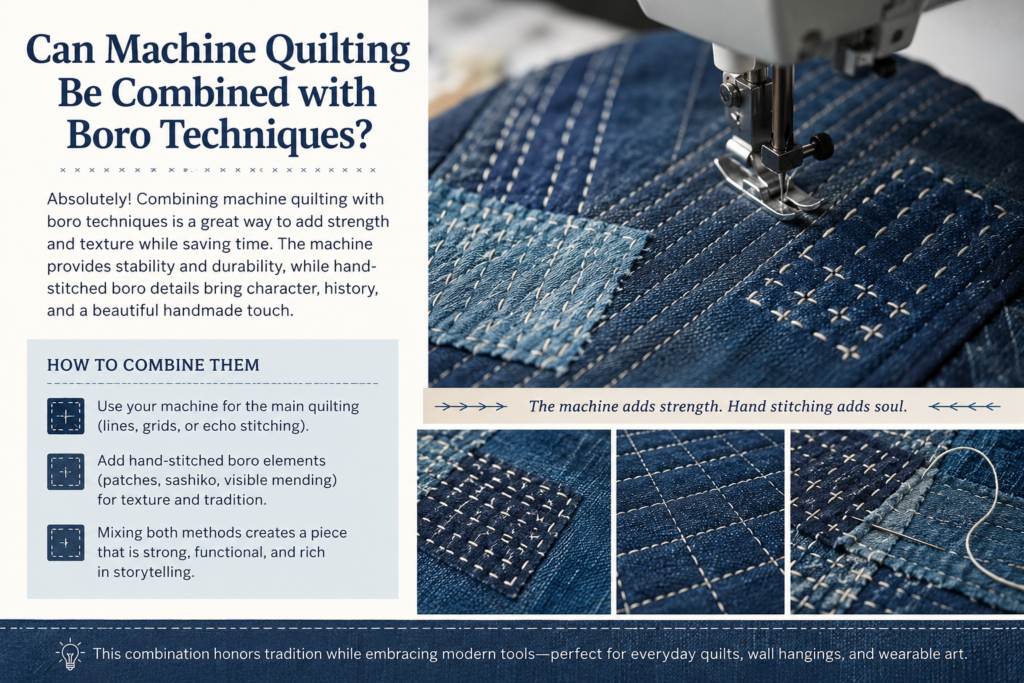
Machine quilting and boro stitching can work together extremely well when each technique is assigned a clear role. Rather than viewing machine quilting as a replacement for hand stitching, many textile artists use it as a structural foundation. The machine quilting stabilizes the quilt sandwich quickly, while hand-stitched boro details add texture, character, and visible craftsmanship.
One of the biggest advantages of this hybrid approach is efficiency. Large quilt areas can be secured using a sewing machine, reducing construction time significantly. After the structure is stabilized, boro patches and visible stitching can be added to specific sections where additional reinforcement or artistic detail is desired. This combination preserves the handmade appearance of boro while benefiting from the speed of modern quilting methods.
Machine quilting is particularly useful for larger projects where hand stitching every layer would require substantial time. Quilts, bed runners, and large wall hangings often benefit from this approach.
Best practices when combining machine quilting and boro include:
- Complete structural quilting first.
- Add decorative boro stitching afterward.
- Use visible thread colors for contrast.
- Avoid excessive machine stitch density.
- Leave room for future patch additions.
- Test stitch tension on layered samples.
Many contemporary boro-inspired quilts use machine quilting as an invisible support system while allowing the hand-stitched sections to become the visual focus. This balance creates projects that are durable, practical, and rich in texture.
How Should Fabric Layers Be Organized in a Boro Quilt?
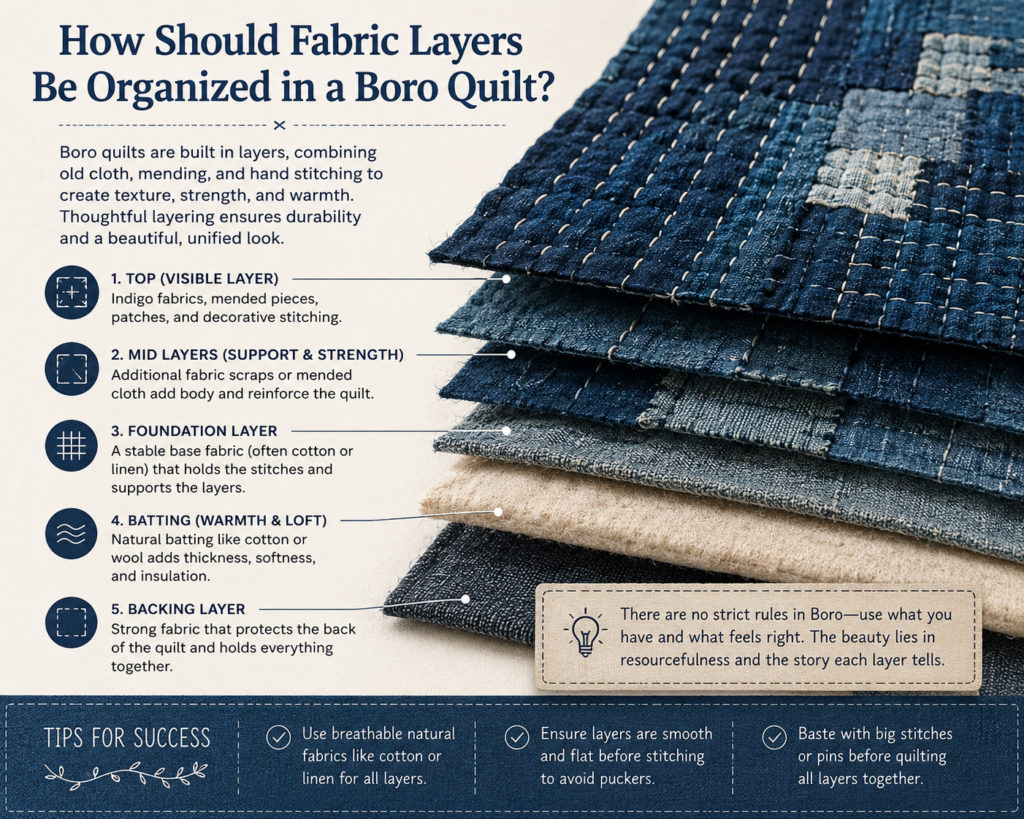
Layer organization is one of the most overlooked aspects of successful boro quilting. A beautiful patch arrangement can still fail if the underlying layers are poorly structured. Proper organization improves durability, reduces bulk, and helps stitches distribute stress evenly across the textile.
A traditional quilt uses three primary layers: quilt top, batting, and backing fabric. When incorporating boro, reinforcement patches are usually integrated into the quilt top before final assembly. This prevents unnecessary thickness and creates a more unified structure.
A common layer sequence is:
- Decorative quilt top
- Boro patches and reinforcements
- Batting
- Backing fabric
Keeping patches near the surface ensures their texture and stitching remain visible. If patches are buried deeper within the structure, much of the visual impact of boro can be lost.
Important considerations include:
- Keep patch layers consistent.
- Avoid stacking too many patches in one area.
- Balance thickness across the quilt.
- Trim excess seam allowances.
- Distribute reinforcement evenly.
- Test flexibility as layers are added.
A well-organized quilt feels balanced when folded, stitched, and handled. Poor organization often results in stiff sections, distorted quilting lines, or uncomfortable bulk. Successful boro quilts achieve a balance between durability and flexibility, allowing the textile to remain functional while showcasing layered craftsmanship.
Can Too Many Layers Ruin a Boro Quilt?
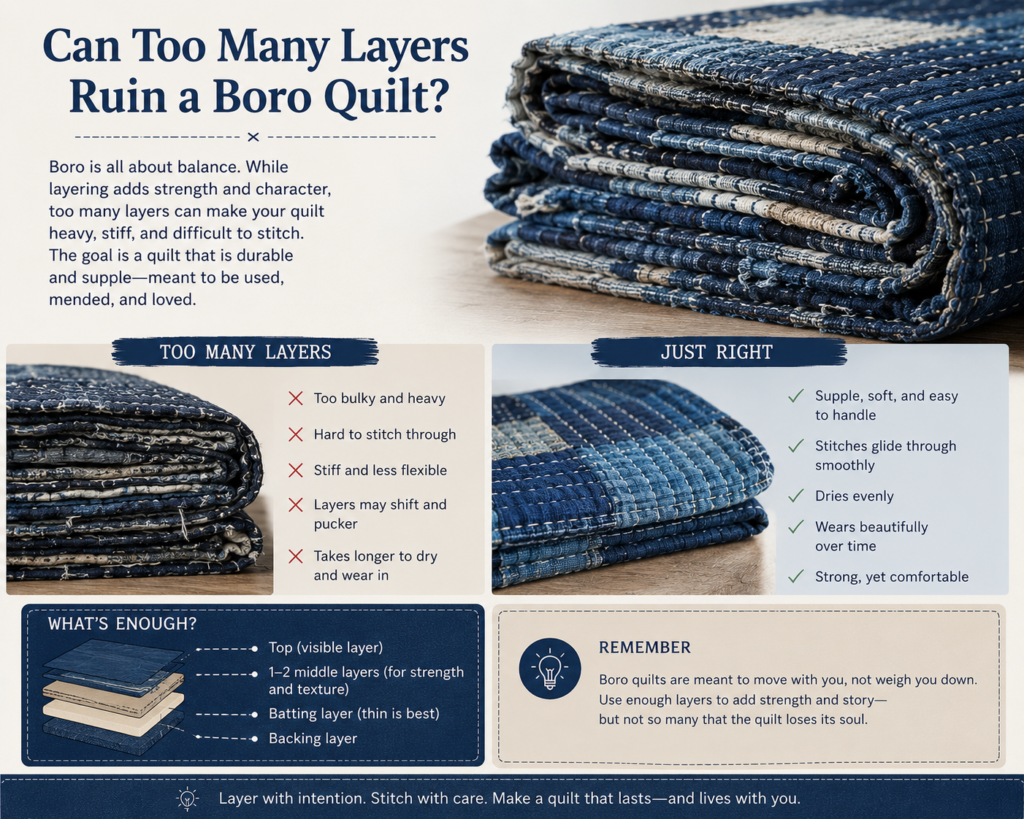
One of the most common beginner mistakes is assuming that more layers automatically create a stronger textile. While additional patches can increase durability, excessive layering often creates stiffness, needle resistance, and uneven quilting. The goal is reinforcement, not unnecessary bulk.
For most projects, two to four fabric layers remain comfortable and flexible. Five to six layers may still work in decorative areas, but stitching becomes noticeably more difficult. Once projects exceed seven layers in multiple locations, puckering, distortion, and discomfort often become significant concerns.
Practical layer guidelines:
- 2–4 layers: Ideal balance of strength and flexibility
- 5–6 layers: Acceptable for reinforcement zones
- 7+ layers: Often too bulky for regular use
- Heavy fabrics require fewer layers than lightweight fabrics
- Test thickness before final assembly
Experienced boro makers focus on strategic reinforcement rather than simply adding more material. Thoughtful patch placement generally produces better results than excessive layering.
Does Fabric Grain Direction Matter in Boro Quilting?
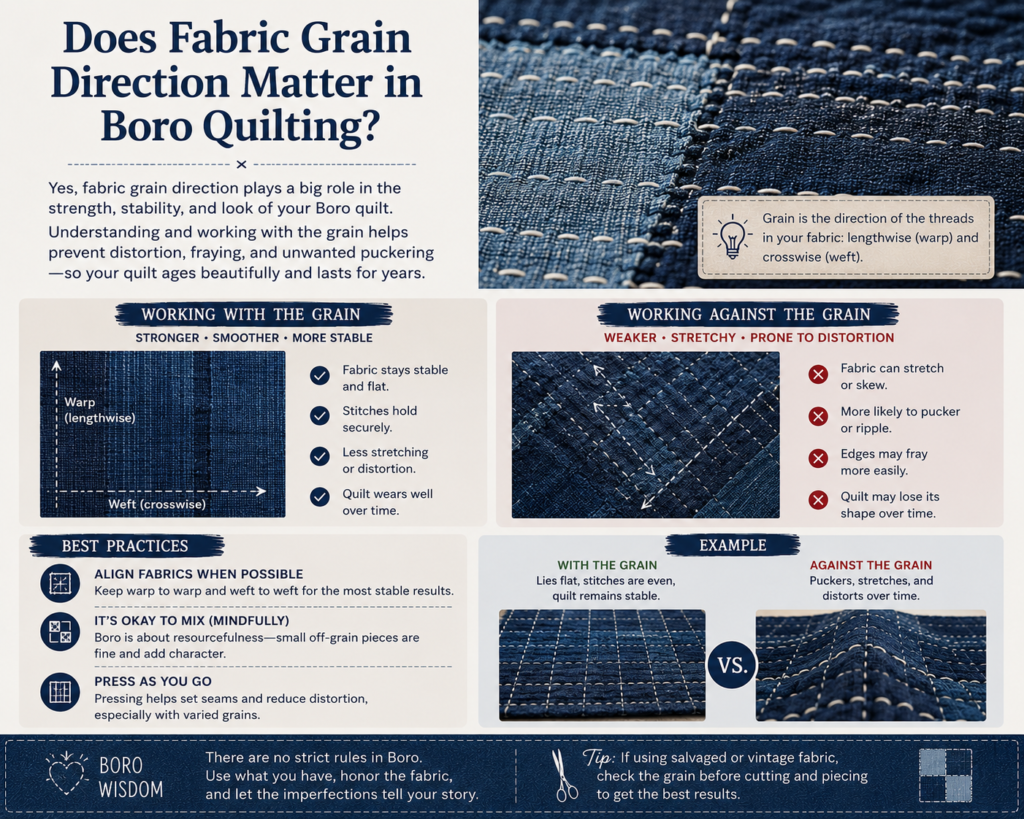
Fabric grain direction matters far more than many beginners realize. While boro often appears spontaneous and organic, successful long-term projects still respect the structural behavior of woven fabric. Ignoring grain direction can lead to stretching, distortion, puckering, and uneven wear.
Every woven fabric contains warp and weft threads. Warp threads generally run lengthwise and provide greater stability, while weft threads run across the width of the fabric. Fabric cut on the bias stretches more easily and behaves differently under tension.
When adding patches, matching grain direction whenever possible helps maintain stability. A patch placed with a completely different grain orientation may shift over time, especially in heavily used textiles.
Benefits of respecting grain direction include:
- Better shape retention
- Reduced stretching
- Improved patch stability
- Cleaner quilting lines
- More predictable aging
- Increased durability
There are situations where intentional grain variation can create artistic effects. Decorative wall hangings often allow more experimentation because they experience less wear than garments or bedding. Functional projects, however, benefit from greater consistency.
A simple grain-awareness strategy can dramatically improve the lifespan of a boro quilt. It reduces stress on stitches and helps fabrics age together rather than pulling against one another over time.
What Types of Projects Work Best for Boro Quilting?
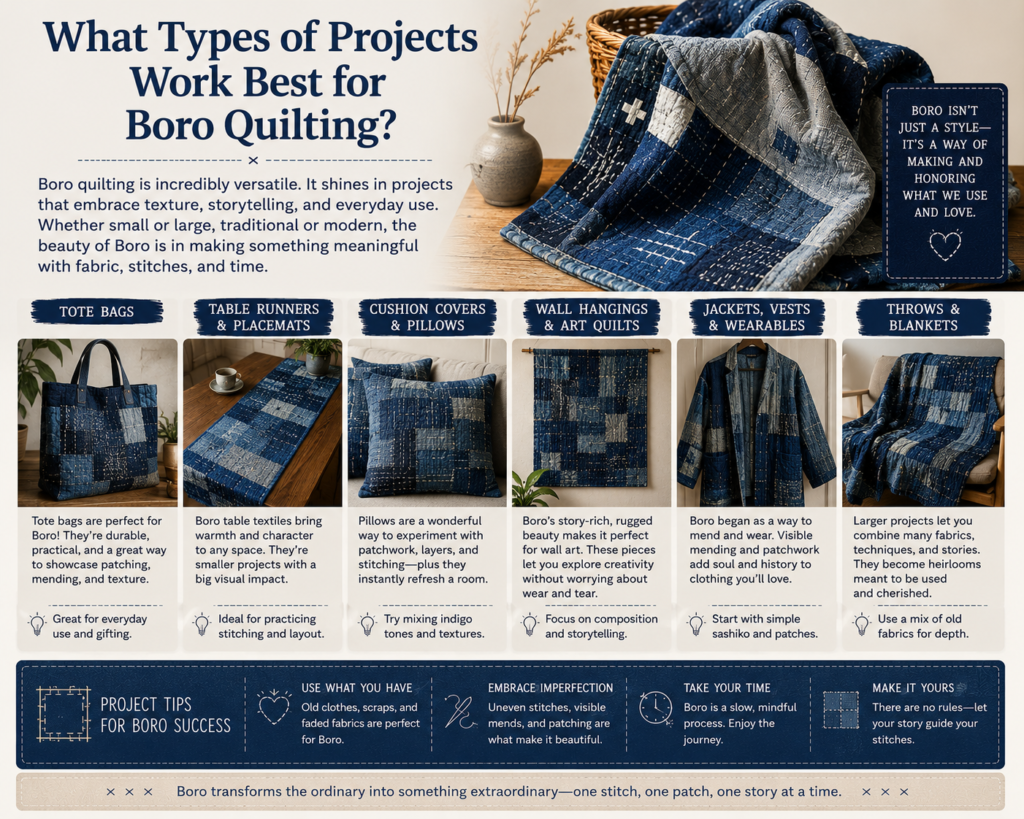
Not every textile project benefits equally from combining boro and quilting. The most successful applications are projects with visible surface areas where patchwork, stitching, and texture can be appreciated. These projects allow both techniques to contribute aesthetically and structurally.
Quilts remain the most obvious choice because they naturally involve layered construction. However, many makers expand beyond traditional bedding into wearable art and home decor. Jackets, bags, and wall hangings often showcase boro stitching exceptionally well because the surface details remain highly visible.
Popular boro quilting projects include:
- Bed quilts
- Lap quilts
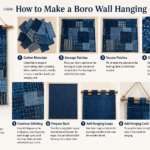
- Wall hangings
- Tote bags
- Cushion covers
- Table runners
- Jackets
- Vest panels
- Textile art pieces
Projects with moderate wear often benefit the most. They provide opportunities for reinforcement while still displaying the craftsmanship involved. Heavy-use items such as bags can gain additional durability from strategically placed boro patches.
Beginners frequently find cushion covers and wall hangings easier than full quilts because they require fewer materials and less time. These smaller projects allow experimentation with patch placement, stitch density, and color balance before committing to larger works.
Choosing the right project helps build confidence while developing an understanding of how quilting and boro interact in practical applications.
Is Boro Quilting Better for Clothing or Home Decor?
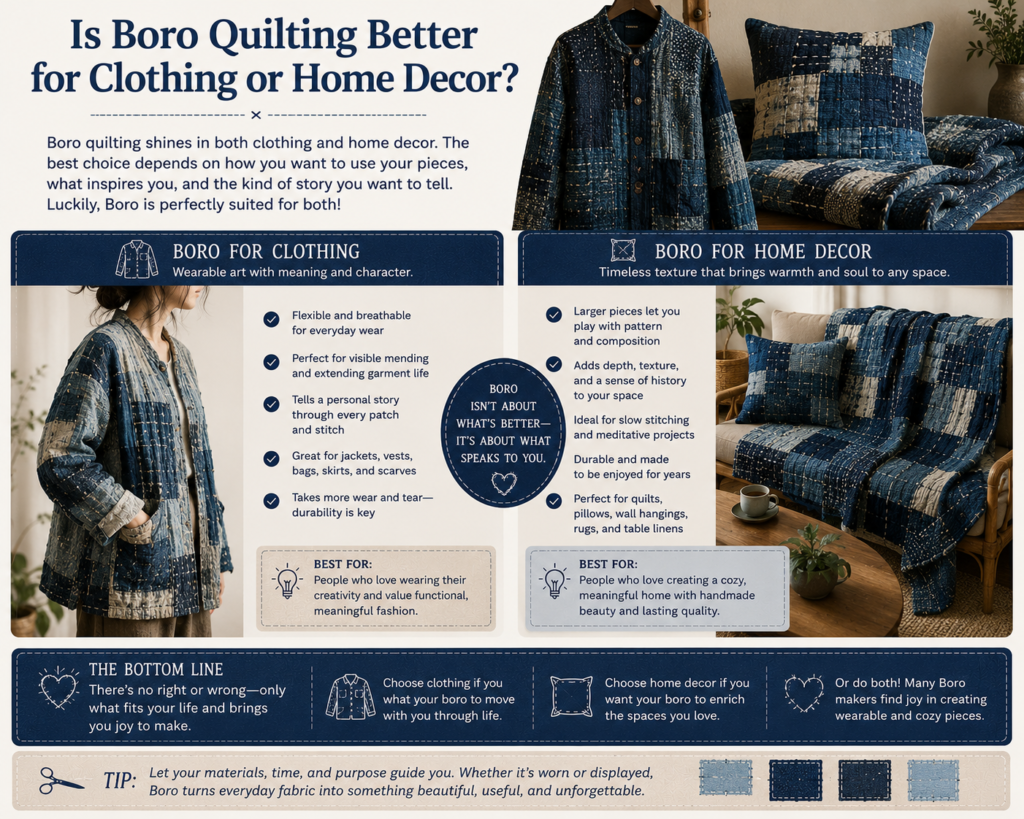
Boro quilting can be adapted successfully for both wearable textiles and home decor, but each application benefits from different design priorities. Clothing requires flexibility, comfort, and controlled bulk, while decorative projects often allow more complex layering and denser stitching.
Wearable projects such as jackets, vests, and bags typically focus on reinforcement and movement. Home decor projects like wall hangings, table runners, and art quilts can emphasize visual texture and elaborate patch compositions because they experience less physical stress.
Comparison considerations:
- Clothing requires flexibility
- Home decor allows thicker layering
- Wearable items prioritize comfort
- Decorative pieces prioritize visual impact
- Wall hangings can support more stitch density
Understanding the final purpose of the textile helps guide decisions regarding fabric weight, patch placement, and stitch complexity.
How Do You Create a Balanced Boro Quilt Design?
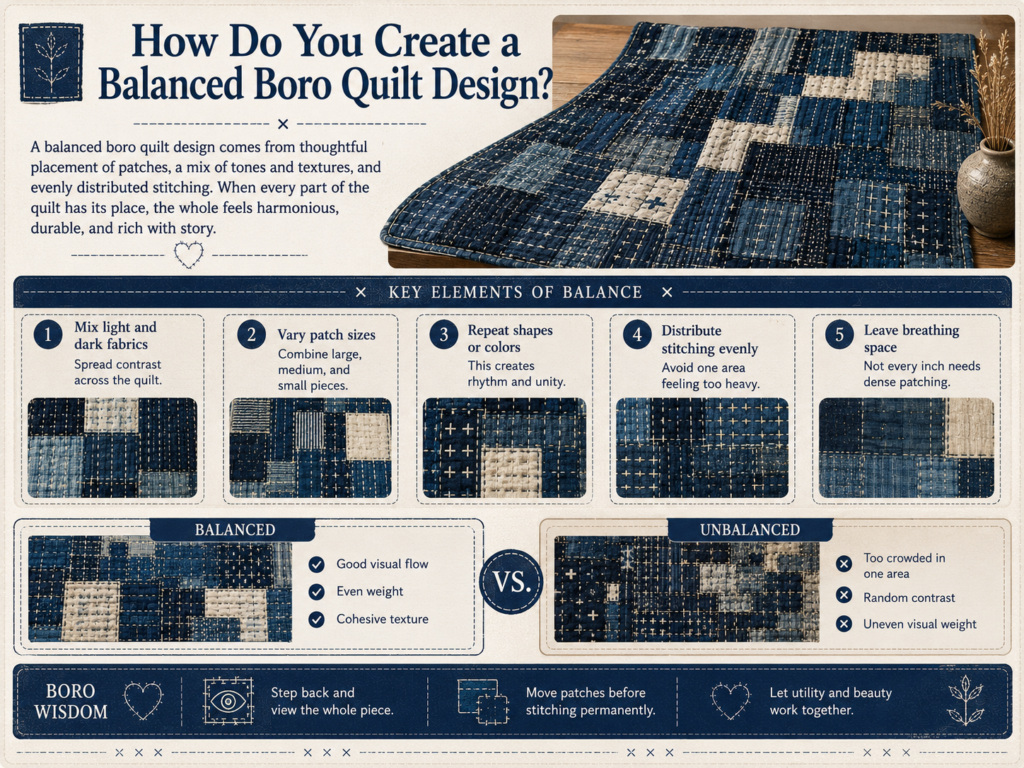
A successful boro quilt appears intentional even when it embraces an organic aesthetic. Balance is achieved through thoughtful distribution of patches, colors, textures, and stitch density. Without planning, a project can quickly become visually chaotic.
Many beginners place too many patches in one section, creating heavy visual weight that draws attention away from the rest of the composition. Balanced designs spread interest across the surface while still allowing focal points to emerge naturally.
Color plays a major role. Traditional boro often relies on indigo variations because the limited palette creates harmony. Modern interpretations may include additional colors, but restraint generally produces stronger results.
Design principles to consider:
- Distribute patches evenly.
- Vary patch sizes.
- Repeat colors strategically.
- Maintain negative space.
- Balance stitch density.
- Create one or two focal areas.
Negative space is particularly important. Areas without patches allow heavily detailed sections to stand out. Continuous patch coverage often reduces visual impact because the eye has nowhere to rest.
A balanced design does not require symmetry. Many of the most compelling boro quilts use asymmetrical arrangements that feel natural while still maintaining visual equilibrium. The goal is to create movement across the textile rather than concentrating all attention in a single area.
What Common Mistakes Make Boro Quilting Projects Look Messy?
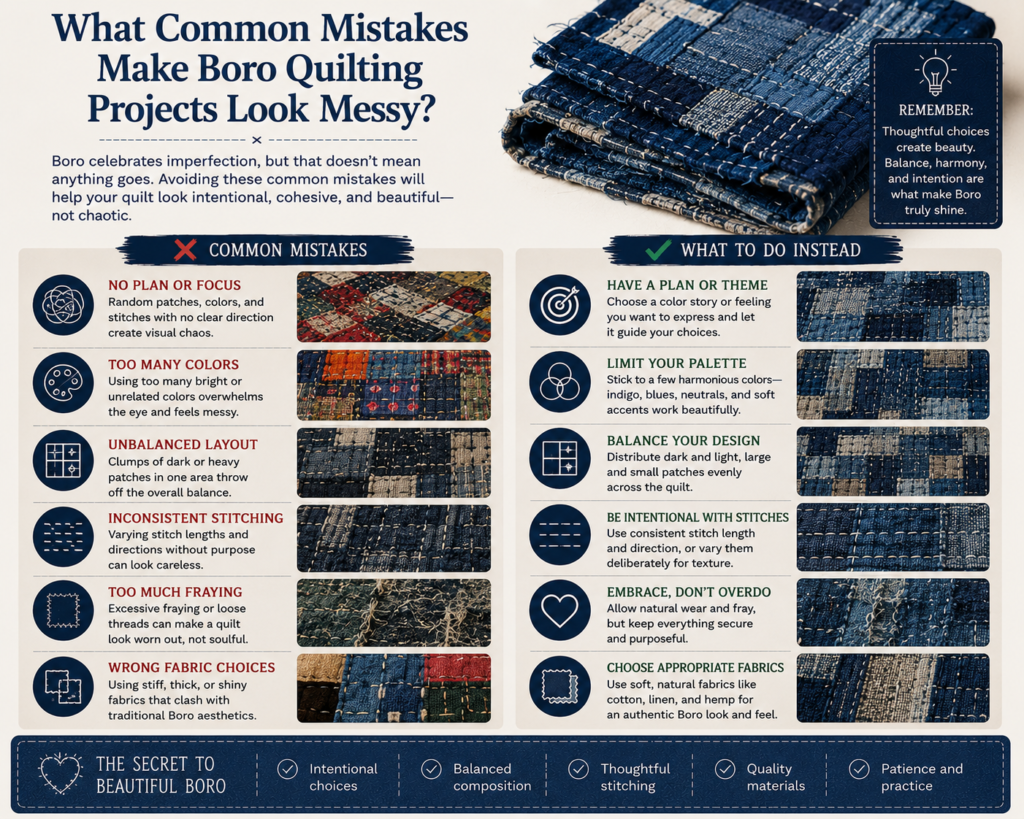
Most messy-looking boro quilts result from construction issues rather than artistic choices. While boro embraces imperfection, it still relies on thoughtful craftsmanship. Random decisions without structural consideration often create cluttered, unstable results.
One common mistake is excessive layering. Multiple overlapping patches may seem visually interesting initially, but they can create uncomfortable thickness and make stitching difficult. Another issue is inconsistent stitch spacing. Visible stitching is part of the design, so irregular spacing becomes highly noticeable.
Frequent mistakes include:
- Too many fabric layers
- Inconsistent stitch length
- Poor patch placement
- Random color selection
- Ignoring grain direction
- Uneven tension
- Excessive bulk
- Weak fabric choices
Color management is another challenge. Combining too many unrelated colors often produces visual noise. Limiting the palette usually results in a stronger composition.
Many problems can be prevented through sampling. Small practice pieces reveal how fabrics, threads, batting, and patches interact before work begins on a larger project. This testing stage saves time and reduces frustration.
Successful boro quilting embraces controlled imperfection. The goal is not precision for its own sake but intentional craftsmanship that supports both beauty and durability.
How Durable Are Combined Boro and Quilting Projects?
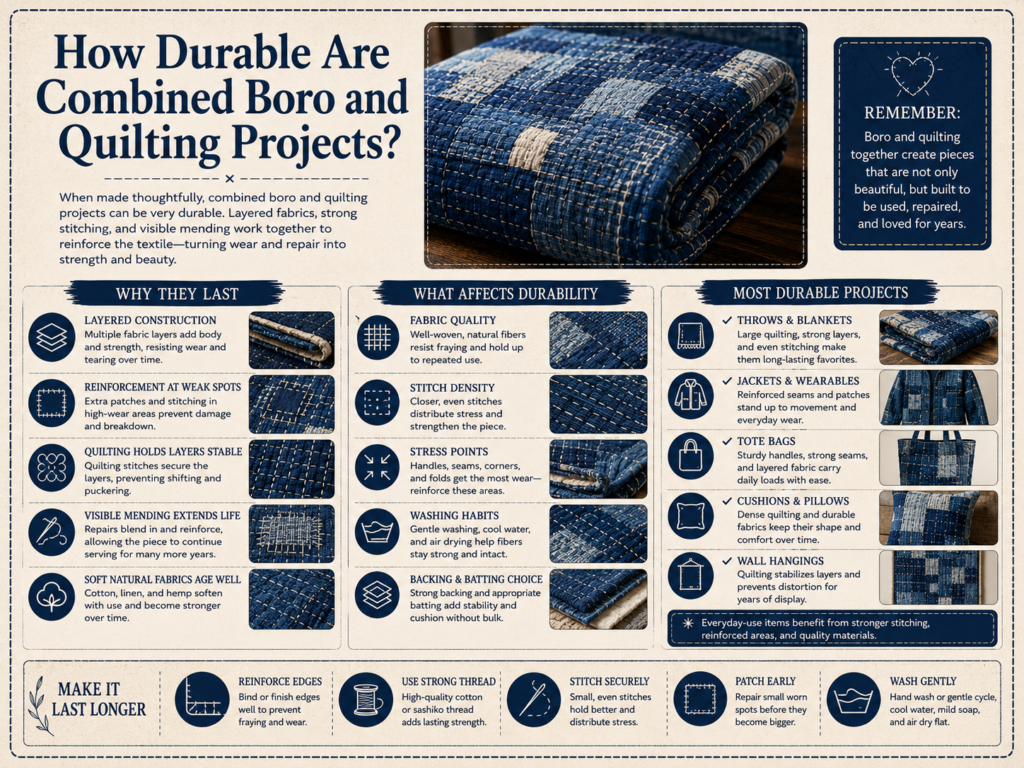
One of the strongest arguments for combining boro and quilting is durability. Both techniques reinforce fabric through stitching and layering, creating textiles capable of lasting for decades when properly maintained.
Quilting distributes stress across multiple layers, while boro strengthens vulnerable areas through targeted reinforcement. Together they create a system where wear is spread across the structure rather than concentrated in a single location.
Factors influencing durability include:
- Fabric quality
- Thread quality
- Stitch density
- Layer organization
- Proper grain alignment
- Ongoing maintenance
Well-constructed boro quilts often become more resilient over time because they are designed to accept future repairs. Additional patches can be added as needed, extending the textile’s lifespan far beyond many modern manufactured products.
Durability is also connected to flexibility. Excessively rigid quilts may crack, distort, or experience thread stress. Balanced layer construction helps maintain movement within the textile while preserving strength.
This repair-friendly philosophy is one reason boro remains relevant today. Instead of discarding worn items, makers continue adapting and strengthening them, creating textiles with exceptionally long service lives.
How Does Boro Quilting Change Over Time?
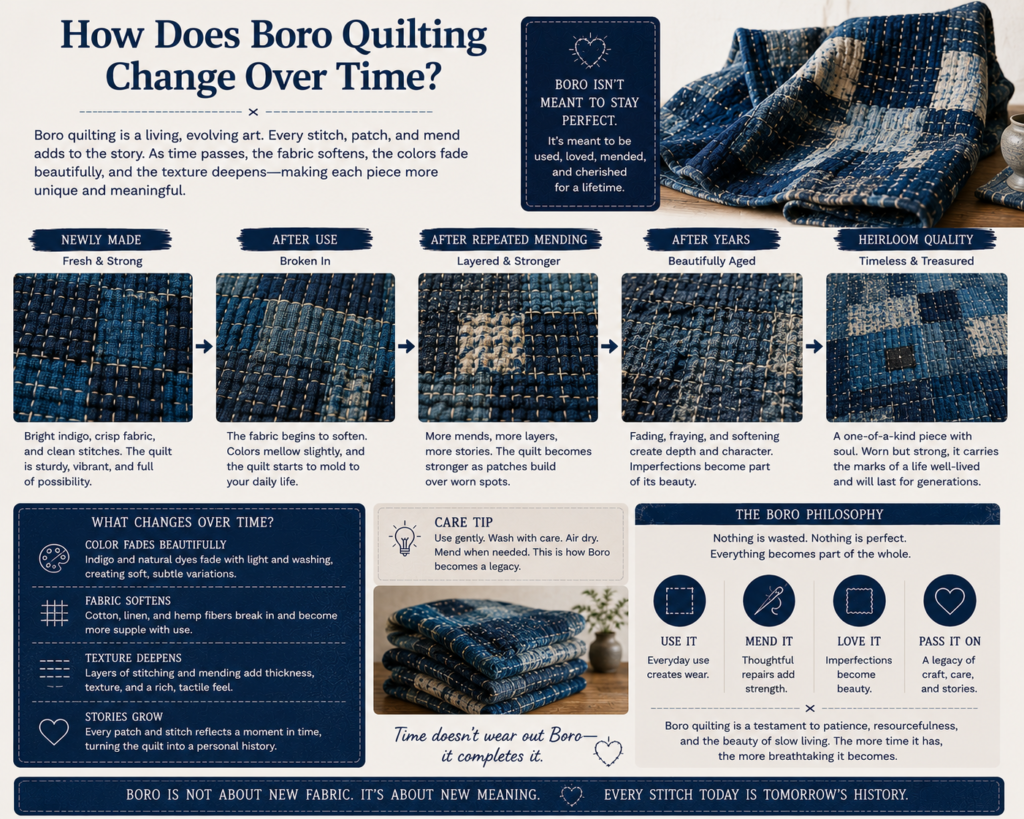
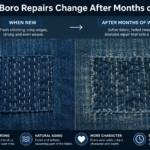
Perhaps the most fascinating aspect of boro quilting is its evolution. Unlike many textiles that simply deteriorate with age, boro quilts often become more visually interesting as they are used. Wear, fading, and softening contribute to their character.
Natural fibers gradually develop a patina. Indigo fabrics fade unevenly, revealing subtle color variation. Stitching settles into the surface, and patches begin blending into the surrounding textile while still remaining visible.
Changes commonly observed over time include:
- Fabric softening
- Indigo fading
- Increased texture
- Stitch settling
- Enhanced patch integration
- Greater visual depth
These changes are often viewed positively because they document the history of the textile. Every repair, stain, fade line, and patch contributes to a unique narrative. This perspective differs from mass-produced textiles that are often expected to remain unchanged.
Proper care helps control aging without preventing it. Gentle washing, thoughtful storage, and occasional repairs allow quilts to mature gracefully while preserving their structural integrity.
For many makers, this evolving appearance is one of the primary reasons they are drawn to boro quilting. The textile continues developing long after the initial construction is complete.
Would Traditional Japanese Boro Makers Have Considered This Quilting?
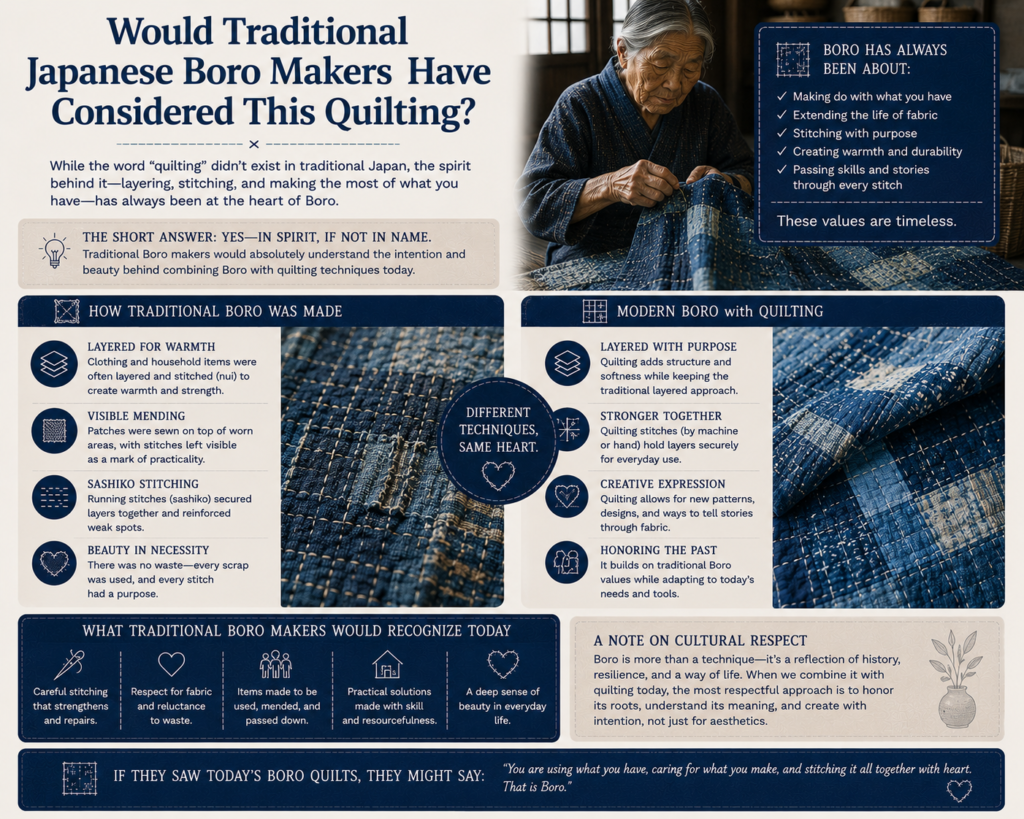
Historically, traditional Japanese boro makers would not have described their work as quilting. Boro emerged from necessity rather than artistic experimentation. Families repaired garments, bedding, and household textiles repeatedly because fabric was valuable and difficult to replace. The focus was durability and survival rather than creating a structured quilt.
Modern boro quilting represents a contemporary interpretation that combines the repair philosophy of boro with the layered construction methods of quilting. While the techniques share similarities, their original purposes were different. Today’s makers blend these traditions to create textiles that honor historical practices while adapting them to modern creative goals.
Key distinctions include:
- Traditional boro emphasized repair
- Quilting emphasized textile construction
- Boro used available scrap fabrics
- Quilting often followed planned designs
- Modern makers combine both approaches
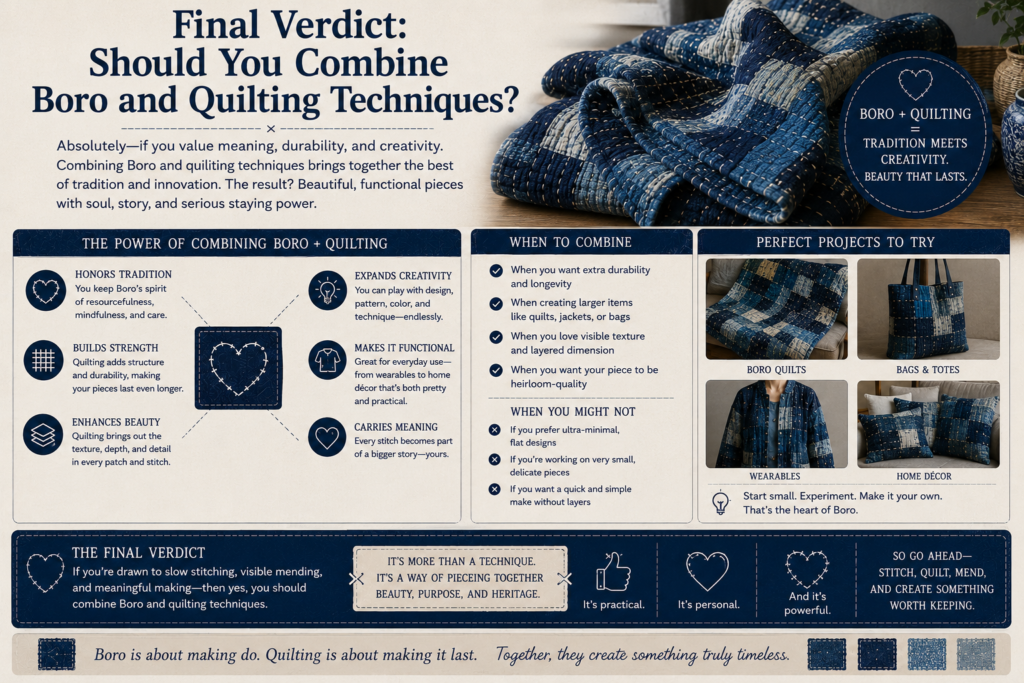
Final Verdict: Should You Combine Boro and Quilting Techniques?
Combining boro and quilting techniques is one of the most effective ways to create textiles that are both beautiful and durable. These traditions complement one another naturally because both rely on layered construction, visible stitching, and long-term fabric preservation.
Quilting provides structure, stability, and comfort. Boro contributes character, reinforcement, sustainability, and visual storytelling. Together they create projects that celebrate craftsmanship while remaining highly functional.
Whether you are making a quilt, wall hanging, tote bag, jacket, or decorative textile artwork, the combination offers unique advantages that neither technique achieves alone. The ability to repair, adapt, and evolve a project over time also aligns with the original spirit of boro—valuing fabric rather than discarding it.
For beginners, starting with a small project such as a cushion cover or wall hanging provides an excellent introduction. More experienced makers can explore larger quilts and complex layered compositions. In either case, combining these techniques creates textiles that continue improving through use, repair, and age.
The result is more than a finished object. It is a textile that tells a story through every stitch, patch, and layer.
FAQs
Can beginners combine boro and quilting?
Yes. Simple patchwork projects and small quilted items are excellent starting points.
Is batting required for boro quilting?
Not always. Decorative wall hangings often use no batting, while quilts usually do.
Can I use old clothing for boro quilting?
Yes. Denim, cotton shirts, and linen garments are commonly repurposed.
Is sashiko thread necessary?
No. Many projects use embroidery thread or quilting thread successfully.
Does machine quilting reduce the boro look?
Not if visible hand stitching remains a major design feature.
What is the best fabric for boro quilting?
Indigo cotton and medium-weight cotton fabrics are among the most versatile choices.
How long do boro quilts last?
Well-made projects can last for decades with occasional repairs.
Can boro quilting be washed?
Yes. Gentle washing helps preserve stitches and fabric integrity.