Most beginners struggle with boro stitching because they focus too heavily on aesthetics before understanding repair structure, fabric reinforcement, and stitch control. Problems like tight stitching, weak fabric selection, excessive patching, poor thread choice, and unstable repairs often reduce durability and make garments uncomfortable to wear. Learning proper repair logic first helps beginners create stronger, more authentic boro stitching that improves naturally with age and repeated use.
What Is Boro Stitching and Why Do Beginners Make Mistakes?
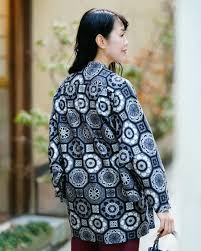
Boro stitching developed in rural Japan as a survival-based textile repair method where garments were repeatedly patched, layered, and reinforced to extend their lifespan. Instead of discarding damaged clothing, families repaired fabric continuously using visible stitches and layered textile patches. Over time, these repairs created beautiful textured garments that reflected history, use, and craftsmanship. Modern beginners often discover boro through social media or fashion trends, but many misunderstand its practical foundation.
A major beginner problem is treating boro like decorative embroidery instead of structural mending. Authentic boro is built around reinforcement, durability, and textile preservation. Decorative stitching alone does not create a strong repair. Many beginners focus heavily on visual patchwork while ignoring tension balance, fabric stability, and wear patterns. This causes repairs to weaken quickly after washing or regular movement.
Beginners commonly underestimate how fabric behaves under long-term stress. Areas like knees, elbows, pockets, and seams constantly flex during wear. Without proper reinforcement, even visually attractive repairs can tear or distort over time. Understanding movement and pressure points is essential for durable visible mending.
Common beginner misunderstandings include:
- confusing boro with embroidery
- using decorative patches without support
- ignoring fabric thickness compatibility
- overcomplicating designs too early
- choosing weak thread
- stitching too tightly
- using unstable synthetic fabric
- failing to reinforce weak areas underneath
Authentic boro becomes visually beautiful because repairs evolve naturally through use. The strongest beginner mindset is focusing on durability first, aesthetics second. Over time, practical repairs often become the most visually compelling pieces.
Authentic Boro vs Decorative Fashion Boro
Many beginners enter boro stitching through fashion trends, social media aesthetics, or modern streetwear without understanding the difference between authentic repair-based boro and decorative fashion-inspired patchwork. Traditional Japanese boro developed from necessity. Families repaired garments repeatedly because fabric was valuable, resources were limited, and clothing needed to survive for years or even generations. Every stitch existed for practical reinforcement before it became visually interesting. Modern decorative “boro-style” fashion often imitates the appearance of layered repairs without preserving the functional repair philosophy behind the craft.
Understanding this distinction helps beginners avoid one of the biggest mistakes in visible mending: prioritizing appearance over structural longevity. Authentic boro usually develops gradually through repeated use, layered reinforcement, fading, and natural wear patterns. Decorative fashion boro is often pre-designed for immediate visual impact. Neither approach is inherently wrong, but beginners create stronger and more believable repairs when they understand the historical repair logic first.
Authentic boro usually focuses on:
- textile preservation
- reinforcement layering
- visible repair history
- practical stitching
- gradual garment evolution
- long-term durability
Decorative fashion boro often emphasizes:
- visual contrast
- artistic composition
- planned patch placement
- heavy decorative stitching
- immediate texture
- aesthetic styling
Real-world boro becomes visually compelling because it reflects use, repair, and survival over time. Beginners who focus on repair logic first usually create more authentic-looking work naturally as the garment ages.
Using the Wrong Fabric for Repairs
Fabric choice is one of the most important parts of successful boro stitching, yet beginners frequently ignore it. Many people select fabric purely for appearance without considering durability, weave structure, or compatibility with the original garment. Thin fashion fabric, slippery synthetics, or stretchy materials often fail quickly because they cannot handle repeated stitching or movement stress.
Traditional boro repairs relied heavily on durable natural fibers such as cotton, hemp, linen, and indigo-dyed textiles. These materials aged gradually while maintaining structural integrity. Modern beginners often use lightweight decorative fabric that tears around stitch holes or shifts excessively during sewing. This creates unstable repairs that weaken after washing.
Good repair fabric should behave similarly to the original garment. Heavy denim patches on lightweight cotton shirts may create stiffness, while thin fabric patches on workwear fail under tension. Matching weight and flexibility improves long-term performance dramatically.
Strong repair fabric usually provides:
- stable woven structure
- medium or heavy durability
- limited stretch
- balanced flexibility
- long-term stitch support
- resistance to fraying
Experienced boro artists frequently use recycled workwear fabric because aged textiles already contain natural wear softness while remaining durable. Vintage denim, canvas, cotton twill, and old indigo fabric are especially popular because they develop beautiful aging patterns over time.
Real-world repair quality depends on the surrounding textile structure, not just the patch itself. Even strong stitching cannot save severely weakened fabric without proper reinforcement underneath. Beginners should always inspect surrounding fabric before sewing.
The best beginner strategy is starting with durable natural materials. Strong fabric creates smoother stitching, more balanced tension, and repairs that survive repeated use instead of becoming decorative temporary patches.
How to Place Boro Patches for Better Durability
Patch placement affects repair lifespan just as much as stitching quality. Many beginners apply patches directly over holes without analyzing how the garment moves during daily wear. This creates stress concentration around repair edges because fabric constantly bends, stretches slightly, and folds at pressure points like knees, elbows, pockets, and seams. Good patch placement distributes tension outward instead of trapping movement inside one rigid repair zone.
Strategic placement becomes especially important on denim and workwear because heavy fabrics create repeated friction during movement. Patches placed too close to seams may distort fabric tension, while oversized patches can create stiffness that accelerates surrounding wear. Experienced repair artists often extend patches slightly beyond visibly damaged areas so reinforcement reaches stronger fabric zones instead of depending entirely on weakened fibers.
Strong patch placement strategies include:
- extending beyond damaged fabric
- reinforcing stress directions
- avoiding bulky seam overlap
- matching patch movement to garment movement
- stabilizing corners and edges
- layering support underneath thin fabric
Curved areas like knees and elbows also require more flexible stitching density than flat garment sections. Repairs that are too rigid in movement-heavy areas may crack or wrinkle after repeated wear. Smaller layered reinforcement patches often work better than one oversized decorative patch.
Real-world durability depends on understanding movement patterns. The strongest repairs usually feel integrated into the garment rather than sitting stiffly on top of the fabric.
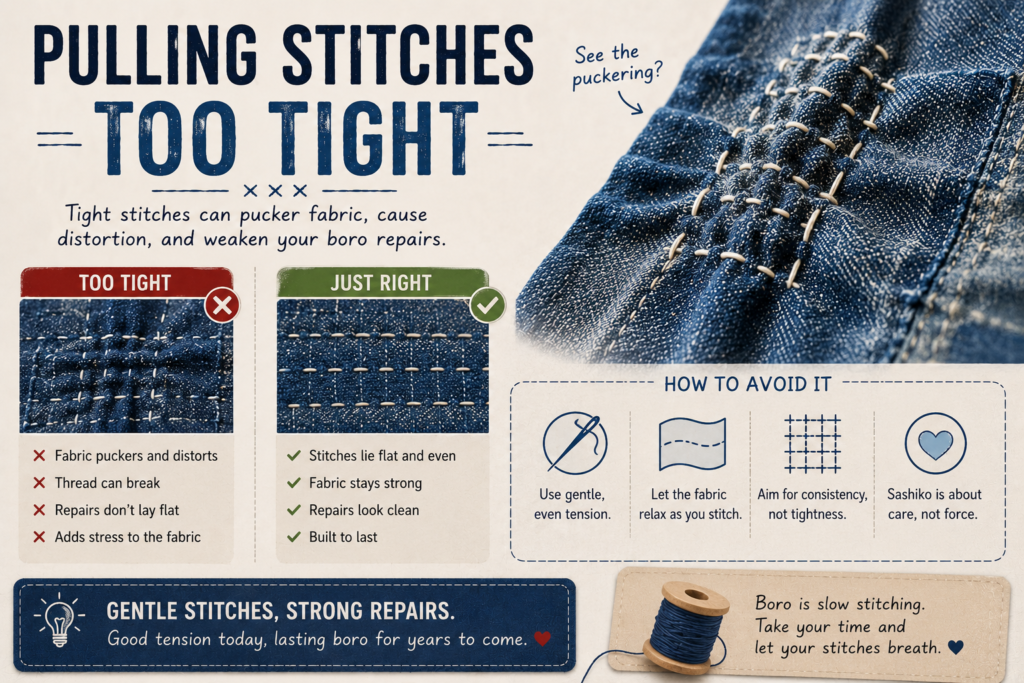
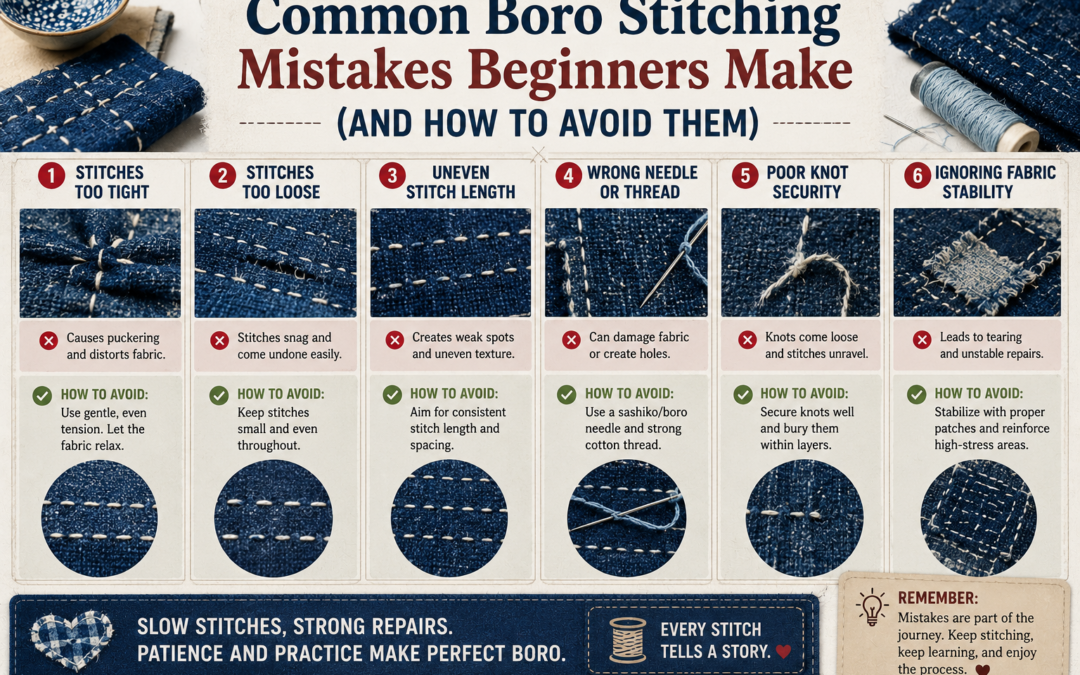
Pulling Stitches Too Tight
Tension problems are among the most common beginner mistakes in boro stitching. Many beginners instinctively pull thread tightly because they assume tighter stitching creates stronger reinforcement. In reality, excessive tension weakens repairs by restricting fabric movement and concentrating stress around stitch holes.
Clothing constantly bends, folds, stretches slightly, and shifts during wear. Tight stitches prevent fabric from moving naturally, causing puckering, wrinkling, and premature tearing. Overly tight repairs often become stiff and uncomfortable, especially in high-movement areas like knees or elbows.
Balanced stitching should hold patches securely while still allowing slight flexibility. Good boro stitching lies flat against the garment without compressing the textile excessively. Proper tension creates smooth reinforcement that integrates naturally into the clothing.
Signs of excessive stitch tension include:
- wrinkled repair areas
- curled patch edges
- stiff fabric movement
- distorted patch shapes
- visible pulling lines
- compressed stitch rows
Beginners can improve tension control by periodically laying the garment flat during sewing. If the fabric puckers or curls, the stitches are likely too tight. Relaxed hand positioning and slower stitching rhythm also improve consistency.
Traditional boro garments survived years of wear partly because repairs remained flexible instead of rigid. Stitching acted like reinforcement rather than restriction. Many experienced textile artists intentionally maintain slight looseness because long-term durability depends on movement tolerance.
Thread length also affects tension. Extremely long thread creates friction and tangling, which encourages beginners to pull harder while sewing. Shorter thread lengths provide smoother control and more even stitch rhythm.
The goal is not perfect precision. Authentic boro contains natural irregularity. However, balanced tension is essential for creating repairs that remain durable, wearable, and comfortable over time.
Why Stitch Density Matters in Boro Repair
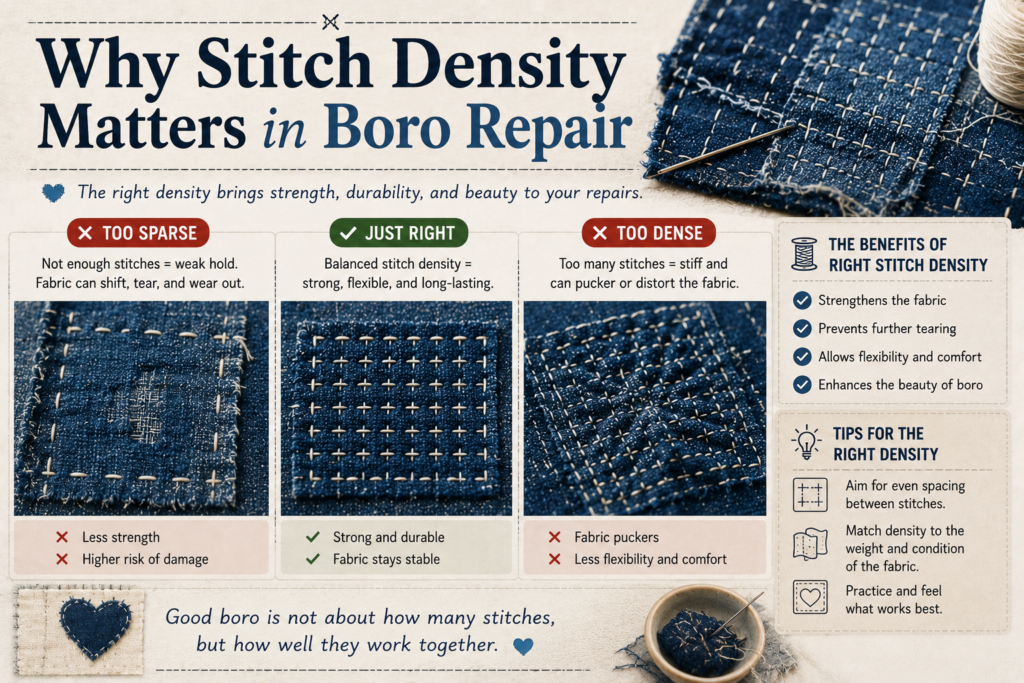
Beginners often focus only on stitch tightness while ignoring stitch density, which plays a major role in flexibility, airflow, and long-term durability. Stitch density refers to how closely stitches are packed together across the repair area. Extremely dense stitching can make garments stiff and uncomfortable, while stitches spaced too far apart may fail to secure patches properly. Good boro stitching balances reinforcement with movement so repaired fabric continues behaving naturally during wear.
Traditional boro garments were designed for repeated use in physically demanding conditions. Repairs needed to survive movement, moisture, folding, and washing without becoming rigid. Excessively dense stitching traps tension inside the repair area and may accelerate tearing around the edges. Sparse stitching, however, can allow patches to shift or lift over time. Balanced stitch spacing distributes pressure evenly across the textile surface.
Balanced stitch density helps improve:
- repair flexibility
- patch stability
- movement comfort
- fabric airflow
- long-term durability
- even tension distribution
Different fabrics also require different stitch density. Heavy denim can tolerate more visible stitching, while lightweight cotton often benefits from wider spacing to prevent stress buildup. Movement-heavy areas like knees and elbows usually require slightly more flexibility than flat garment sections.
A useful beginner approach is testing stitch spacing on scrap fabric before repairing actual garments. This reveals how different densities affect flexibility and texture after folding or washing. Strong repairs should feel secure while still allowing the garment to move naturally.
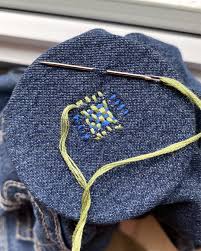
Using Weak Thread or Poor Stitching Materials
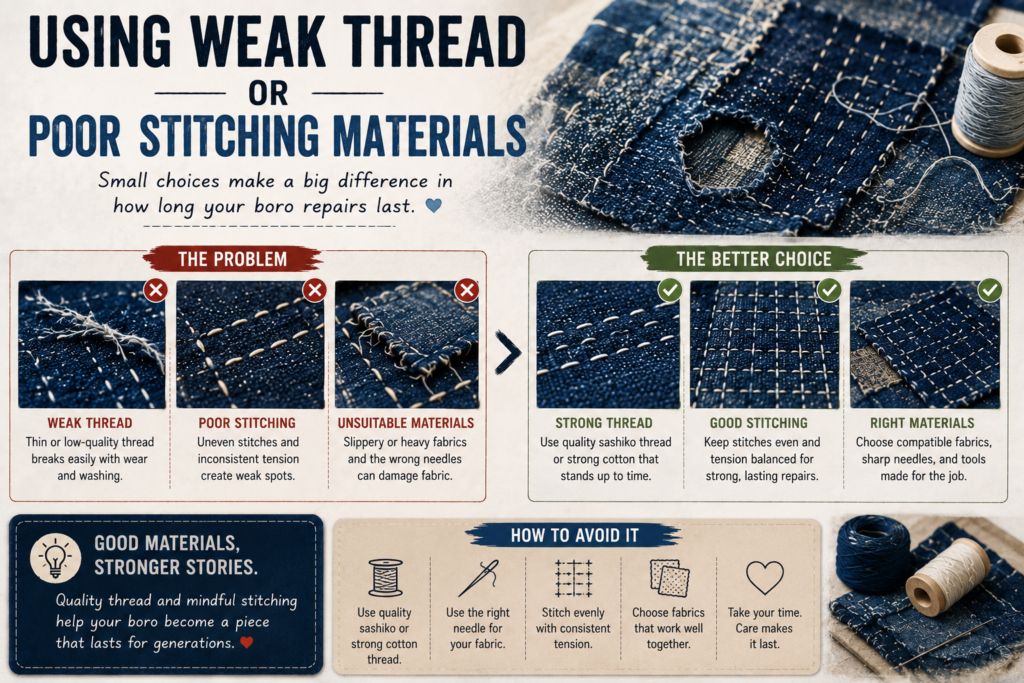
Thread quality significantly affects the lifespan of boro repairs, but beginners often underestimate its importance. Cheap thread breaks easily, frays after washing, and creates inconsistent tension during sewing. Some decorative synthetic threads also cut into fabric over time because they are too stiff or abrasive.
Traditional boro repairs commonly used durable cotton thread because it aged naturally with the garment. Modern beginners still benefit from using strong cotton, sashiko thread, or heavy embroidery cotton for visible mending projects. Strong thread allows repairs to flex repeatedly without snapping under tension.
Poor thread selection creates several long-term problems. Weak thread may initially appear functional, but repeated movement gradually loosens the repair. When stitches begin breaking, patch stability weakens quickly and surrounding fabric experiences additional stress.
Common thread-related beginner problems include:
- thread snapping repeatedly
- excessive tangling
- uneven stitch thickness
- patch separation
- frayed stitching after washing
- inconsistent tension control
Thread thickness should also match fabric weight. Thick denim requires stronger thread than lightweight cotton garments. Extremely thin thread on heavy fabric often cuts into weakened areas instead of reinforcing them properly.
Beginners sometimes use decorative embroidery floss without understanding durability limitations. While embroidery thread can look attractive, some varieties separate easily or weaken under friction. Practical reinforcement should always take priority over decorative appearance.
Needle selection matters as well. A needle that is too large creates oversized holes, while a needle that is too small may damage thread through friction. Balanced tool selection improves stitch consistency dramatically.
Experienced boro practitioners often test thread behavior on scrap fabric before beginning large repairs. This helps identify tension balance, stitch visibility, and durability issues early. Strong thread combined with controlled stitching creates repairs capable of surviving years of wear and repeated washing.
Choosing Fabric Colors That Age Naturally

Color selection affects how boro repairs visually evolve over time. Many beginners choose fabric patches based only on immediate contrast without considering how fading, washing, and wear will change the garment later. Traditional boro repairs often used indigo-dyed textiles because repeated use created gradual tonal blending between patches, thread, and original fabric. Modern beginners sometimes use bright synthetic fabric that ages unevenly and disrupts the natural repair aesthetic.
Indigo and natural cotton develop character gradually because fading occurs through friction, sunlight, washing, and repeated movement. Patches slowly soften into the surrounding garment instead of remaining visually disconnected. This natural aging process is one reason authentic boro gains beauty over time. Strong repairs often become more visually balanced after months or years of wear rather than immediately after stitching.
Beginners should think about:
- how colors fade
- fabric washing behavior
- thread aging
- tonal blending
- patch contrast balance
- long-term visual harmony
Extremely bright patches can dominate garments unnaturally, especially when paired with heavily faded denim or workwear. Slight tonal variation usually creates a more authentic appearance than aggressive contrast. Many experienced boro artists intentionally use recycled fabric because aged textiles already contain softened color variation and natural wear texture.
Real-world boro aesthetics develop slowly through repeated use. Choosing colors that age naturally helps repairs become integrated into the garment instead of appearing artificially decorative.
Overcomplicating Designs Too Early
One of the biggest beginner mistakes is attempting highly artistic boro designs before understanding basic repair structure. Social media often showcases complex patchwork jackets with layered textures, contrasting indigo tones, and dense visible stitching. While visually inspiring, these advanced projects can overwhelm beginners who have not yet mastered tension control, reinforcement placement, or patch stability.
Authentic boro evolved gradually through repeated repairs over many years. Historic garments gained complexity naturally because patches were added only when needed. Modern beginners sometimes try to imitate this appearance immediately, leading to bulky garments, chaotic layouts, and structurally weak stitching.
Simple repairs teach critical foundational skills:
- stitch rhythm
- fabric handling
- reinforcement balance
- tension control
- patch placement
- wear analysis
Overdesigned beginner repairs often become stiff and uncomfortable because excessive stitching restricts natural fabric movement. Too many overlapping patches can also trap moisture and create uneven pressure points during wear.
Common overdesign problems include:
- excessive decorative stitching
- too many contrasting fabrics
- oversized patches
- crowded layouts
- inconsistent repair spacing
- unfinished projects from complexity
Experienced boro artists usually prioritize function first. A small well-executed repair often looks more authentic than an overly decorative project with weak structure. Simplicity allows stitching and textile texture to become visually interesting naturally over time.
Beginners improve faster by completing smaller repairs repeatedly rather than starting with ambitious full-garment projects. Pocket reinforcement, denim knee patches, tote bag repairs, and seam stabilization provide valuable learning experience without overwhelming complexity.
The beauty of boro comes from visible history and practical craftsmanship. Repairs gain character through use, fading, and aging rather than forced decoration. Understanding repair logic first ultimately creates stronger artistic instinct later in the learning process.
Beginner to Advanced: How Boro Skills Improve Over Time
Boro stitching skill develops gradually through repeated repair experience rather than immediate artistic complexity. Many beginners expect professional-looking repairs quickly, but authentic visible mending improves naturally as stitch control, tension awareness, and fabric understanding become more intuitive. Traditional boro garments often accumulated repairs over many years, meaning visual depth came from continuous practical use rather than one carefully planned design.
The first stage of learning usually involves understanding basic stitch rhythm and patch stability. Beginners commonly struggle with tension consistency, thread tangling, or fabric shifting during early projects. Over time, repair decisions become more strategic. Experienced stitchers begin recognizing stress points, reinforcement needs, and movement patterns before damage becomes severe.
Most boro learning progression includes:
- basic running stitches
- patch stabilization
- tension control
- reinforcement layering
- fabric movement awareness
- visual composition understanding
Intermediate stitchers often become more confident combining fabrics, adjusting stitch density, and creating balanced patch layouts. Advanced visible mending usually focuses less on decoration and more on textile intuition. Repairs begin feeling naturally integrated into the garment rather than visually added afterward.
A helpful beginner strategy is documenting repairs over time. Observing how patches soften, fade, wrinkle, or wear after repeated washing teaches valuable lessons that books and tutorials often miss. Real-world garment behavior becomes one of the strongest teachers in boro stitching.
The goal is not perfection. The goal is understanding how textiles age, move, and survive through repeated repair
Ignoring Reinforcement and Fabric Stability
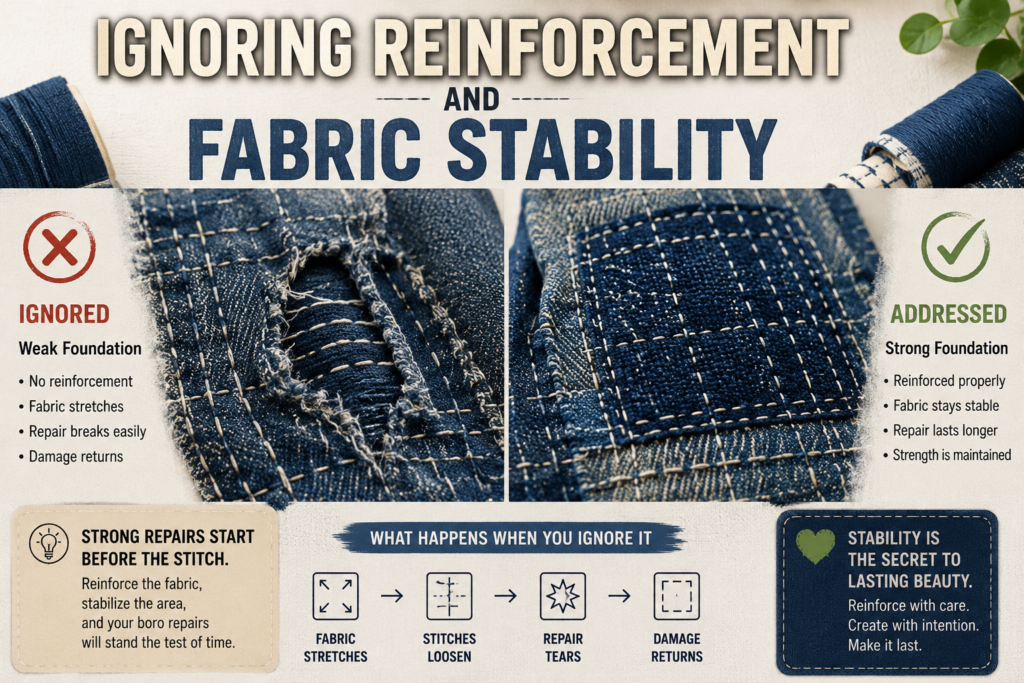
Many beginners focus only on the visible outer patch while ignoring the structural condition underneath damaged fabric. This creates one of the most serious durability problems in boro stitching. If weakened textile areas are not stabilized properly, the repair may tear away even when the stitching itself remains intact.
Fabric surrounding holes is often thinner and weaker than it appears. Areas exposed to friction, sunlight, moisture, or repeated washing gradually lose fiber strength before visible holes fully develop. Beginners commonly sew patches directly onto deteriorated fabric without adding support underneath.
Strong visible mending frequently relies on layered reinforcement systems. Internal support fabric distributes tension away from weak fibers and helps the repair move naturally with the garment. This approach improves longevity dramatically.
Important reinforcement considerations include:
- stabilizing thin fabric first
- supporting holes from underneath
- reinforcing stress points
- distributing tension evenly
- preventing edge tearing
- checking surrounding fabric strength
High-stress garment areas require especially careful reinforcement. Knees, elbows, cuffs, pockets, and seams experience constant movement during daily wear. Without internal support, even beautiful visible repairs can fail quickly.
Experienced repair artists often use smaller hidden patches beneath larger visible patches. This layered technique creates flexibility while strengthening weakened textile zones gradually. Some repairs may contain multiple layers built over time as the garment continues aging.
Real-world durability depends heavily on movement patterns. Clothing bends repeatedly throughout the day, meaning repairs must adapt dynamically instead of remaining rigid. Reinforcement should strengthen the garment without making it stiff or uncomfortable.
The strongest beginner mindset is viewing boro as structural preservation rather than decorative patchwork. Practical reinforcement creates repairs that continue aging beautifully for years instead of becoming temporary fashion details.
Common Boro Mistakes on Denim, Jackets, and Workwear
Different garments require different repair strategies, yet many beginners use the same stitching approach for every textile project. Denim, jackets, workwear, canvas bags, and lightweight shirts all experience stress differently during movement. Understanding garment-specific wear patterns helps beginners place patches more strategically and avoid repairs that fail prematurely.
Denim usually develops friction damage around knees, thighs, pockets, and inseams because these areas bend constantly during walking and sitting. Jackets often weaken around elbows, cuffs, shoulders, and pocket corners where repeated movement creates tension buildup. Workwear garments may experience broader abrasion zones because of physical labor, tool friction, or heavy washing routines.
Common garment-specific mistakes include:
- overly rigid knee repairs
- weak elbow reinforcement
- patching directly on seam stress
- oversized patches on lightweight shirts
- insufficient support under pockets
- ignoring movement-heavy zones
Heavyweight fabrics usually tolerate denser stitching and stronger reinforcement, while lightweight garments require more flexible patch placement. Repairs that feel comfortable on denim may become stiff or distorted on softer cotton clothing.
Experienced boro artists often study how garments fold naturally before sewing. Areas that crease repeatedly usually need more flexible stitching patterns and layered support rather than rigid decorative patchwork. Real-world movement should always guide repair decisions.
Understanding garment behavior improves both durability and comfort. Strong repairs feel naturally connected to the garment’s movement instead of resisting it during daily wear
How Beginners Can Improve Their Boro Stitching Faster
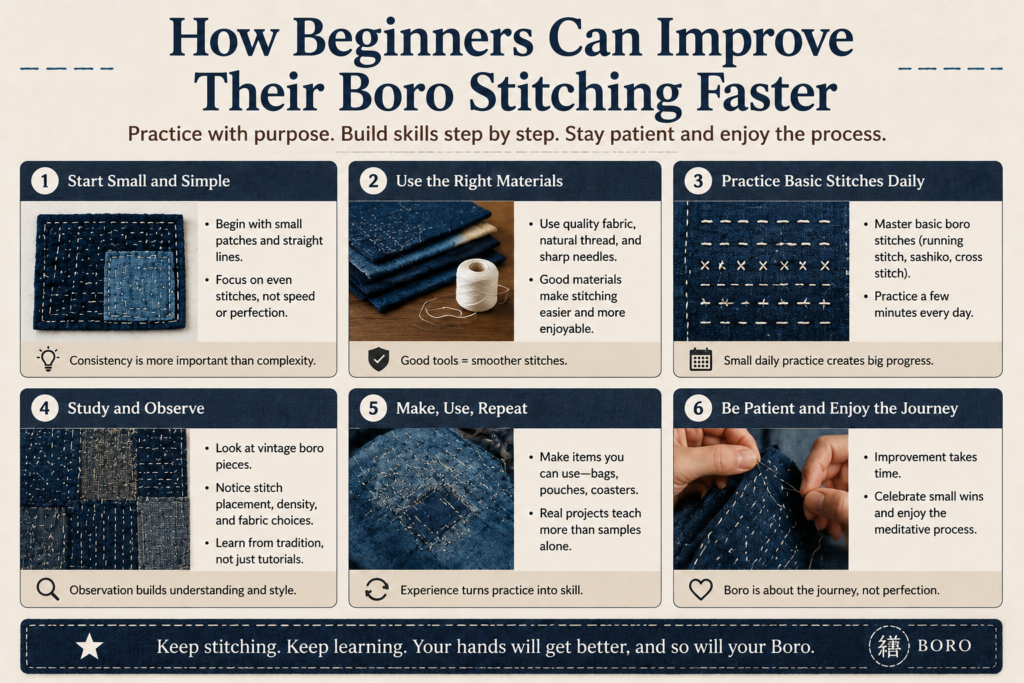
Improving boro stitching requires repetition, observation, and understanding how fabric behaves during real-world use. Beginners often expect immediate perfection, but authentic visible mending develops gradually through experience. Every repair teaches lessons about tension, durability, patch placement, and textile movement.
The fastest improvement usually comes from working on small practical repairs instead of large artistic projects. Repetition builds stitch rhythm naturally while helping beginners recognize common structural mistakes more quickly.
Useful beginner practice projects include:
- denim knee repairs
- tote bag reinforcement
- patching workwear
- reinforcing pockets
- repairing seams
- visible mending samplers
Studying vintage boro garments also helps beginners understand authentic repair logic. Historic textiles reveal how patches were layered strategically over time rather than arranged purely for decoration. Many traditional garments show uneven fading, varied stitching density, and repeated reinforcement around high-friction areas.
Washing repaired garments provides valuable learning experience as well. Some repairs may wrinkle, distort, or loosen after laundering. Observing these changes helps identify tension problems and reinforcement weaknesses that were not obvious during sewing.
Helpful improvement strategies include:
- practicing running stitches separately
- testing tension on scrap fabric
- studying fabric grain direction
- observing natural wear patterns
- using durable natural fibers first
- focusing on function before decoration
Patience is extremely important. Authentic boro reflects history, use, and gradual repair evolution. Slight irregularity is part of the craft’s identity. Perfect symmetry is not necessary for strong visible mending.
The best long-term approach is balancing structure with creativity. Durable repairs naturally become more visually compelling as the garment ages. Fading indigo, softened thread, layered texture, and repeated reinforcement eventually create the authentic character many beginners initially try to force artificially.
True boro craftsmanship comes from understanding textile longevity, visible repair logic, and practical handwork rather than simply copying decorative aesthetics.
Washing and Care Mistakes That Damage Boro Repairs
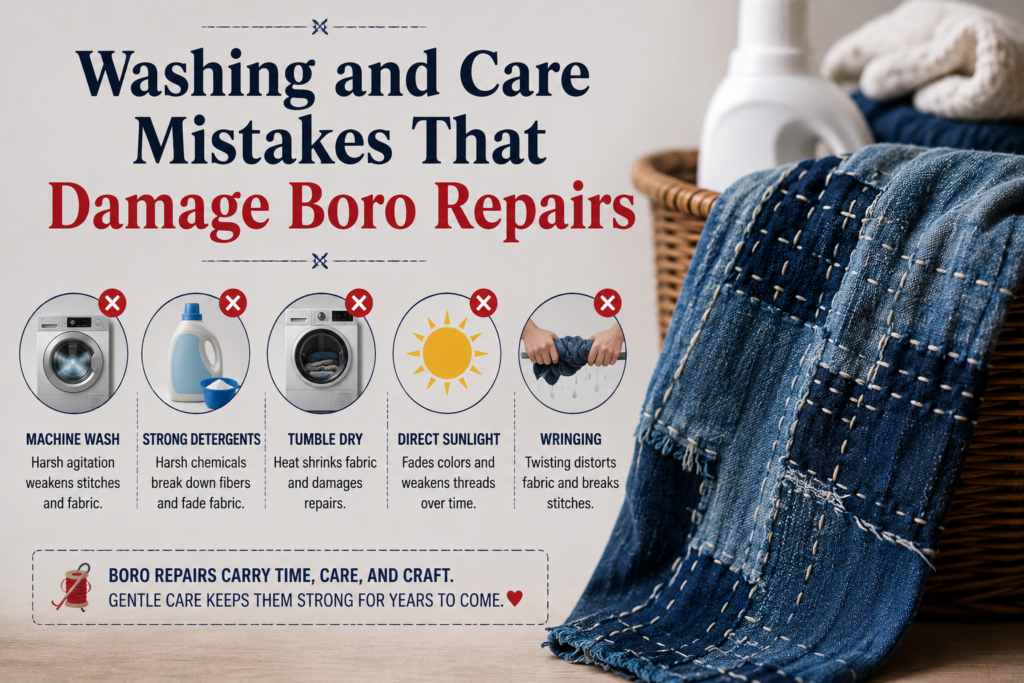
Proper washing and garment care significantly affect the lifespan of boro repairs, yet many beginners overlook this completely. Even well-stitched repairs can weaken quickly if garments are washed aggressively or exposed to excessive heat. Repaired textiles behave differently than untouched fabric because stitched areas contain multiple layers, varied thread tension, and mixed textile aging patterns. Care mistakes often reveal structural weaknesses that were not visible immediately after sewing.
Hot water and aggressive machine cycles place strong stress on repaired areas because fabric layers shrink and shift at different rates. High heat from dryers may also tighten stitches unevenly, distort patch edges, or accelerate thread wear. Delicate repairs, especially on older fabric, usually last longer when washed gently and dried naturally.
Good boro garment care usually includes:
- cold or cool water washing
- gentle wash cycles
- air drying
- avoiding excessive dryer heat
- inspecting repairs after laundering
- trimming loose thread early
Repeated washing also changes the appearance of repairs. Indigo fades gradually around stitch lines, thread softens, and layered patches begin blending visually into the garment. This aging process is one of the reasons authentic boro becomes more attractive over time.
Beginners should regularly inspect repaired areas after washing because small tension problems become easier to fix before major tearing develops. Strong long-term visible mending depends not only on stitching quality but also on how garments are maintained after repair.
Final Thoughts
Most beginner boro stitching mistakes happen because people prioritize appearance before understanding repair structure and textile durability. Authentic boro developed through necessity, where every patch and stitch served a practical function before becoming visually beautiful through years of wear.
Strong repairs rely on durable fabric, balanced tension, proper reinforcement, thoughtful patch placement, and patient craftsmanship. Beginners who focus on structural repair first usually improve faster and create more authentic visible mending over time.
The most important lesson is simple: boro is not about perfection. It is about preservation, visible history, sustainability, and handcrafted resilience.
FAQs
What is the most common beginner mistake in boro stitching?
The most common mistake is pulling stitches too tightly. Tight stitching causes puckering, weak tension points, and uncomfortable fabric stiffness over time.
Can beginners use regular sewing thread for boro stitching?
Yes, but stronger cotton or sashiko thread usually performs better for long-term durability. Cheap thin thread may break after repeated wear and washing.
Is boro stitching supposed to look messy?
Not exactly. Authentic boro looks organic and handmade, but good repairs still maintain structural balance, secure patches, and controlled stitching.
What fabric works best for beginner boro stitching?
Denim, cotton canvas, linen, and durable woven cotton work best because they handle repeated stitching and reinforcement effectively.
Why do my boro patches wrinkle after sewing?
Wrinkling usually happens because stitches are pulled too tight or fabric tension is uneven during stitching.
Is boro stitching difficult to learn?
No, basic boro stitching is beginner-friendly. Most improvement comes through repetition, fabric handling experience, and understanding repair structure.