What Is a Boro Jacket and Why Are People Making Them Today?
A boro jacket is a layered, hand-stitched garment inspired by traditional Japanese textile repair techniques where worn clothing was repeatedly patched and reinforced over generations. Modern makers create boro jackets not only for repair but also for artistic expression, sustainability, slow fashion, and visible craftsmanship. Unlike mass-produced distressed clothing, real boro jackets develop texture, character, and depth through intentional stitching and layered fabric history.
Traditional Japanese families originally practiced boro out of necessity because fabric was valuable and difficult to replace. Instead of throwing away damaged garments, they repaired them repeatedly using small fabric scraps and sashiko stitching. Over time, these repairs created beautifully layered surfaces full of texture, fading, and visible wear patterns. Today, fashion designers, denim collectors, visible mending enthusiasts, and textile artists all use boro techniques to create jackets that feel personal and unique rather than factory-made.
Modern boro jackets often combine vintage workwear aesthetics with practical reinforcement. The process is slow, detailed, and deeply connected to handmade craftsmanship.
Key characteristics of boro jackets include:
- Visible sashiko stitching
- Layered fabric patches
- Indigo-dyed textiles
- Repaired wear zones
- Raw textured surfaces
- Handmade irregularity
- Slow-fashion philosophy
- Functional reinforcement
Many people are drawn to boro because every jacket becomes impossible to duplicate exactly. Each repair, stitch line, faded patch, and fabric layer contributes to a wearable piece of textil
How Authentic Japanese Boro Jackets Were Traditionally Made
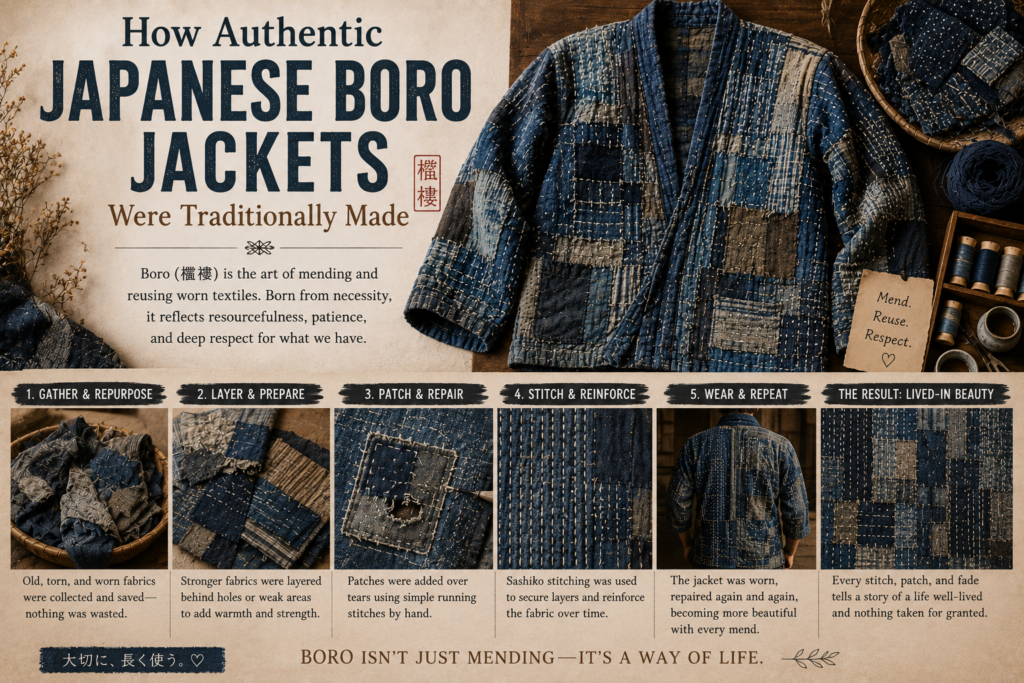
Authentic Japanese boro clothing originally developed from necessity rather than fashion. Rural families in northern Japan often faced fabric shortages, harsh winters, and limited access to new textiles, so garments were repeatedly repaired instead of replaced. Clothing passed through generations slowly accumulated layered patches, visible reinforcement stitching, and fabric repairs that eventually created the textured appearance now associated with traditional boro.
Most original boro garments were made using indigo-dyed cotton because indigo was durable, relatively affordable, and naturally resistant to bacteria and insects. Families reused worn workwear, old futons, damaged garments, and leftover fabric scraps to strengthen weak clothing areas over time. Instead of throwing damaged garments away, new fabric layers were hand stitched directly onto existing fabric surfaces using sashiko reinforcement stitching.
Traditional Japanese boro jackets often contained:
- Multiple generations of repairs
- Hand-spun cotton fabrics
- Uneven indigo fading
- Layered reinforcement patches
- Dense visible sashiko stitching
- Functional workwear construction
Unlike modern decorative fashion versions, authentic japanese boro stitching evolved slowly through everyday labor, farming, fishing, and outdoor work. This gradual evolution created organic layering and irregular stitching patterns that are difficult to imitate artificially.
Understanding these historical repair methods helps modern makers create jackets that feel more believable, balanced, and connected to traditional Japanese textile culture rather than simply distressed for decoration.
What Materials Work Best for Making a Boro Jacket?
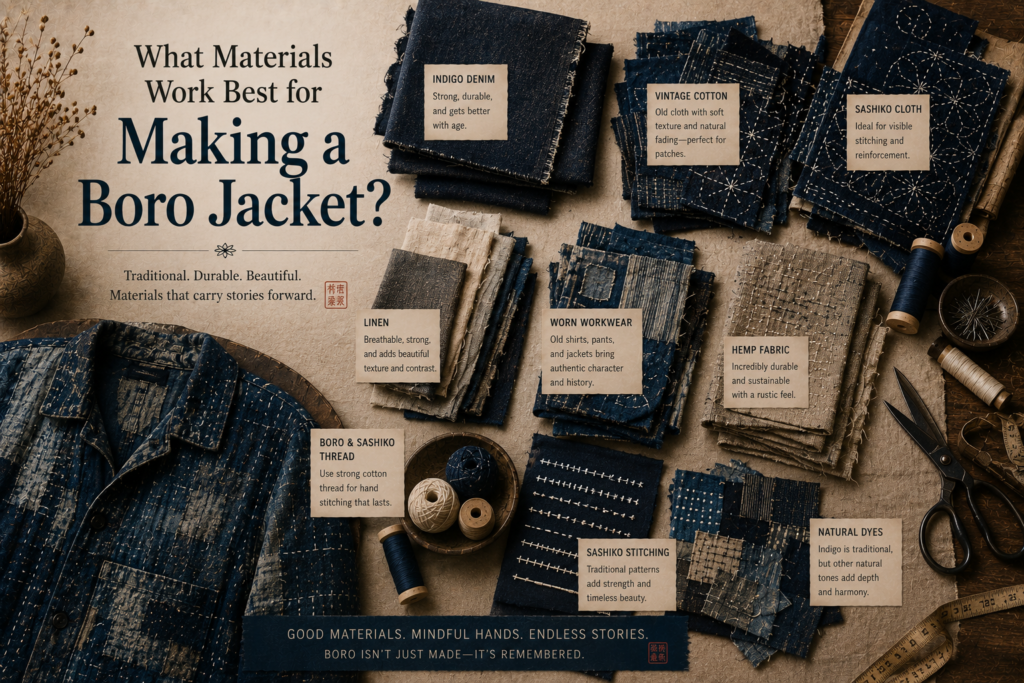
Choosing the right materials is one of the most important parts of making a successful boro jacket. Traditional boro relied heavily on natural fibers because cotton, linen, and hemp aged gracefully while surviving repeated stitching and repairs. Modern makers still prefer these materials because they soften beautifully over time and develop attractive fading around stitched areas.
Denim remains the most popular fabric choice for modern boro jackets because it combines durability with strong visual texture. Indigo denim also ages naturally, allowing the repairs to blend into the garment over years of wear. However, canvas workwear jackets, military surplus garments, chore coats, and heavy cotton overshirts can also work extremely well as boro foundations.
Patch selection matters just as much as the base jacket itself. Mixing fabrics with slightly different shades and textures creates depth without making the jacket look chaotic. Vintage fabrics often produce the best results because natural wear already exists in the textile surface.
Recommended materials include:
- Indigo denim scraps
- Heavy cotton canvas
- Linen fabric pieces
- Vintage work shirts
- Old chore coats
- Sashiko thread
- Cotton embroidery thread
- Fabric scissors
- Hand sewing needles
- Safety pins or clips
Avoid materials that weaken the jacket structure or create awkward stiffness.
Fabrics to avoid include:
- Stretch fabrics
- Thin polyester
- Slippery nylon
- Extremely fragile silk
- Very thick leather
- Cheap synthetic blends
Natural materials not only look better over time but also create more authentic fading, texture variation, and softness after repeated wear and washing.
Which Jacket Base Is Best for a Beginner Boro Project?
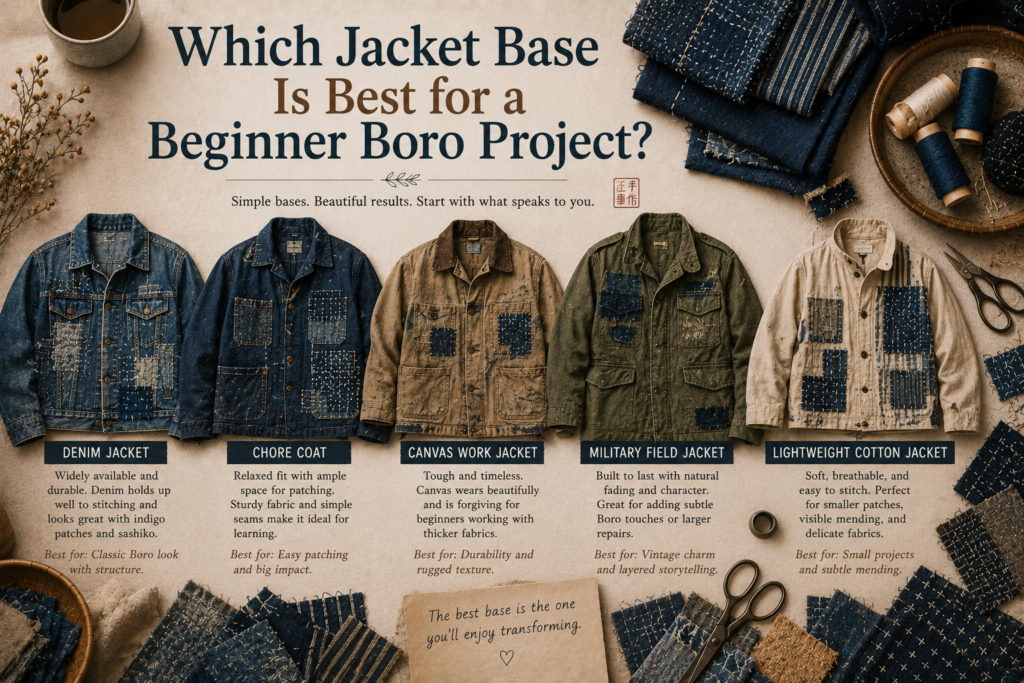
The jacket base controls the entire structure, comfort, and durability of the finished garment. Beginners should always start with sturdy workwear-style jackets because they are easier to stitch through and naturally match the traditional boro aesthetic. Thin fashion jackets often wrinkle or distort under layered stitching, while overly thick garments can become difficult to sew comfortably by hand.
Denim jackets are usually the easiest starting point because denim handles repeated stitching extremely well. Faded denim also blends naturally with indigo patchwork, helping the finished jacket look cohesive rather than artificially decorated. Chore coats are another excellent option because their larger flat surfaces allow patches and stitching to stand out clearly.
Many successful boro jackets begin with slightly worn clothing instead of brand-new garments. Softened fabric accepts stitching more naturally and already contains subtle fading patterns that improve the layered appearance.
Good beginner jacket options include:
- Vintage denim jackets
- Japanese work jackets
- Cotton chore coats
- Military surplus jackets
- Carpenter jackets
- Canvas utility jackets
When selecting a jacket, look carefully at:
- Fabric thickness
- Existing wear zones
- Pocket placement
- Collar structure
- Sleeve flexibility
- Overall comfort
Avoid jackets with excessive stretch because the stitching may pull unevenly during wear. Lightweight fashion jackets can also become distorted after adding multiple patch layers.
A successful boro jacket should still feel wearable after construction. Many beginners accidentally create jackets that become too heavy or stiff because they add excessive patch layers without considering movement and comfort.
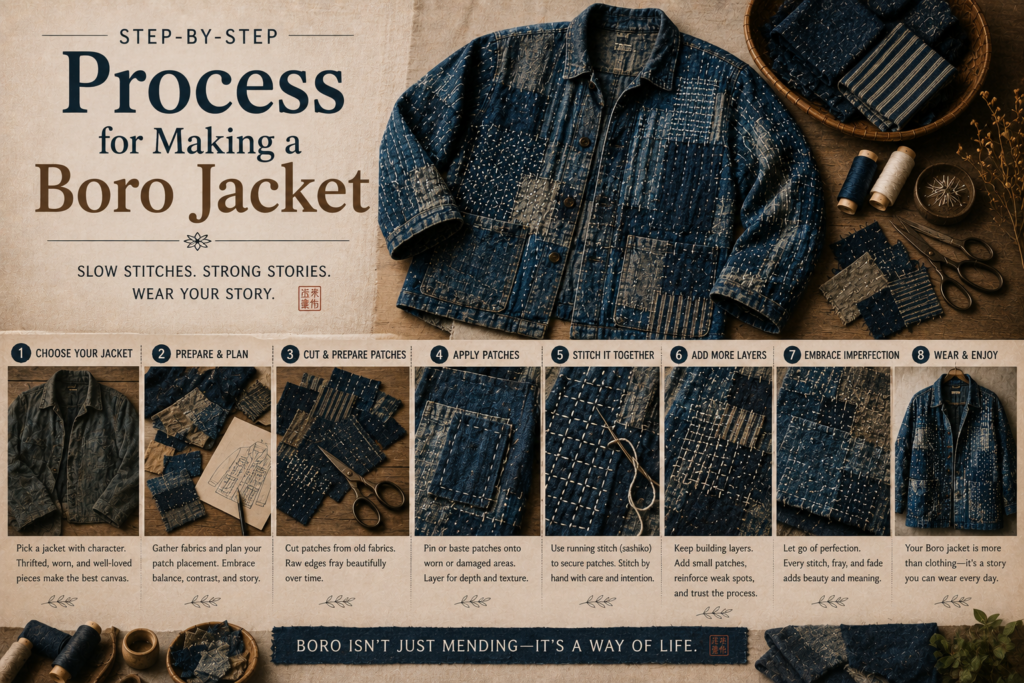
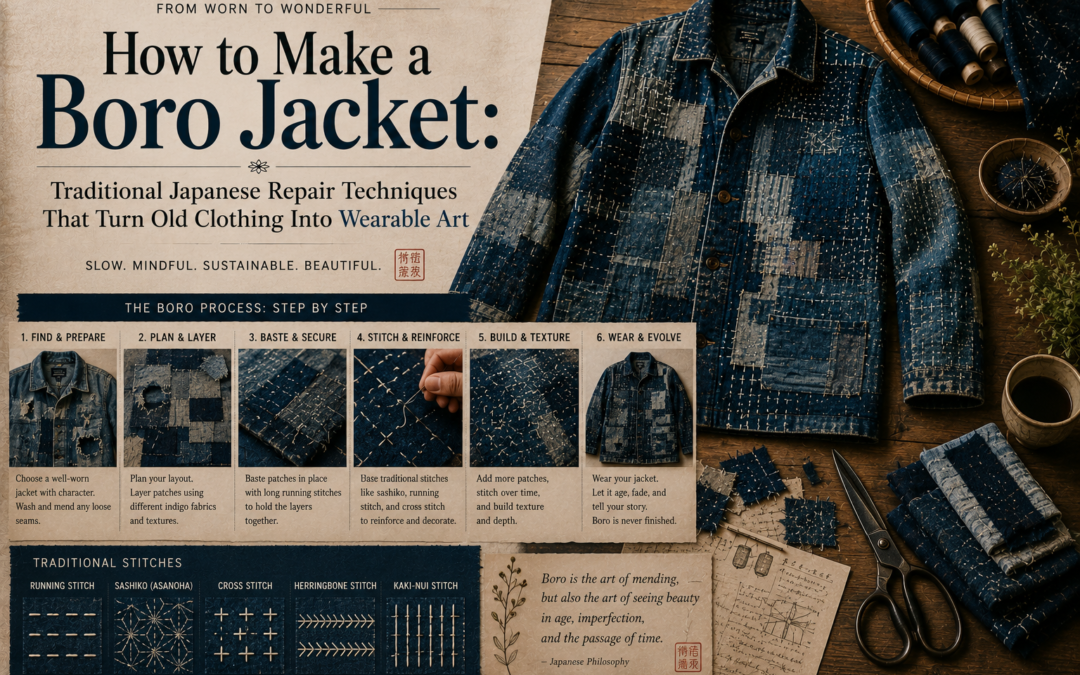
Step-by-Step Process for Making a Boro Jacket
Making a boro jacket becomes much easier when the project is approached in stages instead of randomly adding patches and stitching. Traditional-looking results usually come from gradual layering and thoughtful repair progression rather than trying to finish the entire garment in one sitting. A structured workflow also helps beginners avoid stiffness, uneven balance, and overcrowded fabric sections that can make the jacket uncomfortable to wear.
Most experienced makers begin by studying the jacket carefully before sewing anything. Looking at natural wear zones helps determine where reinforcement should appear first. Elbows, cuffs, pocket edges, and shoulders usually become the foundation areas because these sections experience the most movement and friction during everyday wear. Once the major repair zones are identified, patch colors and fabric weights can be balanced more naturally across the jacket.
A reliable beginner workflow includes:
- Choose a durable jacket base
- Collect matching fabric scraps
- Test patch color combinations
- Pin patches temporarily
- Begin center reinforcement stitching
- Secure patch edges gradually
- Add secondary sashiko details
- Check flexibility continuously
- Reinforce weak areas again
- Wear and evolve the jacket over time
Many beginners discover that slowing down improves the final appearance dramatically. Boro jackets often look more authentic when repairs develop gradually instead of appearing perfectly planned from the beginning.
How Do You Plan the Patch Layout on a Boro Jacket?
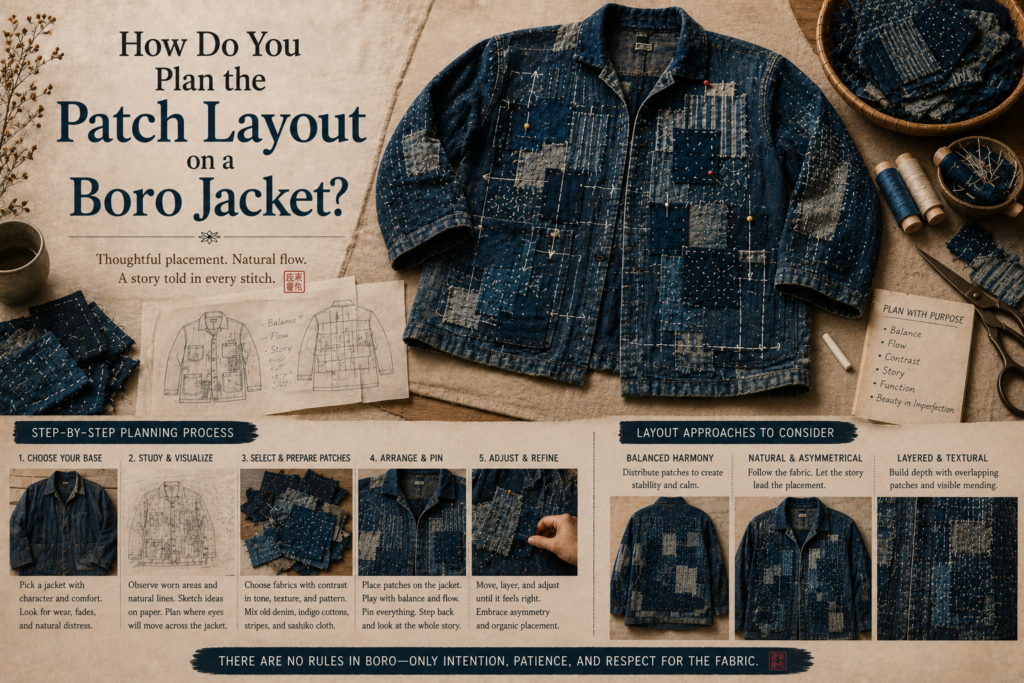
Patch placement is one of the biggest differences between authentic-looking boro and random decorative patchwork. Traditional boro repairs followed practical wear patterns because garments were repaired wherever damage appeared naturally. This created visual balance without trying to force perfect symmetry.
The best approach is to begin with high-stress areas first. Elbows, cuffs, shoulders, pocket corners, hems, and back panels usually receive the most friction during wear. Reinforcing these areas creates a more believable and functional jacket design.
Good patch planning also considers how fabric colors interact together. Indigo fabrics with slightly different fading levels create layered depth without overwhelming the garment visually. Instead of placing extremely large patches everywhere, smaller overlapping repairs often create a more realistic aged appearance.
Useful patch placement areas include:
- Elbows
- Shoulder tops
- Pocket edges
- Lower hem
- Sleeve cuffs
- Collar corners
- Upper back panel
A strong boro layout usually includes:
- Mixed patch sizes
- Organic layering
- Visible wear simulation
- Balanced spacing
- Functional reinforcement
- Irregular patch edges
Beginners often make the mistake of overcrowding one side of the jacket or using patches that are too symmetrical. Realistic boro surfaces usually evolve gradually and contain subtle irregularity.
Another important factor is weight distribution. Too many dense patches in one section can make the jacket uncomfortable or stiff. Experienced makers often spread reinforcement gradually across the garment so the fabric still moves naturally during wear.
The goal is not perfect decoration. The goal is creating a repaired surface that feels believable, durable, and visually layered over time.
How Do You Make a Boro Jacket Look Visually Balanced?
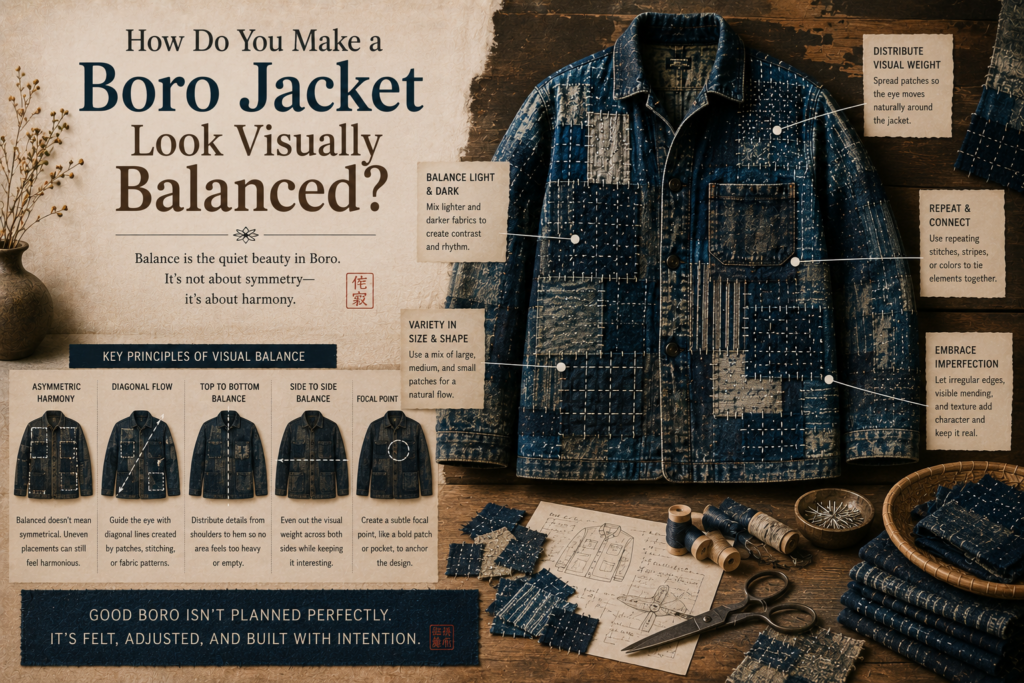
One of the biggest differences between beautiful boro jackets and visually chaotic patchwork is balance. Traditional-looking boro does not rely on perfect symmetry, but it still maintains controlled visual rhythm across the garment. Too many dense patches in one area can overwhelm the jacket and make the design feel forced instead of naturally repaired.
Experienced makers often spread repairs gradually across the garment rather than concentrating everything in one location. Large heavily stitched sections are usually balanced by quieter fabric areas with fewer repairs. This contrast helps the layered textures stand out without making the jacket visually exhausting.
Important balance principles include:
- Vary patch sizes
- Leave negative space
- Repeat indigo tones naturally
- Avoid identical patch shapes
- Balance texture density
- Spread heavy repairs evenly
Color rhythm is also important. Using fabrics with slightly different indigo shades creates depth while still maintaining cohesion. Extremely bright fabrics or random colors can break the traditional workwear aesthetic and make the garment look artificial.
Another useful strategy is creating subtle focal areas. Elbows, shoulders, and upper back panels naturally attract attention, so slightly denser stitching in these sections often improves the overall visual structure without overwhelming the entire jacket.
The best boro jackets feel layered and organic rather than aggressively designed.
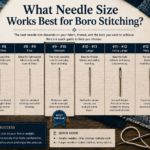
What Stitching Techniques Are Used in Boro Jackets?
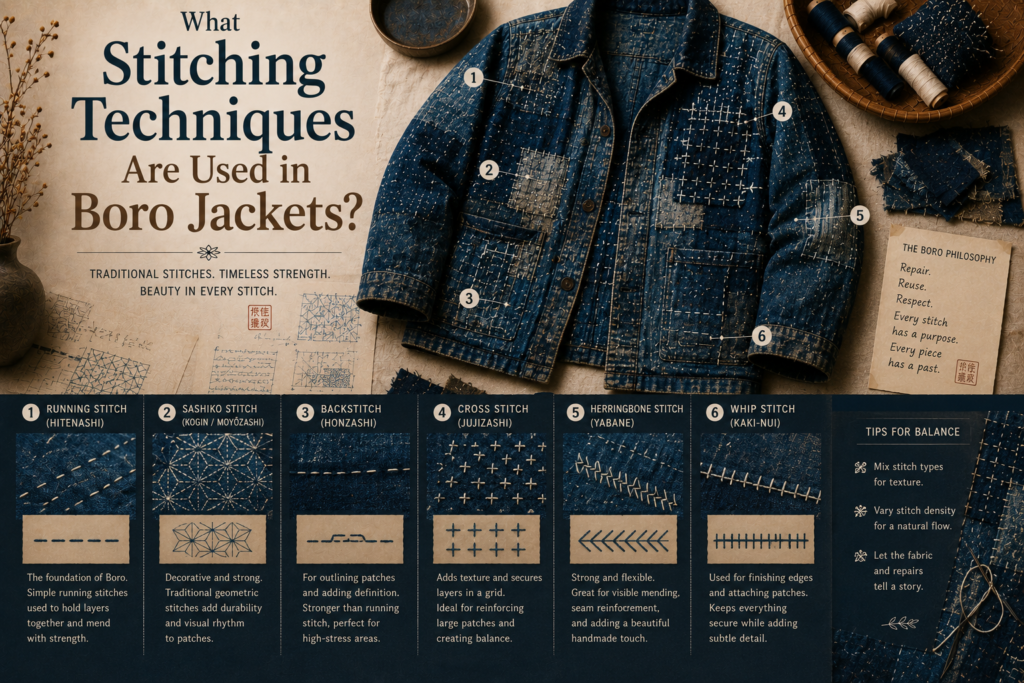
Sashiko stitching is the most important sewing technique used in traditional and modern boro jackets. These visible hand stitches secure layered fabric while also creating geometric texture across the garment surface. Unlike decorative embroidery, sashiko was originally designed for reinforcement and durability.
The basic running stitch forms the foundation of most boro jackets because it distributes tension evenly while allowing the fabric to remain flexible. Dense decorative stitching patterns can also be added later once the structural repairs are complete.
Common boro stitching styles include:
- Running stitch
- Parallel sashiko
- Hitomezashi stitching
- Asanoha patterns
- Kikko patterns
- Reinforcement edge stitching
Good sashiko stitching should:
- Hold layers securely
- Remain slightly flexible
- Avoid excessive tightness
- Reinforce weak fabric
- Create visible texture
- Follow natural fabric movement
One of the most common beginner mistakes is pulling the thread too tightly. Tight stitches cause puckering, stiffness, and distortion, especially around sleeves and seams. Traditional boro stitching usually contains slight irregularity because it was sewn by hand over long periods of use.
Thread choice also affects the final appearance. Thick white sashiko thread creates high contrast against indigo fabric, while faded blue or gray thread produces a softer aged appearance.
Beginners should practice stitching on scrap fabric before working directly on the jacket. Consistent spacing improves durability, but slight variations help preserve the handmade character that makes boro visually appealing.
Machine stitching can technically be used, but hand stitching almost always creates a richer and more authentic texture. Hand-sewn repairs develop natural rhythm and uneven detail that machines rarely replicate convincingly.
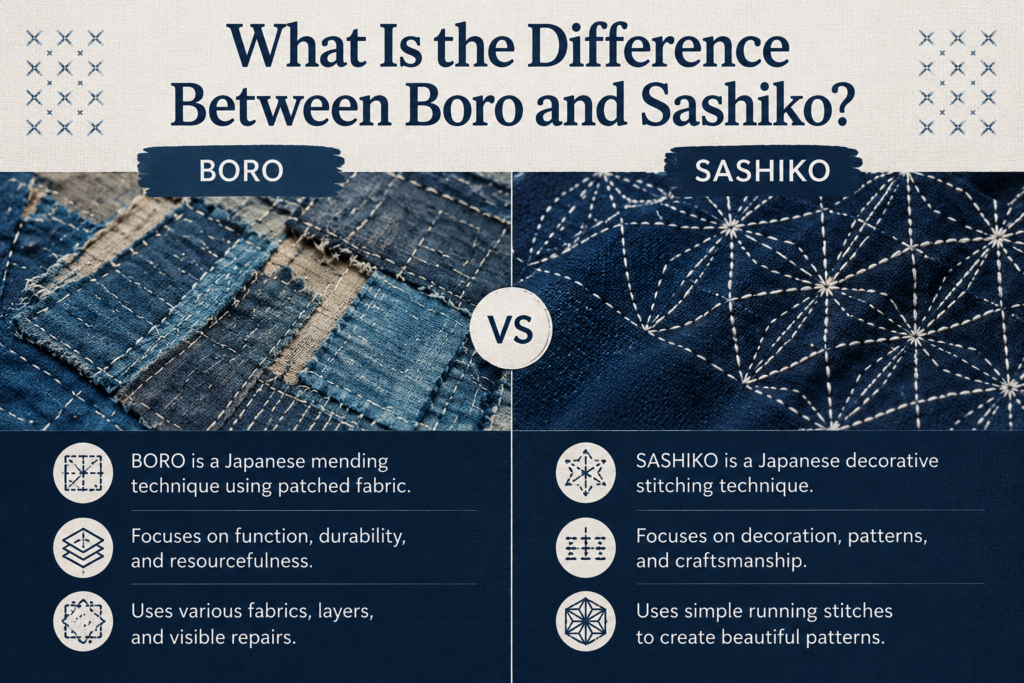
What Is the Difference Between Boro and Sashiko?
Many beginners confuse boro and sashiko because the two techniques are closely connected, but they are not actually the same thing. Boro refers to the overall philosophy and appearance of layered textile repair, while sashiko is the stitching method commonly used to reinforce and secure those repairs.
Traditional Japanese boro garments evolved through repeated patching and fabric reuse over many years. Sashiko stitching was then used to strengthen the layers and prevent further tearing. In simple terms, boro describes the repaired garment itself, while sashiko describes the sewing technique applied to the fabric.
The relationship can be understood more clearly here:
| Boro | Sashiko |
| Repair philosophy | Stitching technique |
| Layered patchwork | Reinforcement stitching |
| Garment evolution | Sewing method |
| Fabric reuse | Decorative structure |
| Visible textile aging | Thread pattern system |
Modern fashion often mixes the terms together, but understanding the distinction helps makers create more authentic projects. A jacket may contain sashiko stitching without becoming true boro if the garment lacks layered repair structure and visible textile evolution.
Many traditional boro jackets contain simple running stitches rather than highly decorative geometric sashiko patterns. Function usually came before decoration in authentic rural Japanese repair work.
Can You Use a Sewing Machine for a Boro Jacket?
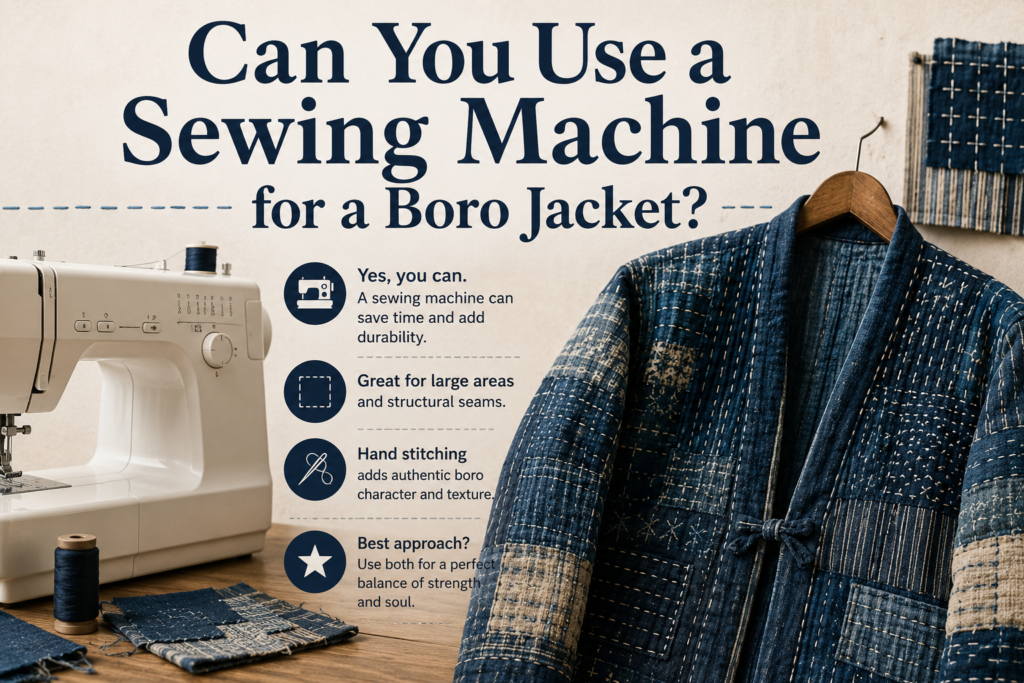
A sewing machine can technically be used for boro jackets, but hand stitching usually creates a more authentic texture, softer fabric movement, and stronger visible repair character. Traditional Japanese boro garments were entirely hand sewn, which naturally produced slight irregularities and layered stitching rhythms that machines rarely replicate convincingly.
Machine stitching works well for structural reinforcement and quickly attaching large patches, especially on heavy denim or thick canvas jackets. Some modern makers use a hybrid method where machine stitching secures the base layers while visible sashiko stitching is added by hand afterward. This approach can save time while still preserving much of the handmade appearance.
Hand stitching advantages include:
- Better visual texture
- More authentic appearance
- Flexible fabric movement
- Easier patch control
- Organic stitch variation
Machine stitching advantages include:
- Faster construction
- Strong structural seams
- Easier thick fabric reinforcement
- More consistent stitching speed
Many beginners discover that fully machine-sewn jackets sometimes look too clean and uniform. Traditional boro aesthetics rely heavily on visible human craftsmanship and slight irregularity. Even imperfect hand stitching often creates more emotional depth than perfectly straight machine lines.
For beginners, combining both methods can be a practical compromise. Machine stitching may handle heavy reinforcement areas, while hand-sewn sashiko adds the layered visible repair texture that defines authentic-looking boro jackets.
Best Thread Colors for Different Boro Jacket Styles
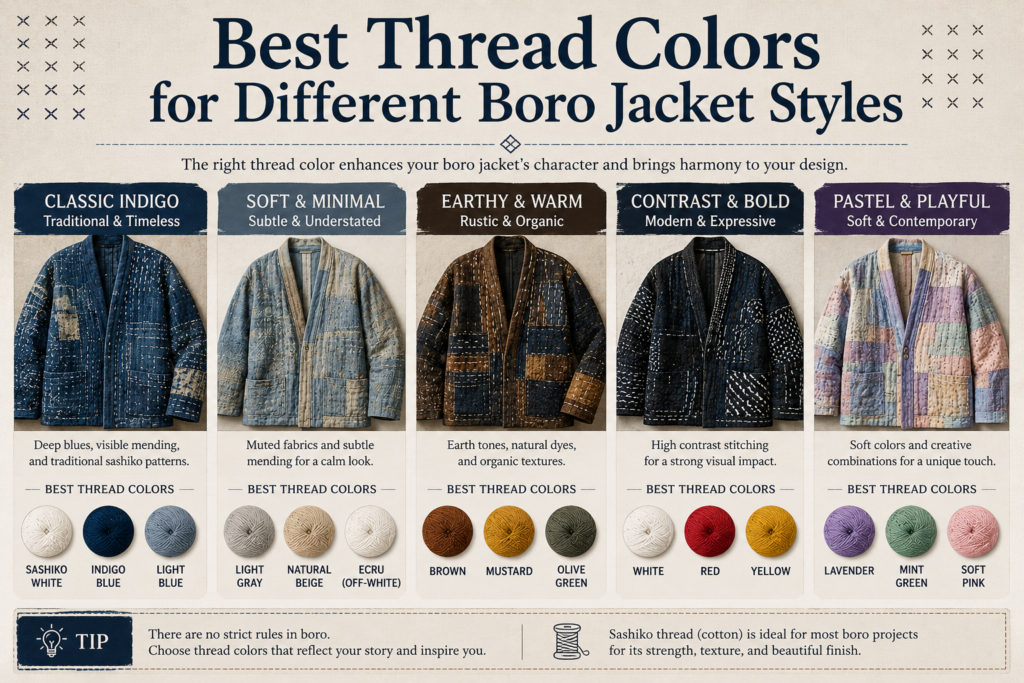
Thread color changes the entire visual personality of a boro jacket. Traditional Japanese repairs often used white sashiko thread because the contrast against indigo fabric made reinforcement stitches highly visible. Modern makers now experiment with softer thread tones to create different aging effects and visual moods.
Bright white thread creates bold contrast and highlights every stitch pattern clearly. Indigo thread blends more naturally into the fabric and produces a quieter aged appearance over time. Gray thread often creates a vintage weathered look, while beige and cream tones can add warmth to faded denim and canvas jackets.
Popular thread color effects include:
| Thread Color | Visual Effect |
| White | Traditional high contrast |
| Indigo | Soft blended appearance |
| Gray | Vintage aged texture |
| Beige | Warm rustic look |
| Black | Modern dramatic contrast |
Thread thickness also matters. Thick sashiko thread creates stronger visual texture, while thinner embroidery thread produces more subtle surface detail. Many makers combine different thread shades throughout the jacket to create layered repair history instead of a perfectly uniform appearance.
The best thread choice usually depends on:
- Fabric color
- Desired contrast
- Vintage appearance
- Repair visibility
- Overall jacket mood
Slight thread fading after repeated washing often improves the authenticity of the finished garment by softening the contrast naturally over time.
How Do You Attach and Layer Boro Patches Properly?
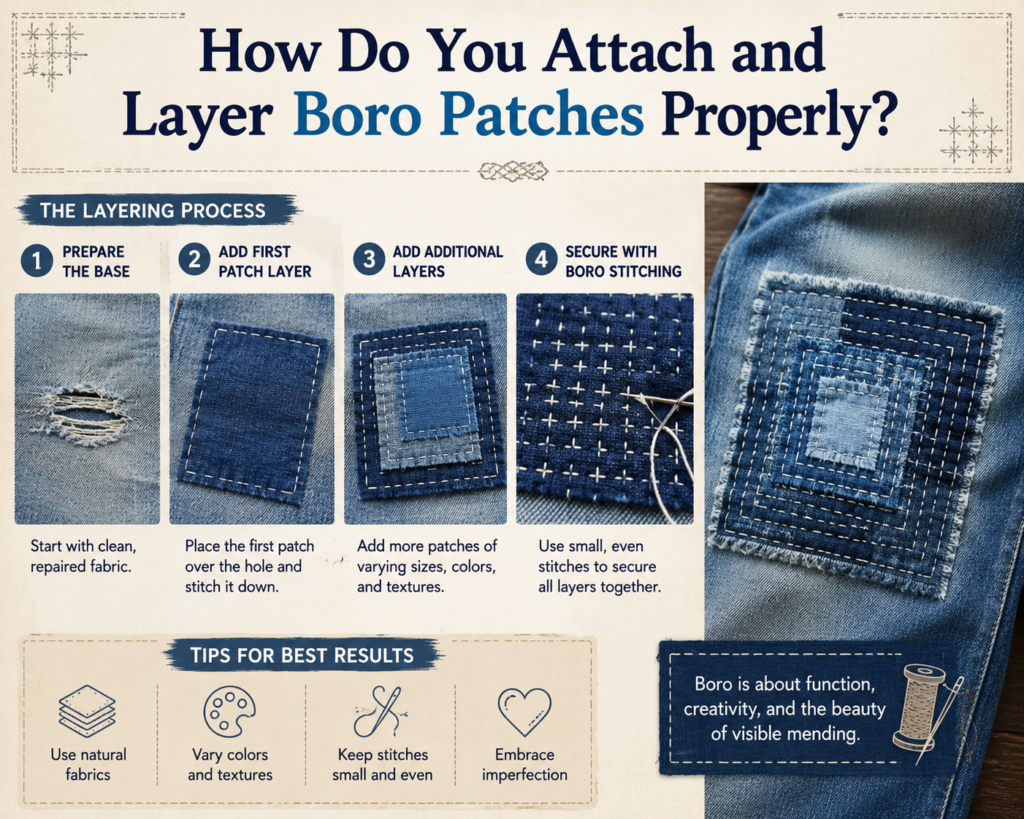
Attaching patches correctly is essential because poorly secured fabric eventually lifts, frays excessively, or distorts the jacket structure. Traditional boro repairs were built to survive long-term daily use, so every patch needed strong reinforcement rather than temporary decoration.
Most makers begin by placing the patch over a damaged or selected area and temporarily securing it with clips, pins, or loose basting stitches. This helps maintain alignment while the permanent sashiko stitching is added. Starting from the center of the patch and gradually working outward usually prevents bunching and uneven tension.
The edges of the patch can either remain raw or be folded slightly inward depending on the desired appearance. Raw edges create stronger visual texture and gradual fraying, while folded edges create a cleaner and more controlled finish.
A reliable patching process includes:
- Position the fabric patch
- Pin or baste the patch temporarily
- Begin center reinforcement stitching
- Secure outer edges
- Add secondary reinforcement lines
- Test flexibility while sewing
Strong boro layering also depends on fabric compatibility. Extremely thick fabric stacked onto thin lightweight cotton may create stiffness or awkward draping. Similar fabric weights usually produce more comfortable and natural-looking results.
Important patching principles include:
- Reinforce stress points
- Avoid excessive thickness
- Maintain fabric flexibility
- Allow gradual aging
- Balance visual texture
- Keep stitching functional
Layering multiple patches partially on top of one another often creates the richest texture. Authentic boro garments rarely look flat because repairs accumulated gradually over time.
As the jacket ages, some edges may fray or soften naturally. This evolving surface texture is part of what gives boro garments their unique visual depth and handmade personality.
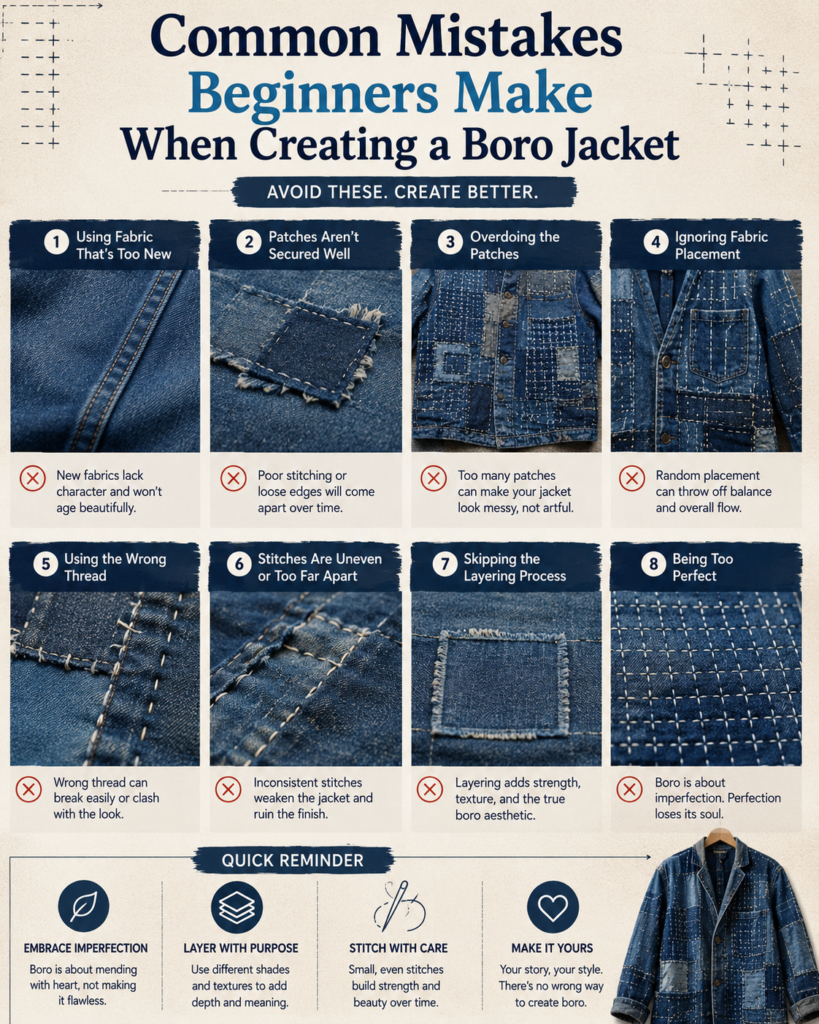
Common Mistakes Beginners Make When Creating a Boro Jacket
Many beginner boro jackets fail not because of poor sewing skill but because of balance problems, fabric incompatibility, and over-designed patch placement. Traditional-looking boro relies on controlled imperfection and believable repair logic, while beginners often unintentionally create jackets that feel overly decorative or visually chaotic.
One of the most common mistakes is using too many patches too quickly. Overcrowding the jacket removes negative space and makes the garment appear stiff and overworked. Realistic boro usually contains quieter fabric areas between heavily repaired sections. Another major problem is combining extremely different fabric weights. Thick canvas stitched onto thin cotton can distort movement and create uncomfortable stiffness during wear.
Frequent beginner mistakes include:
- Over-tight stitching
- Excessive patch layering
- Symmetrical patch placement
- Using bright synthetic fabrics
- Ignoring jacket flexibility
- Weak edge reinforcement
- Decorative stitching without structure
- Fake artificial distressing
- Poor thread quality
Many beginners also pull sashiko thread too tightly, causing puckering around sleeves and seams. Good boro stitching should reinforce the fabric while still allowing natural movement and drape. Slight irregularity is normal and often improves authenticity.
The best approach is gradual construction. Slower layering, lighter reinforcement, and careful fabric selection usually produce jackets that look more natural and remain comfortable over years of wear.
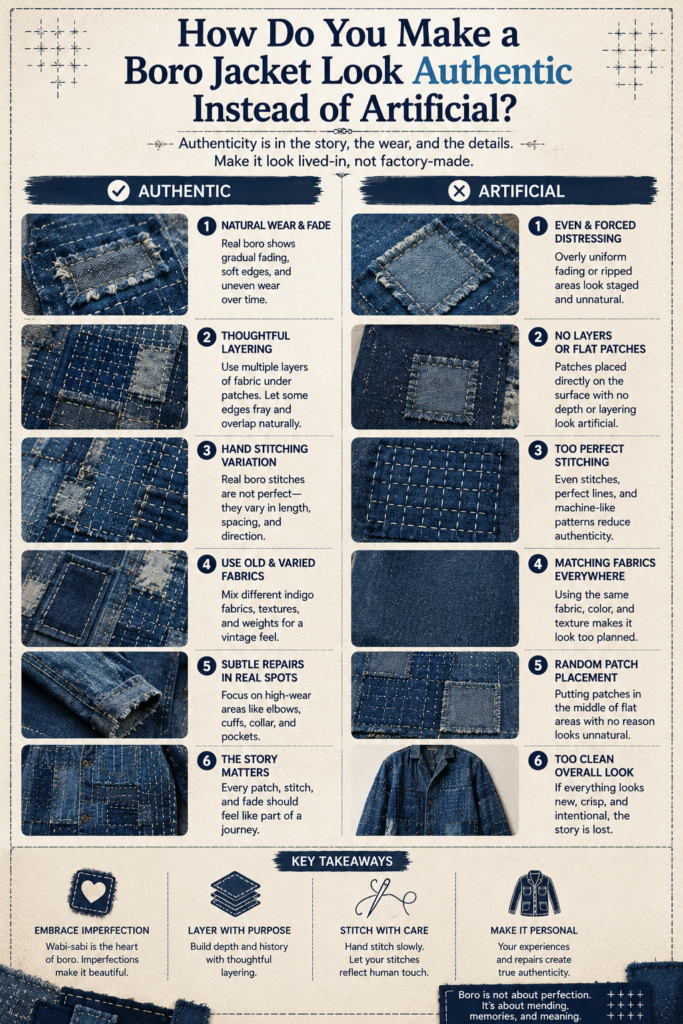
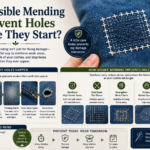
How Do You Make a Boro Jacket Look Authentic Instead of Artificial?
One of the hardest parts of creating a boro jacket is avoiding an overly staged or fashion-commercial appearance. Authentic-looking boro develops from believable repair logic, balanced wear patterns, and gradual textile layering rather than perfectly planned decoration.
Traditional boro garments evolved through necessity, so repairs followed damaged areas naturally. Modern makers often improve realism by imagining how the jacket would wear over years of use. Elbows, cuffs, shoulders, and pocket edges usually receive the most friction and therefore become natural repair locations.
Color balance also matters heavily. Too many bright fabrics or high-contrast decorative patches can make the jacket feel artificial. Indigo variations, faded blue tones, worn cotton textures, and slightly uneven stitching generally create a more believable result.
To improve authenticity:
- Use aged fabrics
- Mix faded indigo tones
- Allow slight irregularity
- Follow natural wear zones
- Avoid excessive symmetry
- Use visible reinforcement
- Let repairs overlap gradually
Many fashion-inspired boro jackets fail because they prioritize decoration over structure. Realistic jackets usually contain practical reinforcement that genuinely strengthens weak areas.
Another important detail is stitch density. Extremely dense stitching across the entire jacket can make the garment feel stiff and visually overworked. Traditional boro often contains variation between heavily repaired zones and quieter fabric areas.
The most convincing boro jackets feel lived-in rather than manufactured. They should appear as though the garment evolved slowly over time through repeated repair, use, fading, and maintenance.
This layered storytelling quality is what separates meaningful handmade boro from fast-fashion imitation.
How Do You Care for and Maintain a Boro Jacket Over Time?
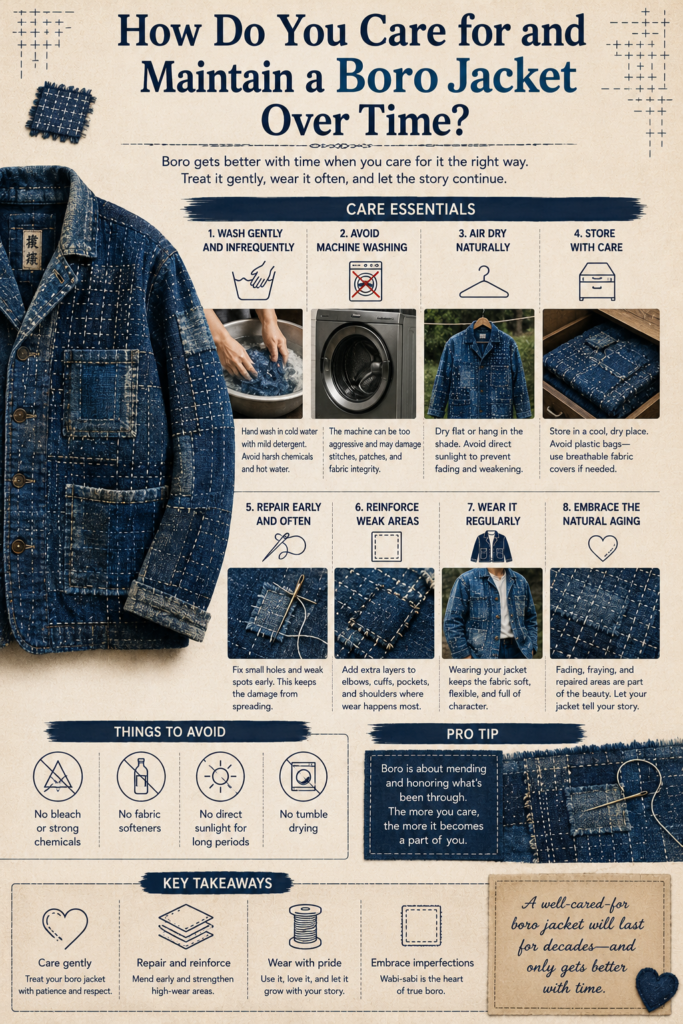
A boro jacket continues evolving long after the original stitching is finished. Proper care helps preserve the layered texture, visible stitching, and indigo fading while allowing the garment to age naturally over time. Unlike fast-fashion clothing, boro jackets are designed to become more interesting as repairs accumulate and fabrics soften.
Gentle washing is extremely important because aggressive machine cycles can stress stitched areas and weaken delicate patch edges. Many experienced textile collectors prefer washing boro garments only when truly necessary in order to preserve texture and color variation.
Recommended care practices include:
- Wash with cold water
- Use mild detergent
- Air dry naturally
- Avoid high heat dryers
- Repair loose stitching early
- Reinforce worn patches gradually
- Store in dry environments
One of the most beautiful aspects of boro is that maintenance becomes part of the artistic process. New repairs can be added years later as the jacket develops additional wear patterns. Over time, these layers create increasingly rich textile surfaces that reflect long-term use and craftsmanship.
Good maintenance also includes:
- Checking sleeve stress points
- Reinforcing pocket corners
- Trimming damaged threads carefully
- Monitoring fabric thinning
- Preserving flexibility
Some fraying is completely normal and even desirable because it contributes to the organic visual depth associated with authentic boro textiles. However, excessively damaged sections should be reinforced before holes expand too aggressively.
A properly maintained boro jacket can last for many years because the repair philosophy itself encourages continuous restoration rather than replacement. The jacket slowly becomes more personalized with every additional stitch and patch added throughout its lifespan.
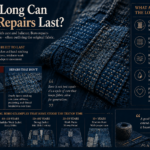
How Long Does a Boro Jacket Last?
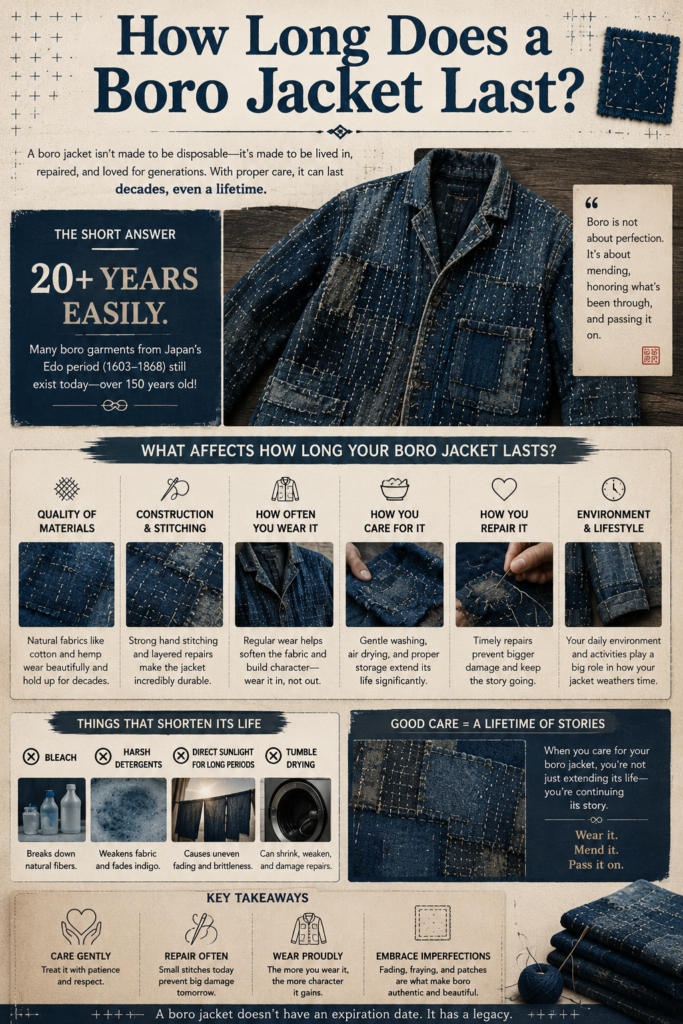
A well-made boro jacket can last for many years because the entire philosophy behind boro focuses on continuous repair and reinforcement rather than replacement. Unlike ordinary fast-fashion garments that weaken after damage appears, boro jackets often become structurally stronger over time as additional layers and stitching are added to stressed areas.
Durability depends heavily on fabric quality, stitch density, patch attachment strength, and how the jacket is maintained. Thick cotton workwear and denim jackets usually survive repeated repairs extremely well because the base fabric can handle multiple stitch layers without tearing excessively.
Several factors affect longevity:
- Fabric thickness
- Patch quality
- Stitch reinforcement
- Washing frequency
- Daily wear conditions
- Moisture exposure
- Repair maintenance
Decorative fashion-inspired boro jackets sometimes wear out faster because the stitching may prioritize appearance over actual reinforcement. Traditional-style boro construction usually lasts longer because the repairs are designed to strengthen damaged fabric instead of simply decorating it.
Many experienced makers continue repairing the same jacket for years. New stitching, fresh patches, and additional reinforcement gradually become part of the garment’s evolving texture and history. Over time, the jacket develops deeper fading, softer fabric movement, and increasingly layered visual complexity.
A properly maintained boro jacket does not stay static. It evolves continuously through wear, repair, washing, and repeated textile aging.
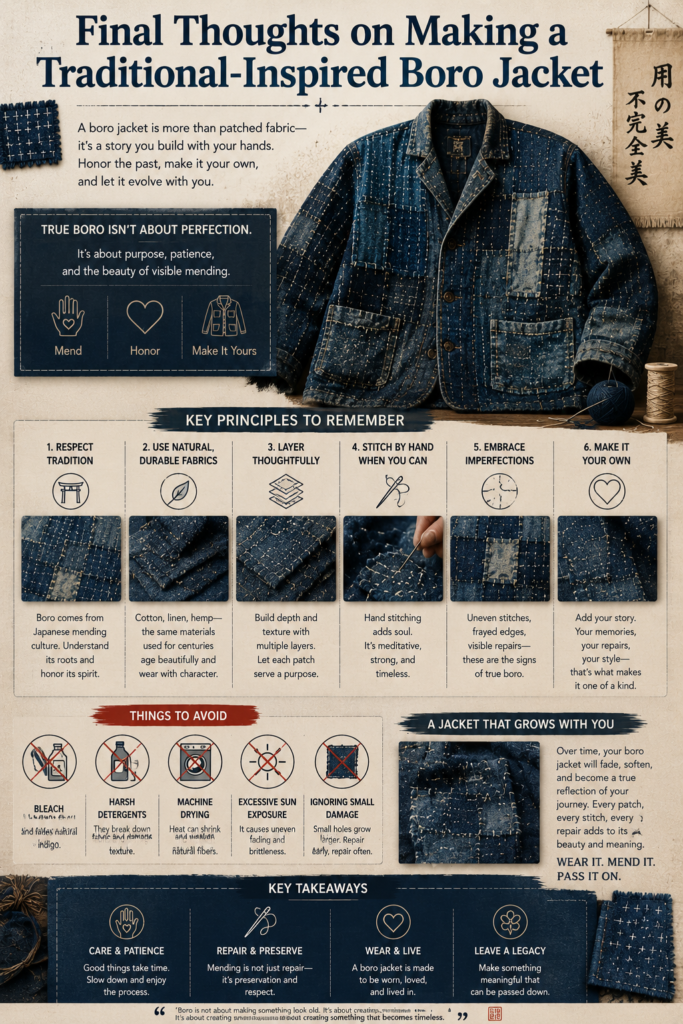
Final Thoughts on Making a Traditional-Inspired Boro Jacket
Making a boro jacket is more than simply sewing patches onto old clothing. The process combines repair, storytelling, craftsmanship, sustainability, and textile history into a wearable garment that evolves over time. Every visible stitch and faded fabric layer contributes to a jacket that becomes increasingly personal rather than disposable.
Unlike mass-produced distressed fashion, handmade boro jackets contain real physical labor and intentional reinforcement. The beauty comes from visible repair, not artificial perfection. Slight irregularity, uneven fading, layered textures, and gradual aging all help create the emotional depth associated with traditional Japanese textile repair.
A successful boro jacket balances:
- Durability
- Comfort
- Texture
- Reinforcement
- Flexibility
- Visual rhythm
- Authentic wear patterns
Beginners do not need perfect sewing skills to begin making boro clothing. Starting with simple running stitches and carefully placed patches is often enough to create meaningful results. As stitching confidence improves, more complex sashiko patterns and layered repairs can gradually be added.
The most important mindset is patience. Traditional boro was never rushed. Garments evolved slowly through use, repair, and time. Modern makers who embrace this slower process usually create jackets with much stronger visual character and authenticity.
Over the years, the jacket becomes a living textile surface shaped by movement, fading, weather, repairs, and continued wear. That long-term evolution is ultimately what makes boro jackets feel
FAQ
What fabric is best for a boro jacket?
Denim, cotton canvas, linen, and indigo-dyed cotton are the best options because they handle repeated stitching and aging well.
Can beginners make a boro jacket?
Yes. Beginners can start with simple running stitches and gradually add more complex patchwork and reinforcement techniques.
Is sashiko required for boro jackets?
Traditional boro jackets commonly use sashiko stitching, but other strong hand-stitching methods can also work.
Can sewing machines be used for boro jackets?
Yes, but hand stitching usually creates a more authentic texture and flexible layered appearance.
Why are boro jackets usually blue?
Traditional Japanese boro clothing often used indigo-dyed fabrics because indigo was widely available and durable.
How long do boro jackets last?
Well-made boro jackets can last many years because repairs and reinforcement continue evolving over time.
Are raw patch edges acceptable in boro?
Yes. Controlled fraying is part of the traditional aesthetic, although fragile fabrics may need folded edges.
Can boro jackets become too heavy?
Yes. Excessive layering and dense stitching can reduce comfort and flexibility if weight balance is ignored.