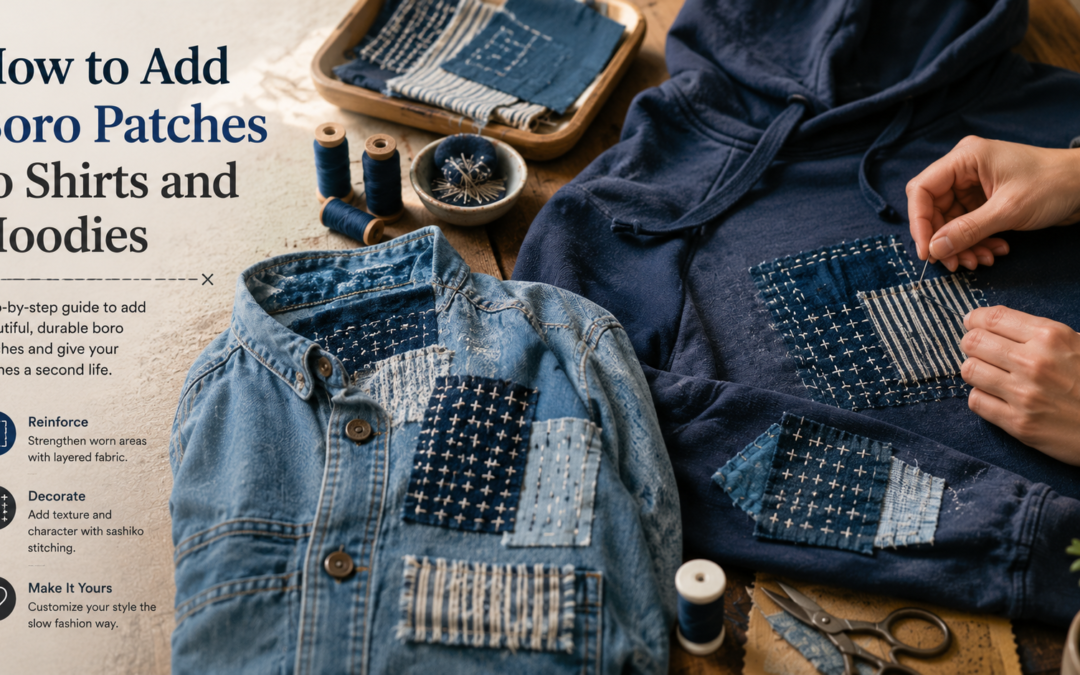
Boro patching is a traditional Japanese visible mending technique that repairs and reinforces clothing using layered fabric and hand stitching. Shirts and hoodies are excellent for boro repairs because elbows, pockets, cuffs, and seams naturally weaken from repeated movement and washing. Properly attached boro patches strengthen worn fabric while creating a textured handcrafted appearance that improves with age. This guide gives an expert insight into the overall workings, thought process, decision making and execution of how to add boro patches to shirts and hoodies.
Unlike iron-on patches, boro repairs remain flexible because stitched reinforcement moves naturally with the garment. This reduces cracking, stiffness, and edge separation over time. Modern visible mending also supports slow-fashion repair culture by extending clothing lifespan instead of replacing damaged garments.
In this guide, you will learn:
- How to choose the best patch fabric
- Where to place boro patches
- How to hand stitch durable repairs
- How to prevent repair failure
- Ways to improve comfort and durability
- Decorative vs functional patching methods
Why Shirts and Hoodies Work Well for Boro Patching

Shirts and hoodies naturally experience constant friction and movement during everyday wear. Elbows bend repeatedly, hoodie pockets stretch under pressure, and cuffs weaken from pulling and washing. These repeated stress points slowly thin the fabric long before large holes appear. Traditional boro patching helps reinforce these weak areas using layered textile repair techniques that distribute tension across a larger stitched surface.
One reason hoodies respond especially well to visible mending is their soft flexible structure. Most hoodies use fleece-backed knit cotton or French terry fabric, which bends continuously during movement. Rigid repair methods often fail because they resist this flexibility. Hand-sewn boro stitching allows the reinforcement to move naturally with the garment instead of fighting against the fabric structure.
Another important factor is visual texture. Hoodies and shirts develop natural fading, soft wear marks, and fabric variation over time. Boro patches blend into this aging process beautifully, especially when indigo denim, canvas, or cotton twill are used. The repair becomes part of the garment’s identity instead of looking like a temporary fix.
Common repair zones include:
- Hoodie elbows
- Sleeve cuffs
- Kangaroo pockets
- Shirt hems
- Shoulder seams
- Neckline edges
- Hood attachment areas
Real-world repair insight:
Many experienced visible menders reinforce hoodie elbows before holes fully appear because early reinforcement dramatically reduces future tearing and preserves the original garment structure longer.
Why Traditional Japanese Boro Was Originally Functional Instead of Decorative
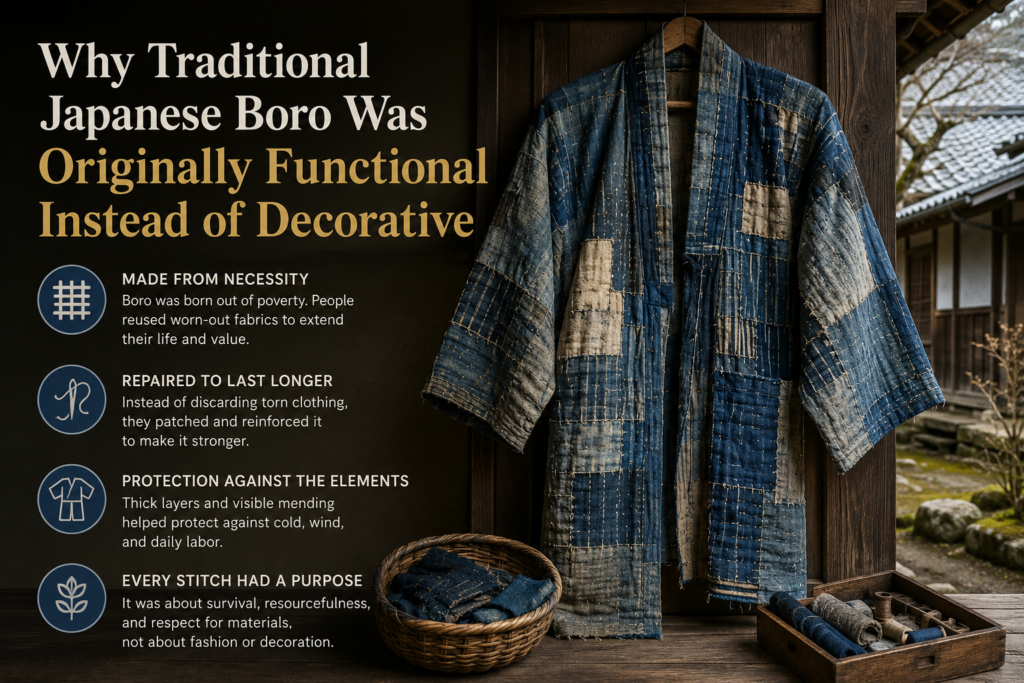
Traditional Japanese boro developed from necessity rather than fashion. Rural families repeatedly repaired clothing using layered indigo fabric because textiles were valuable and difficult to replace. Instead of discarding damaged garments, fabric scraps were stitched over weak areas again and again across multiple generations. Over time, repeated repairs created richly textured patchwork clothing designed for warmth, durability, and survival.
For more information on the originality and history of Japanese Boro Stitching, refer to our expert analysis, providing some very clear and interesting facts about it.
Indigo-dyed cotton became common because natural indigo helped strengthen fabric while also resisting insects and dirt more effectively than untreated material. Running stitches reinforced weak sections without making garments excessively rigid. Unlike modern fashion-inspired boro aesthetics, traditional repairs focused almost entirely on extending garment lifespan through practical reinforcement.
Traditional boro characteristics included:
- Reused fabric scraps
- Layered indigo cotton
- Repeated reinforcement stitching
- Functional textile repair
- Generational clothing reuse
- Visible patch accumulation
Modern decorative boro often emphasizes:
- Fashion aesthetics
- Contrast stitching
- Artistic patch placement
- Curated visible texture
Real-world cultural insight:
Many modern visible mending techniques are inspired by historical Japanese repair culture, but traditional boro originally existed because durable fabric preservation was economically necessary rather than stylistically trendy.
How to Choose the Best Fabric for Boro Patches
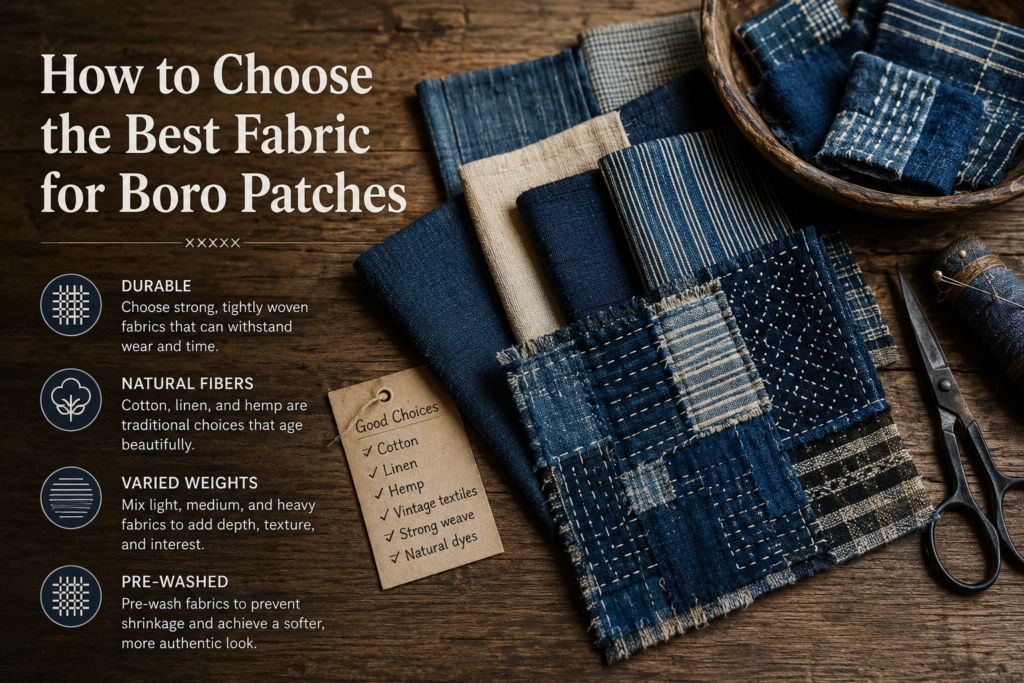
Choosing the correct patch fabric strongly affects repair durability, flexibility, and comfort. Many beginners focus only on color or appearance, but fabric behavior matters far more than visual matching alone. The strongest repairs happen when the patch moves similarly to the original garment instead of resisting its flexibility.
Heavyweight denim works well on thicker hoodies because it provides durable reinforcement without tearing quickly. However, extremely rigid denim on thin cotton shirts may create excessive stress around the repair edge. Lightweight woven cotton, linen, and soft twill usually perform better for shirts because they bend naturally during movement.
Natural fabrics generally work best because they breathe well and soften with repeated washing. Older worn fabric is often superior to stiff new fabric because it already flexes comfortably. This is one reason many traditional boro repairs used recycled textile scraps from older garments.
Best fabric choices include:
- Soft denim
- Cotton twill
- Linen scraps
- Canvas
- Indigo cotton
- Worn workwear fabric
Avoid:
- Plastic-backed patches
- Thick stiff synthetics
- Slippery polyester fabric
- Heavy leather on lightweight shirts
Real-world strategy:
Fabric weight matching matters too. Thin shirts patched with extremely thick denim may pucker or become uncomfortable. Likewise, thin patches on heavyweight hoodies may fail quickly after repeated wear.
Many advanced visible menders test patch flexibility by bending the garment naturally before stitching. If the patch resists movement too aggressively, the repair often becomes uncomfortable and structurally unstable later.
What Thread Works Best for Boro Hoodie Repairs?
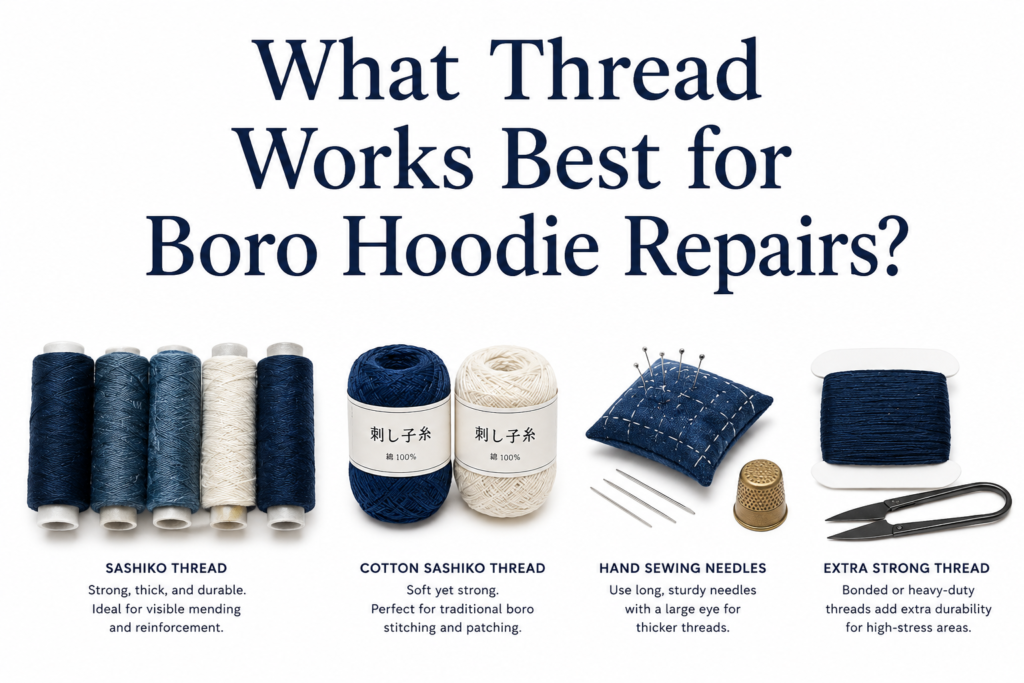
Thread selection affects durability almost as much as the patch fabric itself. Hoodies and shirts flex constantly during movement, so weak or overly thin thread may wear down quickly around elbows, cuffs, and pocket corners. Traditional sashiko thread remains one of the best choices because it combines strength, visibility, and flexibility while creating the classic textured appearance associated with Japanese boro stitching.
Pearl cotton and embroidery floss also work well for decorative visible mending because they create thicker stitch lines that distribute tension more evenly across layered fabric. Waxed thread improves abrasion resistance on heavy hoodies, but extremely stiff thread may reduce flexibility if overused. Cotton-based thread generally ages more naturally than slippery polyester because it softens gradually with repeated washing and movement.
Best thread choices include:
- Sashiko thread
- Pearl cotton
- Embroidery floss
- Waxed cotton thread
- Upholstery-weight cotton
Avoid:
- Extremely thin sewing thread
- Brittle synthetic thread
- Overly stiff waxed cord
- Weak decorative craft thread
Real-world repair insight:
Many failed visible mending repairs happen because the thread wears out before the patch itself. Thick balanced stitching usually survives hoodie friction much longer than thin standard sewing thread.

Where Should Boro Patches Be Placed on Hoodies and Shirts?
Patch placement changes how stress moves through the repaired garment. One of the biggest beginner mistakes is covering only the visible hole while ignoring weakened surrounding fabric. Successful boro repairs reinforce a larger zone so tension spreads across healthy material instead of concentrating directly beside the damage.
Elbows and hoodie pockets usually require larger reinforcement areas because these zones stretch constantly. Extending the patch at least one or two inches beyond weakened fabric helps prevent new tearing from forming near the repair border. Rounded patch corners also tend to age better than sharp square corners because they distribute tension more evenly during movement.
Functional patch placement works best around:
- Hoodie elbows
- Pocket corners
- Shoulder seams
- Sleeve cuffs
- Thin chest sections
- Hood attachment points
Decorative placements are also common on:
- Hoodie sleeves
- Shirt backs
- Front chest panels
- Side seams
- Hood edges
Inside patches create smoother comfort and subtle reinforcement, while outside patches highlight the visible mending aesthetic. Some advanced repairs combine both methods by placing structural reinforcement underneath and decorative patchwork above.
Mini case study:
A heavily worn cotton hoodie repeatedly tore around the elbow seam after several iron-on repairs. Replacing the stiff adhesive patch with layered denim boro reinforcement extending beyond the weak area solved the issue because movement stress spread across a much larger stitched surface.
Decision clarity:
The strongest patch placement supports surrounding weak fabric instead of focusing only on the visible hole itself
How Large Should Boro Patches Be?
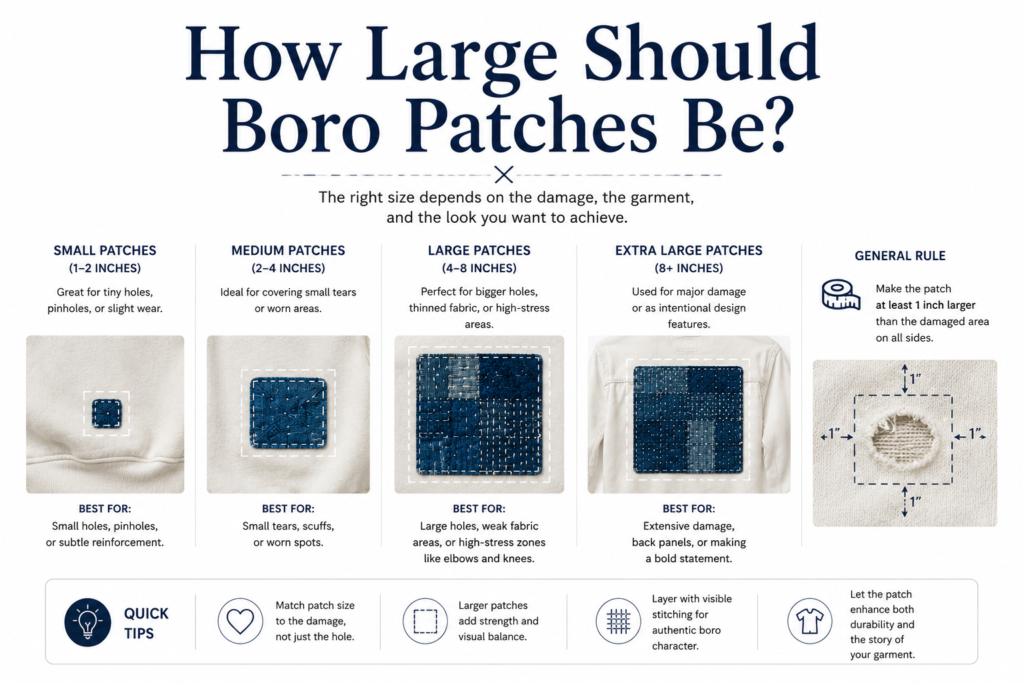
Patch size strongly affects repair durability and stress distribution. Small patches may temporarily cover a hole, but they often fail quickly because tension concentrates around the repair edge. Strong boro reinforcement usually extends at least one or two inches beyond damaged fabric so movement pressure spreads across healthier surrounding material instead of focusing directly beside the tear.
Oversized patches can also create problems if they become too stiff or bulky for the garment. Large heavy reinforcement on lightweight shirts may reduce flexibility and create uncomfortable pressure points during movement. Balanced patch sizing depends on garment thickness, stress level, and repair location. Hoodie elbows usually require larger reinforcement zones than flat chest areas because they bend constantly throughout the day.
General patch sizing guidelines:
- Small tears: 1–2 inch margin
- Hoodie elbows: larger reinforcement zones
- Thin shirts: lightweight wider patches
- High-stress areas: extended support coverage
Avoid:
- Tiny patches directly over holes
- Extremely oversized rigid panels
- Sharp square corners
- Uneven reinforcement shapes
Decision clarity:
A properly sized boro patch supports the surrounding fabric structure instead of behaving like a separate isolated repair panel.
How Stretch Fabric Changes Boro Patch Durability
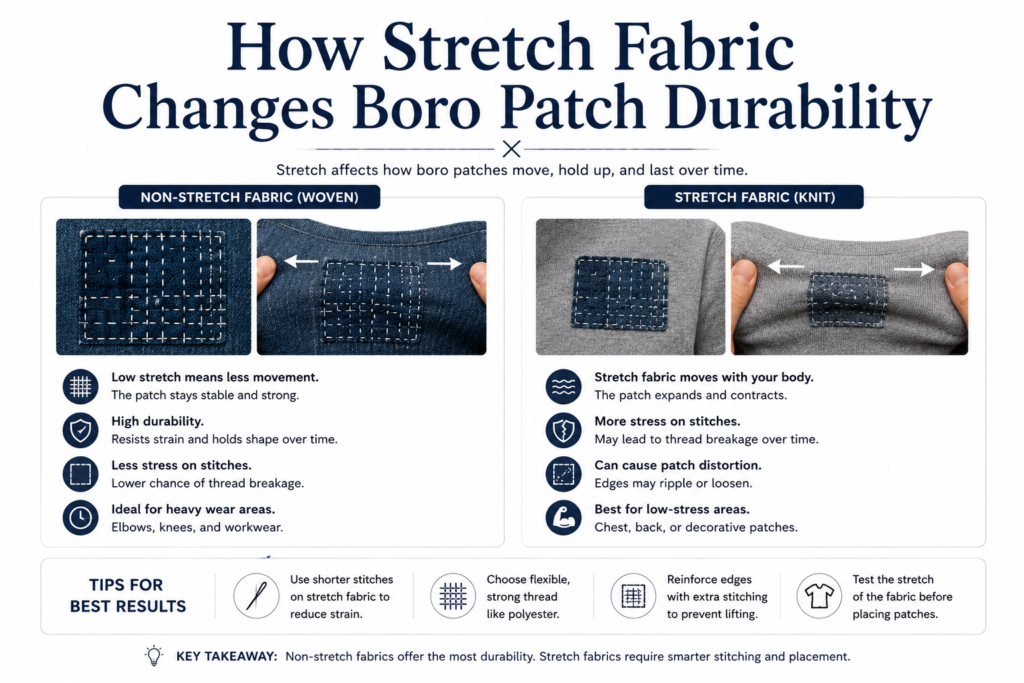
Stretch behavior is one of the most overlooked parts of hoodie repair. Most hoodies use knit fleece or French terry fabric that stretches constantly during wear. If the patch material is too rigid or stitched too tightly, tension builds around the repair edge instead of moving naturally with the garment. This often causes puckering, edge curling, or new tearing nearby.
Woven patch fabric and knit hoodie fabric behave differently under movement. Knit fabric stretches and recovers repeatedly, while woven patches remain more stable. Balanced repairs compensate for this difference by using flexible stitching and softer patch materials. Lightweight woven cotton often adapts better than extremely stiff denim on stretch-heavy hoodie areas.
Stretch-related repair factors include:
- Knit vs woven behavior
- Stretch direction mismatch
- Ribbed cuff movement
- Fabric recovery tension
- Hoodie fleece compression
- Edge distortion during washing
Loose balanced running stitches usually work better than extremely tight dense stitching because they preserve movement flexibility. Some visible menders intentionally leave slightly wider stitch spacing on hoodies compared to rigid denim garments.
Real-world repair insight:
Many failed hoodie repairs are caused by incompatible fabric movement rather than weak stitching. A structurally strong patch can still fail if it restricts natural garment flexibility.
Another important factor is washing behavior. Stretch fabric shifts during machine washing, especially around elbows and cuffs. Flexible layered repairs usually survive this movement better than rigid stitched panels.
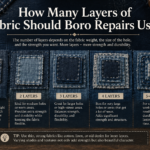
How Many Fabric Layers Are Too Much for Boro Repairs?
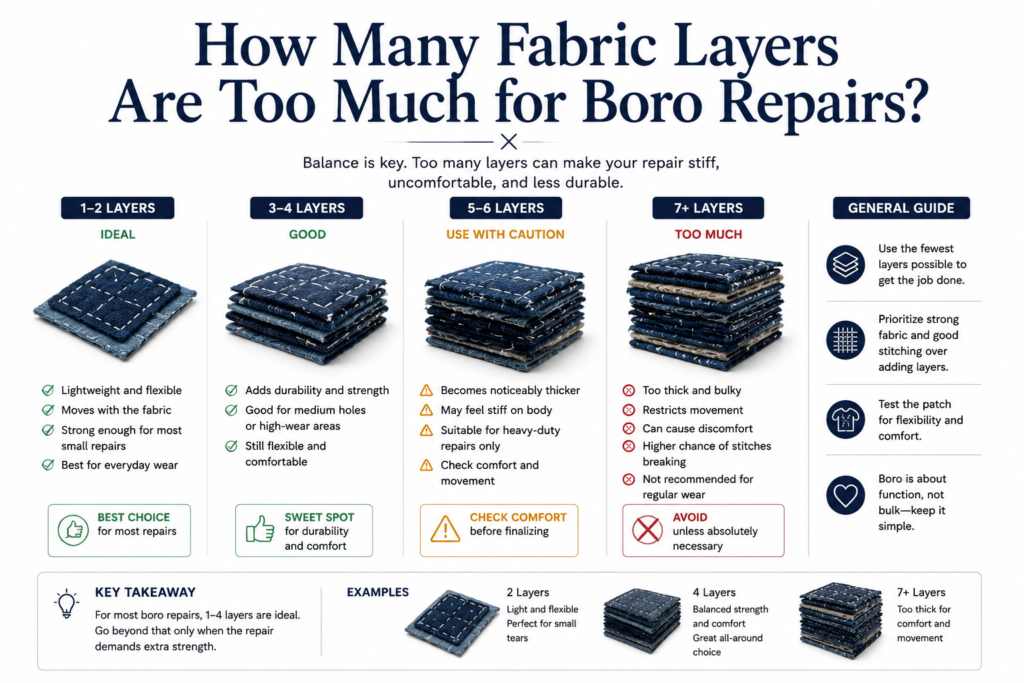
Layering improves durability, but excessive fabric thickness can reduce comfort and flexibility. Hoodies already contain dense fleece or French terry fabric, so stacking too many reinforcement layers may create stiff pressure points around elbows, cuffs, or seams. Shirts usually tolerate fewer layers because lightweight fabric bends more visibly during movement.
Traditional boro often used multiple thin layers instead of one extremely thick reinforcement patch. Thin overlapping fabric allows the repair to flex more naturally while still distributing stress effectively. Breathability also matters because heavy patch density can trap heat and moisture inside hoodies during daily wear.
Balanced layering helps:
- Improve durability
- Spread tension evenly
- Preserve flexibility
- Reduce edge stress
- Maintain wearable comfort
Too many layers may cause:
- Excessive stiffness
- Sweat retention
- Reduced airflow
- Pressure points
- Restricted movement
Real-world repair insight:
Several thin flexible layers usually age better than one oversized thick patch because movement distributes naturally across softer reinforcement zones instead of fighting against rigid fabric stacks.
For most hoodies, two or three moderate-weight layers are usually enough for durable reinforcement without creating excessive bulk.
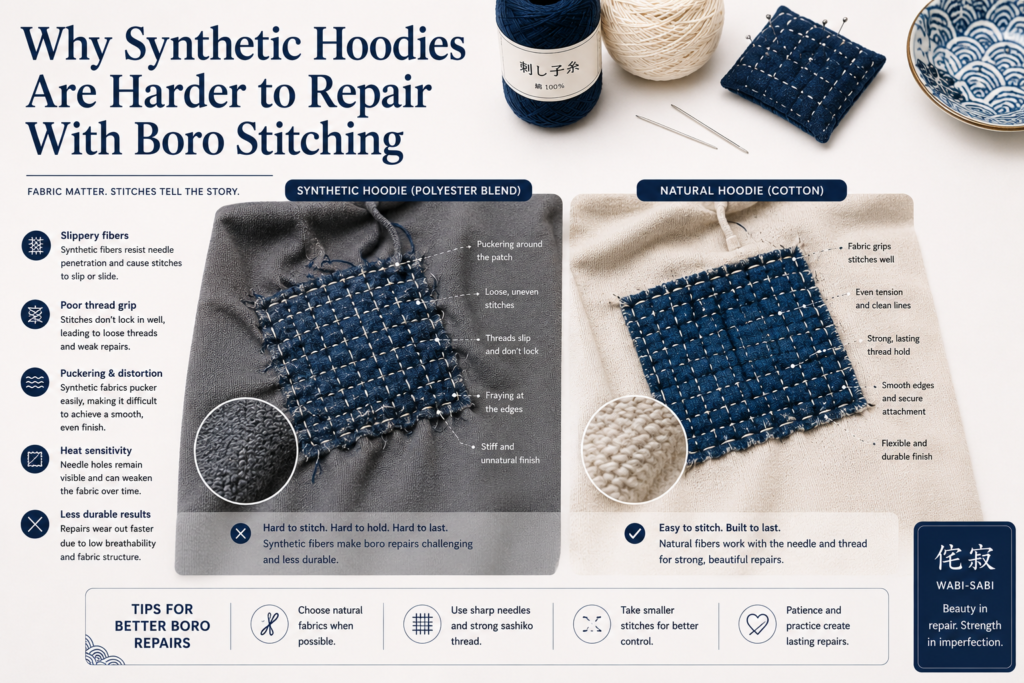
Why Synthetic Hoodies Are Harder to Repair With Boro Stitching
Synthetic hoodies often behave differently than natural cotton garments during visible mending. Polyester blends, athletic fleece, and synthetic stretch fabrics tend to be more slippery and less breathable than traditional cotton hoodies. Because of this, stitched reinforcement may shift more easily during movement and washing, especially around elbows and cuffs.
Natural cotton fabric usually grips thread more effectively, allowing stitches to settle securely into the textile structure over time. Synthetic fleece sometimes resists this behavior because smooth fibers create less friction around stitch lines. Excessive heat from ironing or aggressive drying can also damage synthetic fabric more quickly during repair preparation.
Common synthetic hoodie challenges:
- Slippery fabric texture
- Reduced stitch grip
- Heat sensitivity
- Stretch distortion
- Puckering around seams
- Lower breathability
Helpful synthetic repair strategies:
- Use softer lightweight patches
- Reduce stitch tension
- Avoid high dryer heat
- Reinforce larger areas
- Test flexibility carefully
Decision clarity:
Cotton hoodies are generally easier to repair with traditional boro stitching because natural fibers stabilize layered reinforcement more effectively than highly synthetic blends.
Should Boro Patches Go Inside or Outside Hoodies?
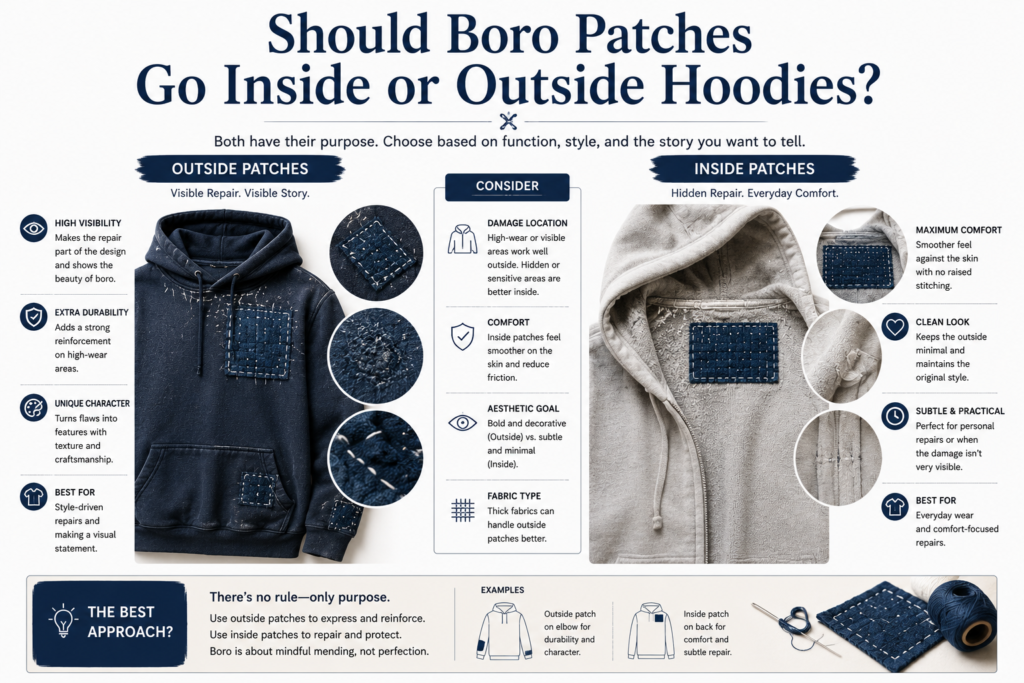
Inside and outside patch placement each offer different advantages depending on the repair goal. Outside patches create the classic visible mending appearance because the layered fabric and sashiko stitching remain fully visible. These repairs add decorative texture while also reinforcing damaged fabric underneath. Indigo patchwork on hoodie elbows and pockets is one of the most recognizable modern boro aesthetics.
Inside patches focus more on subtle reinforcement and comfort. Placing fabric beneath the damaged area stabilizes weak fibers while preserving a cleaner external appearance. Internal patching works especially well for thin shirts or lightweight hoodies where thick external layering might feel restrictive during movement.
Outside patches work best for:
- Decorative visible mending
- Traditional boro aesthetics
- Layered indigo patchwork
- Bold sashiko stitching
Inside patches are better for:
- Thin cotton shirts
- Minimal visible repairs
- Comfort-sensitive areas
- Flexible reinforcement
Some advanced visible menders combine both methods. An internal support patch stabilizes weak fabric while an external decorative layer adds texture and stitch detail. This creates both structural durability and visible repair character.
Comfort also matters. Internal patches with thick knots or rough thread can irritate sensitive skin areas like underarms or cuffs. Softer cotton thread and flatter stitching help reduce friction during everyday wear.
Decision clarity:
External patches create stronger visual texture, while internal patches often provide smoother comfort and cleaner appearance for daily use.
How to Prepare Shirts and Hoodies Before Stitching
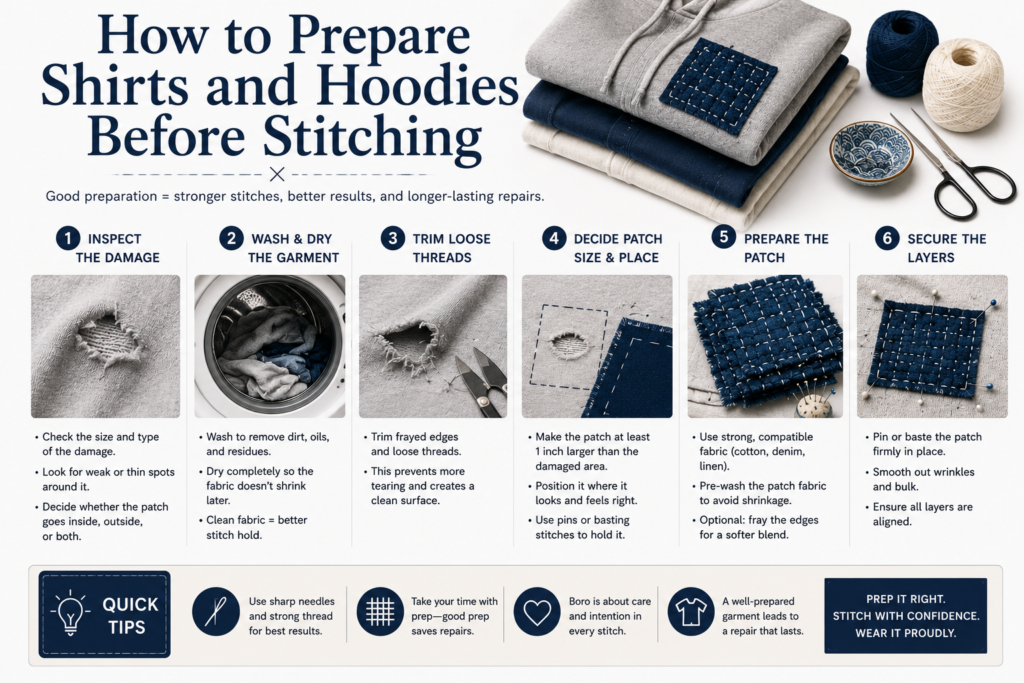
Preparation is one of the biggest durability factors in visible mending. Dirty fabric, curled edges, stretched holes, and unstable fibers weaken stitch stability and increase the chance of repair failure later. Proper preparation creates flatter patches, smoother stitching, and stronger reinforcement overall.
The first step is washing and drying both the garment and patch fabric completely. Unwashed materials often shrink differently after sewing, which can distort the repair. After cleaning, inspect the damaged area carefully because weak fabric usually extends farther than the visible hole itself.
Preparation steps:
- Wash and dry the garment
- Trim loose threads
- Flatten curled edges
- Inspect nearby weak areas
- Position the patch carefully
- Pin or baste temporarily
- Test patch flexibility
Helpful repair tools include:
- Sashiko needles
- Fabric clips
- Chalk markers
- Embroidery scissors
- Thread conditioner
- Temporary fabric adhesive
For hoodies, avoid stretching the fabric while pinning patches because knit material distorts easily. Fabric clips or loose basting stitches often work better than aggressive pinning methods.
Real-world preparation insight:
Many experienced visible menders lightly press hoodie fabric before stitching because wrinkles and folds can distort stitch spacing across larger reinforcement patches.
Patch layering should also be tested before sewing. Thick stacked layers may become uncomfortable around elbows or cuffs if flexibility is lost. Softer layered reinforcement usually ages more naturally over time.
How to Sew Durable Boro Patches by Hand
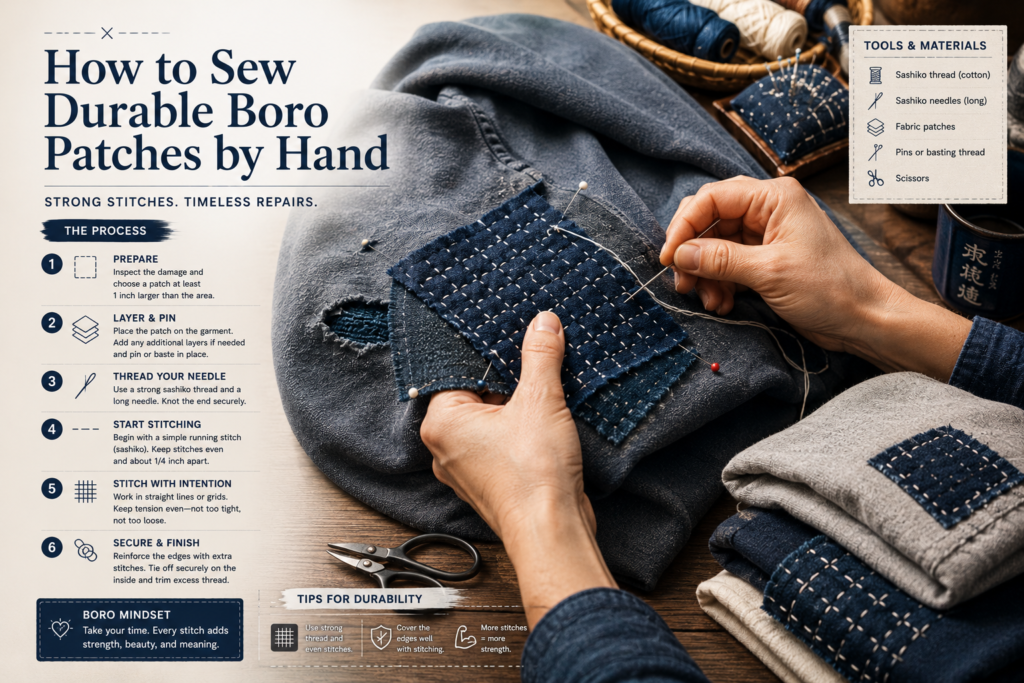
Hand stitching is the foundation of traditional boro repair. The goal is not perfect decorative embroidery but flexible reinforcement that distributes stress evenly across layered fabric. Shirts and hoodies need movement-friendly stitching because the fabric constantly bends, folds, and stretches during everyday wear.
The running stitch is the most common boro technique because it spreads tension effectively without making the repair excessively stiff. Instead of one dense stitched border, multiple rows of evenly spaced stitches stabilize the patch across a wider area.
Basic stitching process:
- Secure the patch
- Start stitching from the center
- Work outward gradually
- Keep stitch spacing balanced
- Reinforce corners carefully
- Spread tension evenly
Good stitching practices:
- Use balanced thread tension
- Avoid tight pulling
- Reinforce beyond weak fabric
- Layer stitch directions
- Maintain patch flexibility
Common beginner mistakes:
- Tiny reinforcement patches
- Tight stitch tension
- Uneven stitch spacing
- Excessively rigid patch fabric
- Ignoring surrounding weak material
Decorative stitch patterns can also improve structural durability. Grid stitching, diagonal running stitches, and layered geometric lines help stabilize large patches while creating visual texture.
Real-world repair strategy:
Many advanced visible menders use multiple lighter stitch rows instead of one heavy stitched border because movement stress spreads more naturally during wear and washing.
Over time, hand-sewn boro repairs soften and blend naturally into the garment structure, creating texture impossible to reproduce artificially..
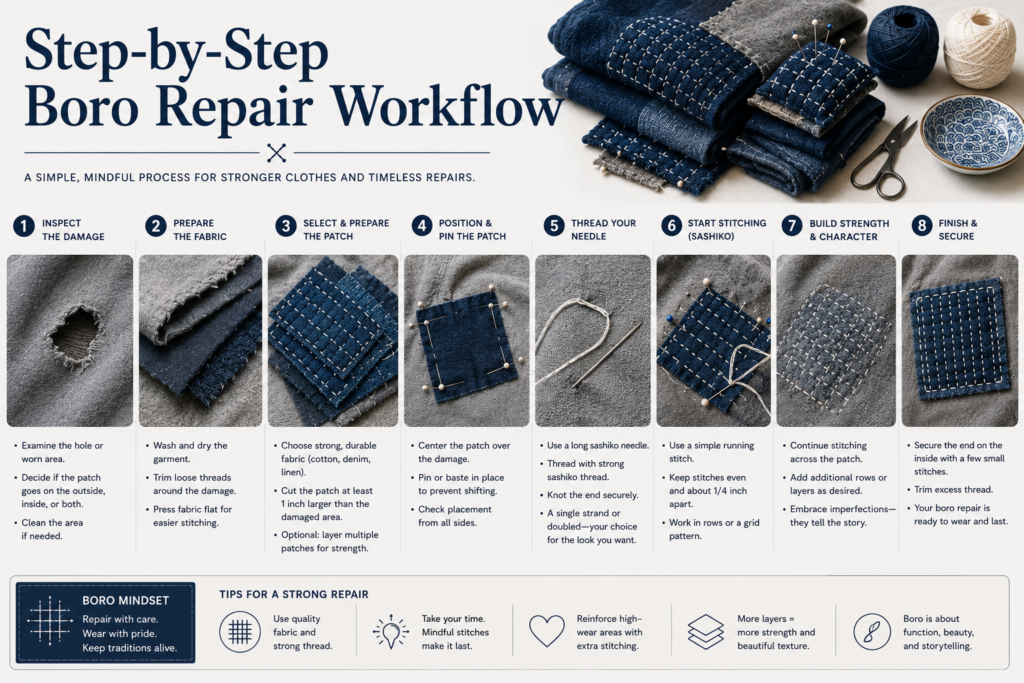
Step-by-Step Boro Repair Workflow
Successful visible mending usually follows a consistent repair sequence instead of random stitching. A structured workflow helps prevent uneven reinforcement, excessive patch thickness, and fabric distortion during sewing. Many beginners rush directly into stitching before stabilizing weak areas properly, which often leads to puckering and premature repair failure.
Traditional boro repairs developed gradually through layered reinforcement and repeated maintenance over time. Even modern visible mending benefits from a slower methodical process because balanced preparation improves durability significantly.
Basic boro repair workflow:
- Inspect weak fabric carefully
- Trim loose damaged fibers
- Wash and stabilize materials
- Choose compatible patch fabric
- Position reinforcement correctly
- Secure with clips or basting
- Stitch gradually from the center outward
- Test flexibility after sewing
- Wash gently to soften naturally
Important workflow principles:
- Reinforce beyond visible holes
- Avoid excessive stitch tension
- Maintain fabric flexibility
- Balance durability with comfort
- Layer patches gradually
Real-world repair insight:
Experienced visible menders often pause midway through stitching to flex the garment naturally because early movement testing helps identify stiffness or tension imbalance before the repair is fully finished.
Can Boro Patching Prevent Holes Before They Start?
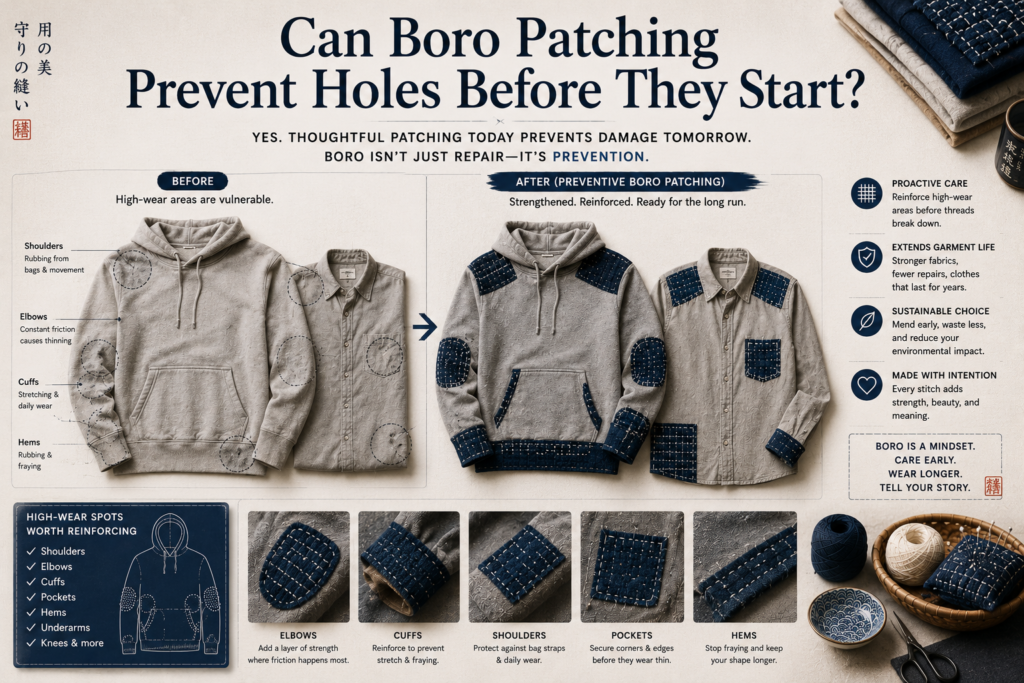
One of the most valuable visible mending strategies is preventative reinforcement. Many hoodie elbows, cuffs, and pockets begin thinning gradually long before visible holes appear. Adding lightweight boro reinforcement early helps stabilize weak fibers before major tearing develops. This often creates cleaner and more durable repairs compared to patching heavily damaged fabric later.
Preventative visible mending works especially well on frequently worn hoodies and work shirts because movement slowly weakens fabric over time. Thin shiny areas, fading texture, or soft worn spots usually indicate stress fatigue before full tearing happens.
Signs fabric needs reinforcement:
- Thin elbows
- Soft worn cuffs
- Weak pocket corners
- Loose fabric texture
- Small stress lines
- Fading seam edges
Benefits of preventative patching:
- Extends garment lifespan
- Reduces future tearing
- Preserves original structure
- Prevents large repairs
- Improves long-term durability
Small lightweight reinforcement patches are often enough to stabilize weak areas before damage spreads. Flexible running stitches preserve movement while reducing concentrated tension during bending and stretching.
Real-world repair insight:
Many long-lasting boro garments develop through repeated preventative repairs over years instead of one large dramatic patching project.
Works Best for Different Clothing Types?

Different garments require different repair strategies because fabric weight, flexibility, and stress behavior vary significantly between hoodies, shirts, and lightweight clothing. Heavy fleece hoodies usually need larger reinforcement zones and softer flexible stitching, while thin cotton shirts often require lightweight patching to avoid stiffness and puckering.
Decorative visible mending may work beautifully on denim overshirts, but highly textured patch layering can become uncomfortable on thin T-shirts. Matching the repair method to the garment structure improves both durability and comfort over time. This is one reason traditional boro evolved differently depending on the textile type being repaired.
Check out the complete Japanese Boro Clothing and Denim Guide for a much better understanding and deep technical stuff about the different ways you can tackle with Clothes using Japanese Boro Stitching.
Comparison Table — Best Repair Styles by Garment Type
| Garment Type | Best Patch Fabric | Recommended Stitch Style |
| Hoodie | Soft denim | Loose running stitch |
| Flannel shirt | Cotton twill | Medium sashiko |
| T-shirt | Thin cotton | Light stitching |
| Work shirt | Canvas | Dense reinforcement |
| Sweatshirt cuffs | Soft woven cotton | Flexible stitching |
Best repair strategy factors:
- Fabric thickness
- Movement level
- Comfort requirements
- Stretch behavior
- Wash frequency
- Decorative preference
Decision clarity:
The strongest visible mending repairs adapt to the garment’s natural behavior instead of using one identical repair method for every fabric type.
duces textile waste and extends wearable life significantly.
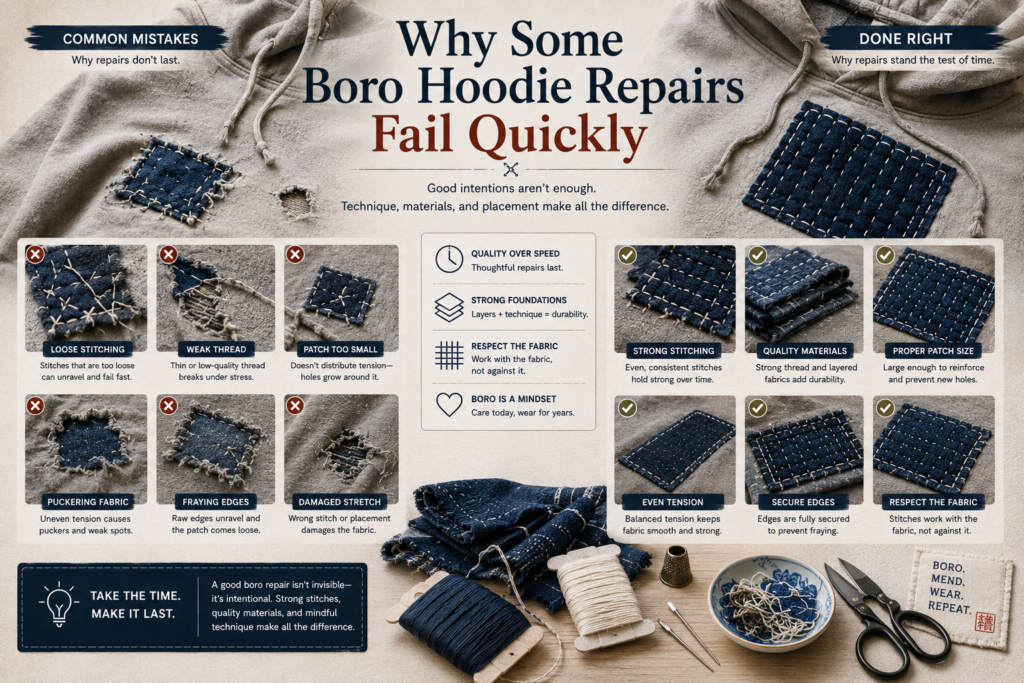
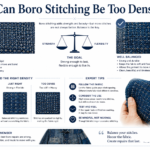
Why Some Boro Hoodie Repairs Fail Quickly
Most failed repairs happen because the reinforcement does not match the movement behavior of the garment itself. Tight stitching, stiff patch fabric, and tiny reinforcement zones often concentrate stress directly beside the repair. This eventually causes puckering, edge separation, or new tearing around the patch border.
Another major problem is ignoring surrounding weak fabric. Many people repair only the visible hole while leaving nearby thin material unsupported. During movement, the patched area stays stable but the surrounding weak fabric begins tearing quickly.
Common repair failure causes:
- Tight stitch tension
- Patches that are too small
- Rigid synthetic fabric
- Weak surrounding material
- Poor stretch compatibility
- Excessive patch thickness
Warning signs include:
- Curling patch edges
- Broken thread lines
- Uneven stretching
- Fabric puckering
- New holes beside repairs
Repair layering also matters. Thick stacked fabric may become stiff and uncomfortable on hoodies, especially around elbows and cuffs. Several thinner overlapping layers usually flex more naturally than one oversized rigid patch.
Real-world repair insight
Many failed visible mending repairs are not caused by weak stitching itself but by movement imbalance between the patch and the original garment fabric..
Decision clarity:
Successful boro repairs distribute stress across the entire reinforcement area instead of concentrating tension around the original damage.
How to Maintain Boro Repairs After Washing
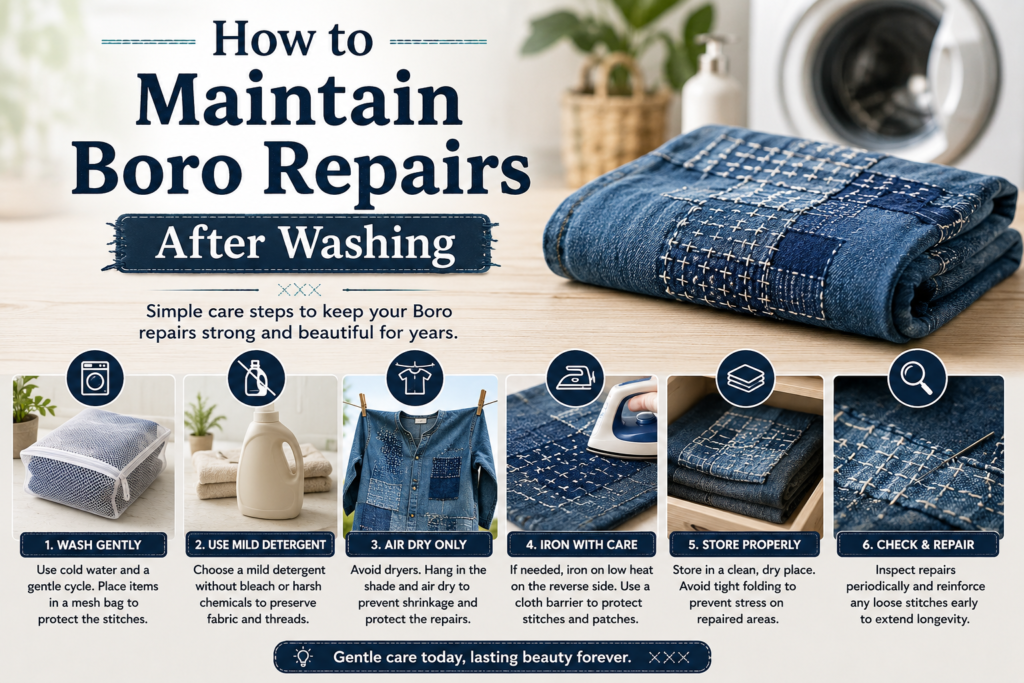
Long-lasting visible mending depends heavily on proper maintenance after the repair is finished. Hoodies and shirts experience repeated stress during washing because water, heat, and agitation constantly pull against stitched reinforcement zones. Gentle care helps preserve both the patch structure and thread durability over time.
Cold water washing usually works best because excessive heat may tighten thread tension or distort flexible patch layers. Air drying also reduces stress because aggressive machine drying repeatedly compresses and twists the repaired fabric. Over time, some visible menders lightly re-stitch weakened sections as part of ongoing garment maintenance instead of waiting for major damage to reappear.
Best maintenance practices:
- Wash garments inside out
- Use cold water
- Avoid aggressive detergents
- Air dry when possible
- Inspect stitch tension regularly
- Re-secure loose threads early
Signs maintenance is needed:
- Loose stitching
- Curling patch edges
- Fraying thread
- Uneven stretching
- Weak surrounding fabric
Real-world maintenance insight:
Many traditional boro garments survived for years because repairs were continuously maintained and reinforced gradually instead of being treated as one-time permanent fixes
How Boro Patches Change After Months of Wear
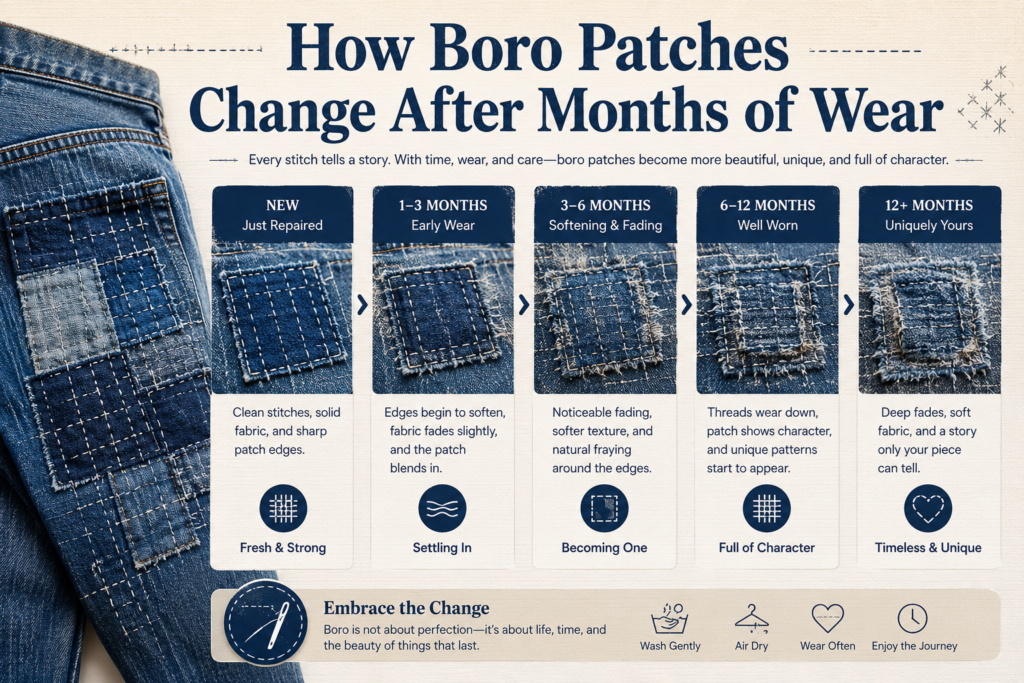
One of the most unique parts of visible mending is how the repair evolves over time. Freshly stitched boro patches often appear bold and textured initially, but repeated washing, movement, and fading gradually soften both the fabric and thread. Over months of wear, indigo patches begin blending naturally into the garment while stitch lines settle deeper into the fabric structure.
Raw patch edges may fray slightly, creating softer texture and layered depth that many visible menders intentionally appreciate. Cotton thread also softens over time, reducing stiffness and making the repair feel more integrated into the hoodie or shirt itself. Unlike factory-made repairs that aim to disappear completely, traditional boro embraces the visible aging process as part of the garment’s identity.
Long-term changes often include:
- Indigo fading
- Softer thread texture
- Edge fraying
- Fabric blending
- Patch softening
- Natural repair patina
Well-aged repairs usually:
- Become more flexible
- Develop richer texture
- Blend visually into the garment
- Feel softer during wear
- Gain handcrafted character
Real-world wear insight:
Many experienced visible menders believe older repaired garments often become more visually interesting after years of fading and repeated reinforcement because the patchwork reflects real use instead of artificial distressing.

Final Thoughts on Adding Boro Patches to Shirts and Hoodies
Boro patching transforms worn shirts and hoodies into stronger, more personal garments through layered reinforcement and visible stitching. The best repairs balance flexibility, patch sizing, stitch tension, and fabric compatibility instead of focusing only on decoration. Strong visible mending supports movement naturally while reinforcing weak fabric against future damage.
Traditional Japanese boro developed from necessity and long-term textile maintenance. Modern visible mending continues this philosophy by encouraging repair instead of disposal. Over time, layered indigo fabric, faded stitching, and softened patchwork create unique texture and craftsmanship impossible to reproduce with mass-produced clothing.
Key takeaways:
- Use flexible natural fabric
- Extend patches beyond weak areas
- Avoid overly tight stitching
- Reinforce early before holes grow
- Match patch movement to the garment
- Prioritize flexibility and comfort
Well-made boro repairs often become visually more interesting and structurally stronger than the original garment because layered reinforcement distributes stress more effectively across high-friction areas.
For hoodies and shirts especially, visible mending combines practicality, sustainability, and handcrafted design in a way that improves with age instead of wearing out quickly.
Frequently Asked Questions
What fabric works best for boro patches?
Soft denim, cotton twill, linen, and canvas usually work best because they balance flexibility with durability.
Can beginners add boro patches successfully?
Yes. Running stitches and layered fabric make boro one of the most beginner-friendly visible mending methods.
Should boro patches go inside or outside?
Outside patches create decorative visible mending, while inside patches usually improve comfort and subtle reinforcement.
Can boro patching prevent holes?
Yes. Reinforcing thin weak areas early helps reduce future tearing significantly.
Why do some hoodie repairs fail quickly?
Tight stitching, small patches, rigid fabric, and weak surrounding material are the most common causes.
Is sashiko required for boro patching?
No. Simple running stitches can still create durable visible mending repairs.
Do boro patches survive washing?
Properly stitched flexible repairs usually survive repeated washing very well.
Are decorative repairs still durable?
Yes. Decorative visible mending can remain highly durable if the underlying reinforcement is structurally stable.
Meta Package
Meta Title
How to Add Boro Patches to Shirts and Hoodies
Meta Description
Learn how to add durable boro patches to shirts and hoodies using visible mending, sashiko stitching, and layered fabric repair methods.
URL Slug
how-to-add-boro-patches-to-shirts-and-hoodies
OG Title
How to Add Boro Patches to Shirts and Hoodies
OG Description
A complete guide to visible mending hoodies and shirts with durable Japanese boro patching techniques.