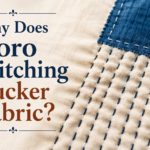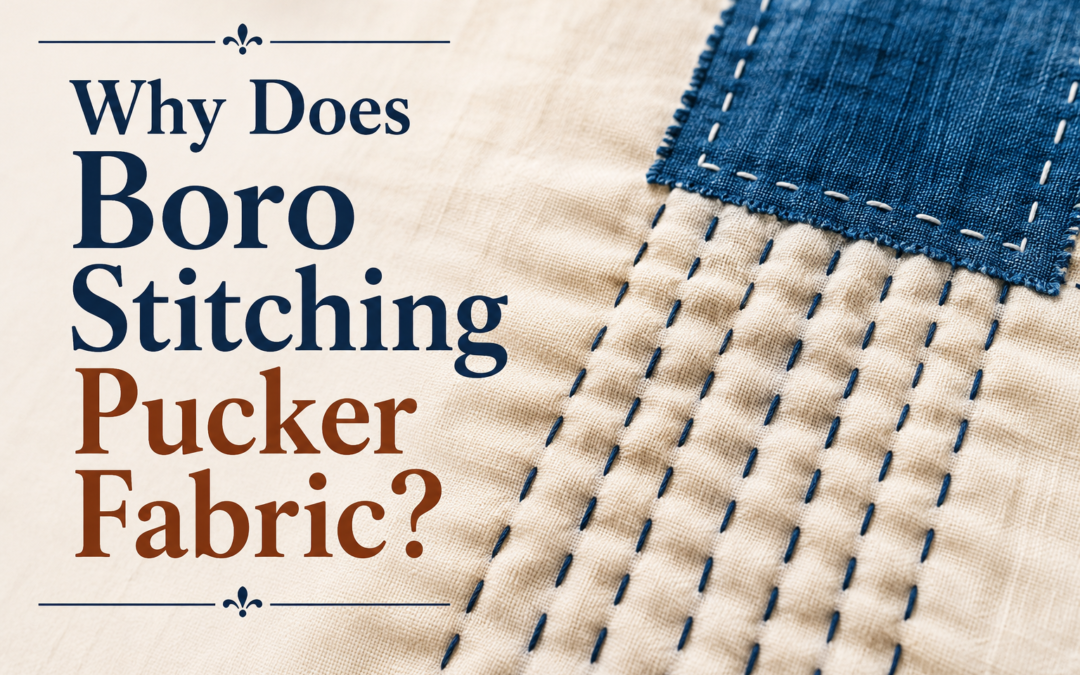
Boro stitching puckers fabric because repeated running stitches compress textile fibers and pull layered materials together. Mild puckering is often normal in traditional Japanese boro because handmade texture is part of the repair aesthetic. However, severe wrinkling usually comes from overly tight tension, uneven stitch spacing, unstable fabric layering, or improper fabric preparation before stitching. This article delivers an excellent explanatory insight for the various solutions on “How to stop Fabric Puckering in Boro Stitching”.
Why Does Tight Thread Tension Cause Boro Fabric to Pucker?
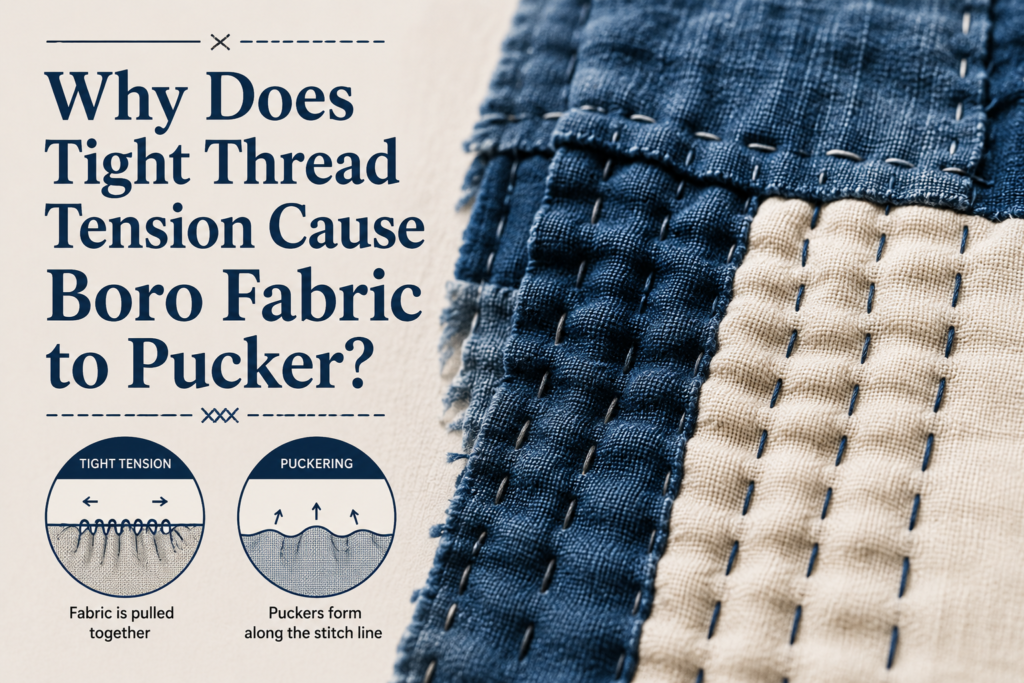
Tight thread tension is one of the biggest reasons boro stitching creates puckered fabric. Every running stitch slightly compresses the cloth underneath it. When the thread is pulled too firmly after each stitch, the fabric begins gathering inward around the stitched area. This creates visible wrinkles, uneven folds, and distorted patch shapes.
Many beginners accidentally believe tight stitching makes fabric stronger. In reality, excessively tight thread often weakens flexibility and causes the repaired section to lose its natural drape. Traditional Japanese boro textiles were designed for long-term daily wear, which required movement and softness rather than rigid tension.
Thin fabrics react more dramatically because lightweight fibers compress faster than heavier textiles. Old recycled cloth also puckers more easily because aged fibers lose structural stability after years of wear and washing. When several layers are stitched together, the compression effect becomes even stronger.
Professional boro artists usually maintain relaxed tension instead of pulling each stitch completely flat. Slight thread flexibility allows the fabric to move naturally while still holding patches securely in place.
Common signs of overly tight thread tension:
- Dense wrinkles around stitch lines
- Raised ridges along patches
- Curved or twisted fabric edges
- Reduced fabric flexibility
- Stiff repair sections after washing
Helpful tension control techniques:
- Pull thread gently instead of firmly
- Leave slight relaxation between stitches
- Test tension on scrap fabric first
- Use medium-weight fabric for beginners
- Avoid stitching too densely in one area
Real-world experience shows that balanced tension creates smoother and more durable boro repairs than extremely tight stitching.
Is Some Puckering Normal in Traditional Boro Stitching?
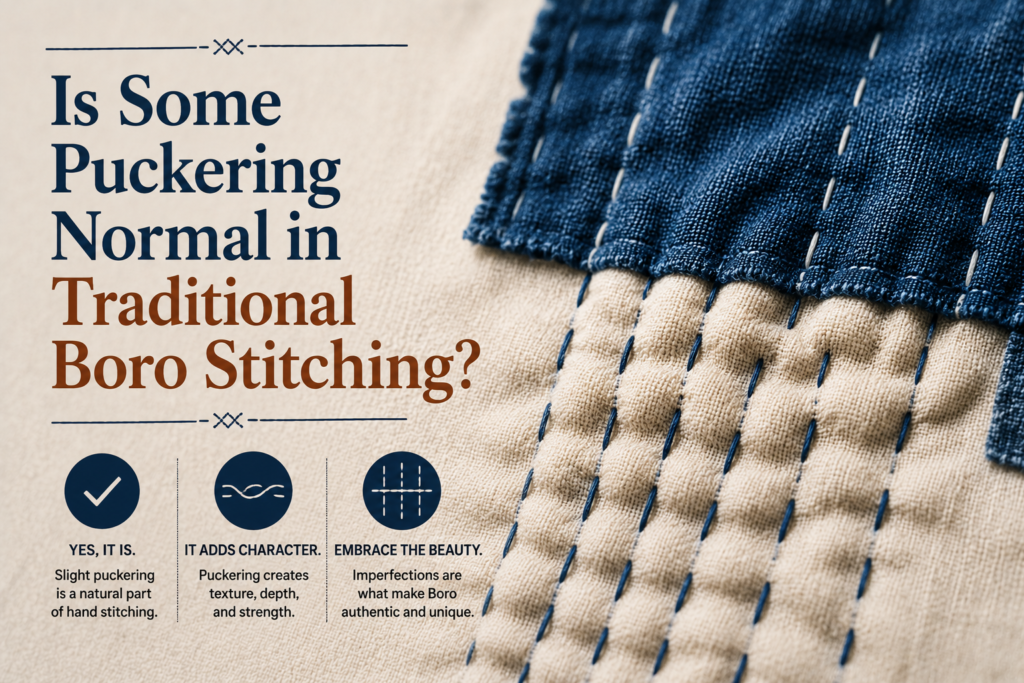
Yes, some puckering is completely normal in authentic boro stitching. Traditional Japanese boro textiles were not designed to appear perfectly smooth like modern factory-made fabric. These garments were repeatedly repaired over many years using layered cloth, visible running stitches, and hand-sewn reinforcement techniques. Slight texture naturally developed through this process.
Modern beginners often expect every repair to lie perfectly flat. However, traditional boro aesthetics value visible handmade character. Small ripples, layered depth, and soft fabric compression are considered signs of authentic repair work rather than flaws.
The key difference is whether the puckering looks balanced or destructive. Gentle texture adds personality and dimension to the textile, while severe wrinkling can distort the fabric structure and reduce comfort.
Vintage boro garments frequently contain irregular surfaces because the original makers focused on durability, warmth, and extending fabric life rather than visual perfection. These textiles reflected practical survival sewing rather than decorative precision.
Normal handmade boro texture includes:
- Mild surface rippling
- Slight dimensional layering
- Flexible stitched movement
- Soft compression around patches
- Organic stitch variation
Problematic puckering includes:
- Sharp folding along stitch lines
- Twisted or warped fabric grain
- Large gathered wrinkles
- Distorted patch shapes
- Excessively stiff sections
Real-world observation shows that experienced boro artists usually accept small imperfections because they enhance the handcrafted appearance of the finished piece. Completely flat stitching often removes the natural texture associated with traditional Japanese visible mending.
Controlled puckering becomes part of the fabric’s visual storytelling and repair history. Vintage boro garments frequently contain irregular surfaces.
How Can You Tell if Boro Puckering Is Normal or a Problem?
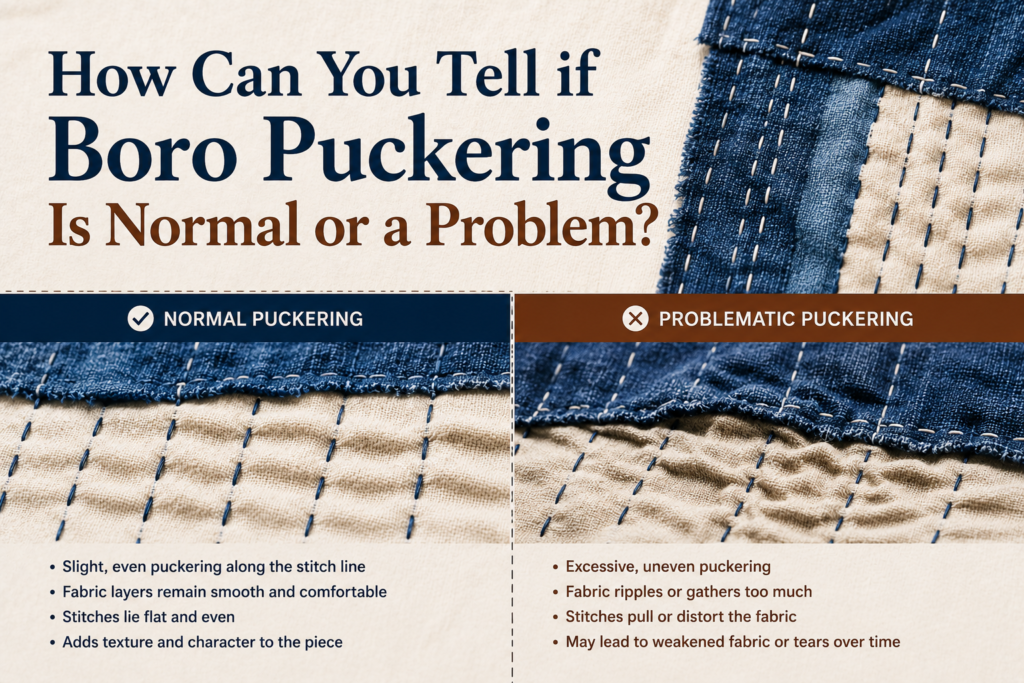
Not all puckering means something went wrong. Traditional boro stitching naturally creates mild surface texture because layered fabrics compress slightly under repeated running stitches. The important difference is whether the fabric still moves comfortably and maintains structural balance.
Healthy handmade texture usually appears soft and evenly distributed across the stitched area. Problematic puckering creates sharp folds, stiff distortion, and twisting that changes the natural drape of the textile.
Experienced boro artists often evaluate the flexibility of the fabric rather than focusing only on visual smoothness. If the repaired section still bends naturally and the fabric grain remains stable, slight puckering is usually acceptable.
Quick comparison guide:
| Healthy Handmade Texture | Problematic Puckering |
| Soft ripples | Sharp folds |
| Flexible movement | Stiff fabric |
| Balanced appearance | Twisted distortion |
| Gentle layered texture | Dense wrinkling |
| Natural drape | Restricted movement |
Traditional Japanese visible mending values authentic repair texture more than machine-flat perfection.
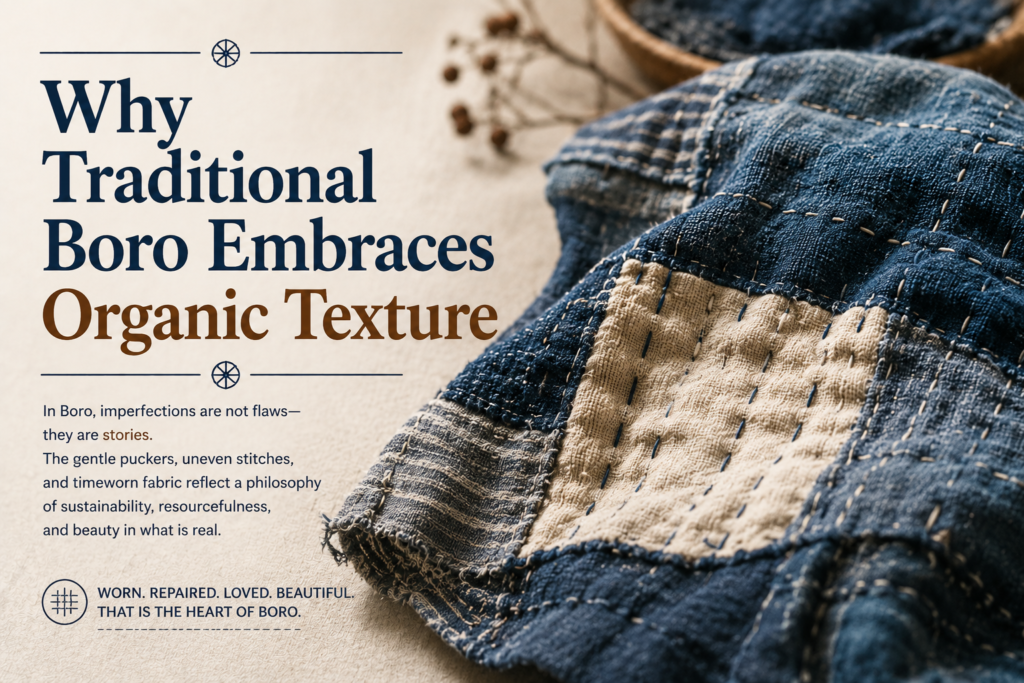
Why Traditional Boro Embraces Organic Texture
Traditional boro stitching developed from practical repair culture rather than decorative perfection. Rural Japanese families repeatedly repaired garments using layered fabric scraps to extend clothing life during periods of material scarcity.
Because these textiles were repaired by hand over many years, slight irregularities naturally became part of their visual identity. Small ripples, uneven fading, and layered texture reflected real use and survival rather than factory precision.
Modern visible mending continues embracing this philosophy by allowing handmade character to remain visible instead of hiding every imperfection.
Traditional boro values include:
- Repair visibility
- Long-term durability
- Functional beauty
- Handmade texture
- Material preservation
Authentic boro often looks more natural when slight texture remains visible instead of forcing the fabric perfectly flat. Experienced makers often choose compatible fabric weights
In order to understand the true cultural history and impact of Japanese Boro Stitching, one must first study its roots, origin and the necessity which essentially gave birth to boro in the first place.
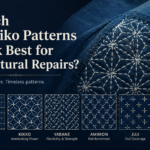
Which Fabrics Pucker Most During Boro Stitching?
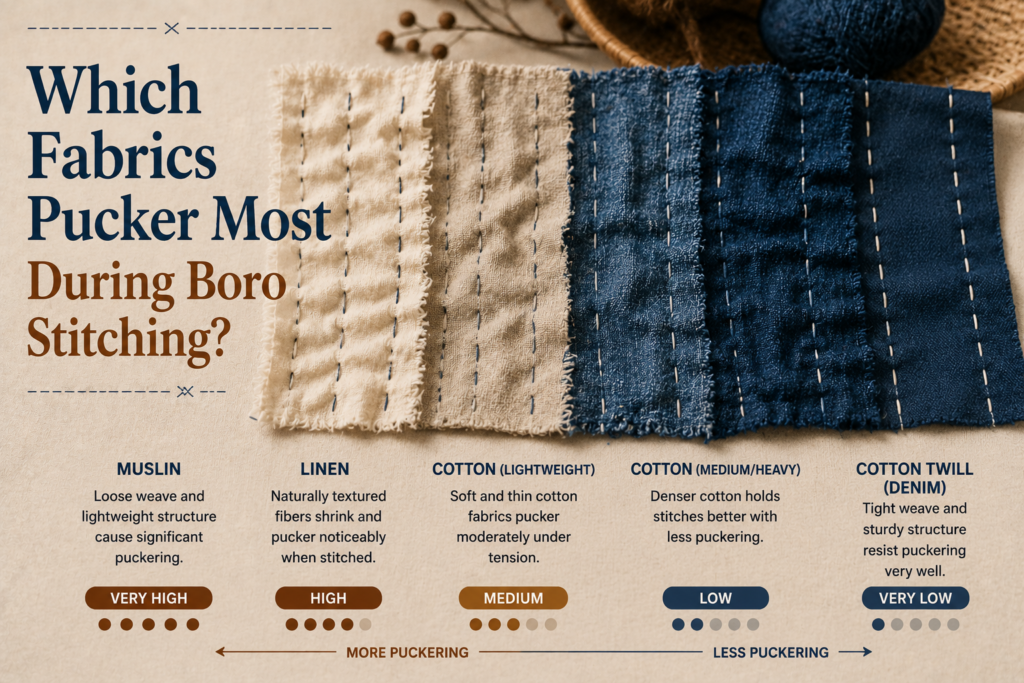
Fabric type strongly affects how much puckering appears during boro stitching. Lightweight fabrics usually wrinkle more because thin fibers compress easily under repeated running stitches. Soft cotton, thin linen, gauze, and worn vintage cloth are especially sensitive to tension changes.
Heavier fabrics such as denim, canvas, and tightly woven indigo cotton resist distortion more effectively because their structure distributes tension across a wider surface area. Medium-weight textiles generally provide the best balance for beginners because they remain flexible without collapsing under stitch pressure.
Old recycled fabric also behaves differently than new cloth. Vintage textiles often contain weakened fibers from repeated washing, sunlight exposure, and long-term wear. These weakened fibers stretch and compress unevenly, increasing the risk of puckering during stitching.
Mixing different fabric weights can create additional tension problems. For example, attaching a heavy denim patch onto lightweight cotton often causes the softer base fabric to wrinkle around the edges of the patch.
Fabric preparation is equally important. Unwashed fabric may shrink later and increase puckering after the project is completed.
Fabrics most likely to pucker:
- Lightweight cotton
- Thin linen
- Gauze fabric
- Soft recycled shirts
- Delicate vintage cloth
Fabrics that usually remain flatter:
- Medium-weight denim
- Canvas
- Heavy indigo cotton
- Structured twill fabric
- Durable workwear textiles
Fabric preparation tips:
- Prewash all fabrics first
- Iron layers flat before stitching
- Match similar fabric weights together
- Avoid extremely stretchy textiles
- Align fabric grain directions carefully
Experienced makers often choose compatible fabric weights because balanced material behavior produces smoother long-term repairs with less distortion. Old recycled fabric also behaves differently than new cloth..
How Thread Thickness Affects Fabric Puckering
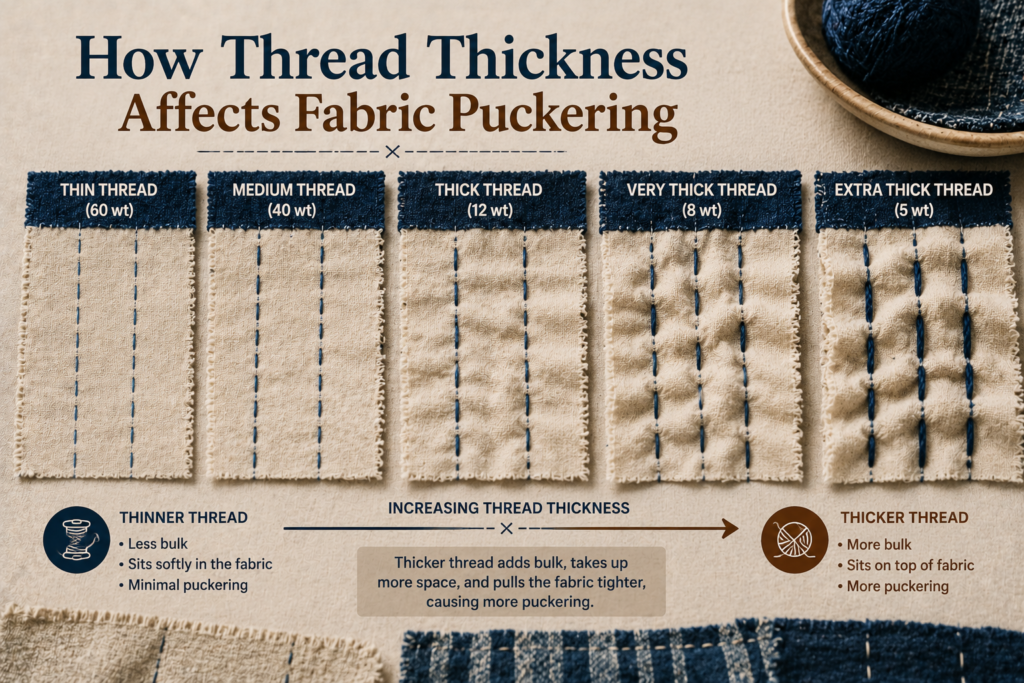
Thread thickness changes how strongly stitches compress fabric during boro repairs. Thick sashiko thread creates bold visible texture, but it also increases compression force on lightweight fabric. Fine thread usually produces smoother stitching with less wrinkling.
Balancing thread thickness with fabric weight helps distribute tension more evenly across the textile surface.
Recommended thread matching guide:
| Fabric Weight | Recommended Thread Type |
| Lightweight cotton | Fine sashiko thread |
| Medium cotton | Standard cotton thread |
| Heavy denim | Thick sashiko thread |
| Vintage thin fabric | Soft fine cotton thread |
| Canvas | Medium-heavy sashiko thread |
Heavy thread on delicate fabric often creates dense ridges and excessive wrinkling. Matching softer thread to lighter textiles usually improves flexibility and long-term fabric balance.
Decorative stitching may still use thicker thread intentionally for visual texture, but tension must remain relaxed to avoid severe puckering.
Why Old Fabric Puckers More Easily
Vintage fabric often puckers faster because older fibers lose structural strength after years of washing, sunlight exposure, and repeated movement. Thin worn cotton gradually becomes softer and less resistant to compression, making stitch distortion more visible during boro repairs.
Sun fading and detergent exposure can weaken internal fiber tension over time. Even high-quality vintage indigo fabric may react differently than newer material once repeated wear softens the textile structure.
Signs of fabric fiber fatigue include:
- Excessive softness
- Thin transparent areas
- Uneven stretching
- Fragile weave structure
- Fast wrinkling during stitching
Experienced makers sometimes reinforce extremely fragile vintage fabric with lightweight backing material before beginning decorative boro stitching.
How Does Uneven Stitch Spacing Create Fabric Distortion?
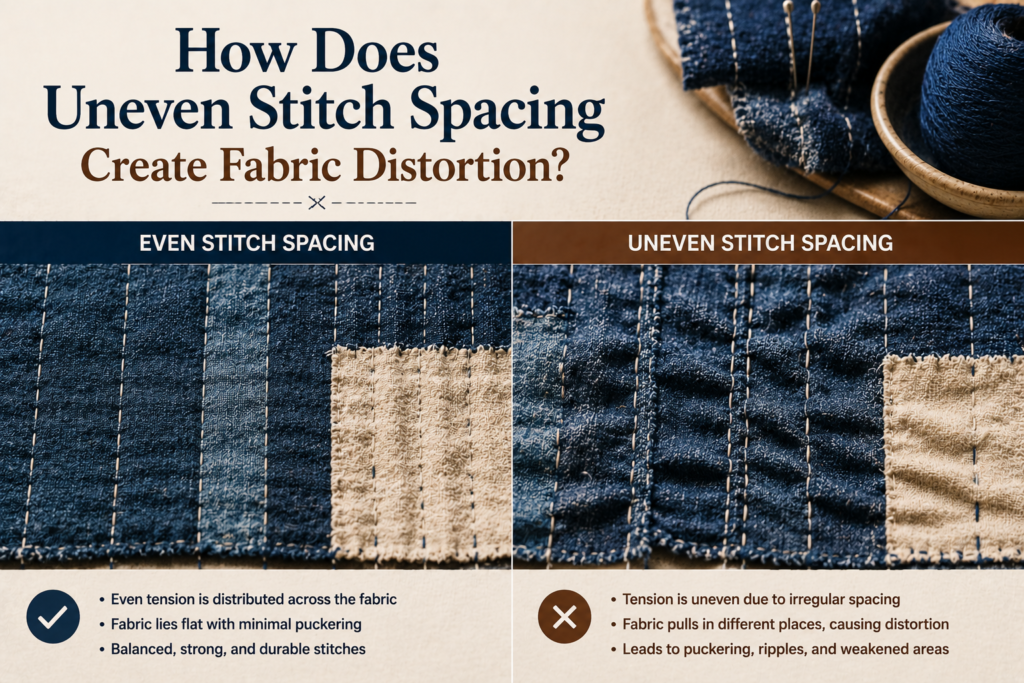
Uneven stitch spacing creates fabric distortion because tension becomes inconsistent across the stitched surface. Some stitches pull tightly while others remain relaxed, causing certain areas of the fabric to compress more than others. This imbalance gradually creates twisting, wrinkling, and uneven patch movement.
Running stitches work best when they follow a balanced rhythm. Traditional sashiko-inspired boro stitching usually uses relatively consistent stitch length and spacing to distribute tension evenly throughout the repair area. When stitches become random in size, the fabric loses structural balance.
Tiny stitches compress fabric more aggressively because multiple stitch points concentrate pressure into a smaller space. Longer stitches spread tension more gently across the textile. Sudden changes between tiny and large stitches create visible distortion lines.
Beginners often create distortion unintentionally by stitching too tightly around corners or focusing excessive stitch density in one small section. Uneven hand movement can also affect stitch consistency.
Professional makers typically develop a stitching rhythm that keeps tension balanced naturally. They prioritize smooth fabric movement instead of forcing perfect stitch precision.
Common stitch spacing mistakes:
- Extremely tiny stitches
- Random stitch lengths
- Dense stitching in one area
- Tight corners around patches
- Abrupt spacing changes
Techniques experts use for balanced stitching:
- Maintain consistent rhythm
- Use relaxed hand movement
- Keep stitch length visually similar
- Rotate fabric gradually while sewing
- Avoid overcrowding stitches
Real-world repair experience shows that visually balanced stitching usually creates flatter and more flexible boro fabric over time.
Consistent stitch spacing also improves the visual harmony of traditional Japanese visible mending patterns. Traditional sashiko-inspired boro stitching usually uses relatively consistent stitch length.
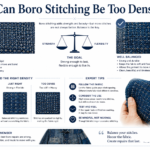
Why Dense Decorative Stitching Creates More Puckering
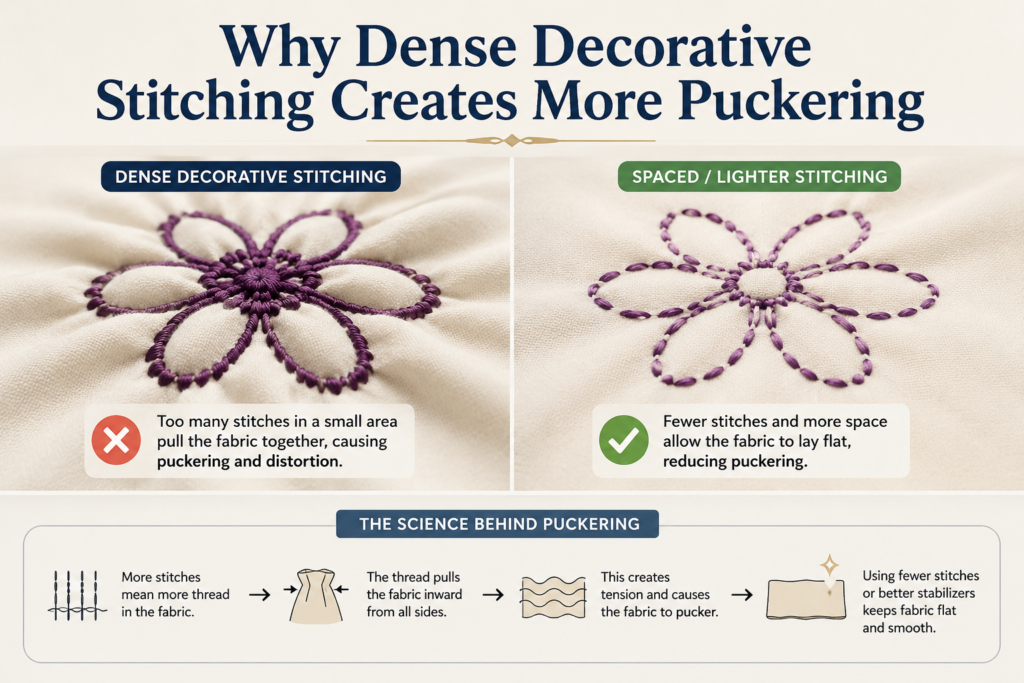
Decorative sashiko-style patterns often create stronger fabric compression than simple reinforcement stitching. Dense geometric stitch grids place repeated tension across large sections of fabric, increasing the chance of wrinkling and surface distortion.
This becomes especially noticeable on lightweight cotton or vintage textiles where repeated stitch rows compress the fibers aggressively.
Large decorative patterns usually require looser thread tension than structural repairs because decorative stitching covers wider surface areas.
Dense stitching patterns that increase puckering risk:
- Tight geometric grids
- Heavy parallel stitch rows
- Repeated diamond patterns
- Dense crosshatch stitching
- Overlapping decorative repairs
Experienced boro artists often balance decorative density with relaxed stitch tension to preserve natural fabric flexibility.
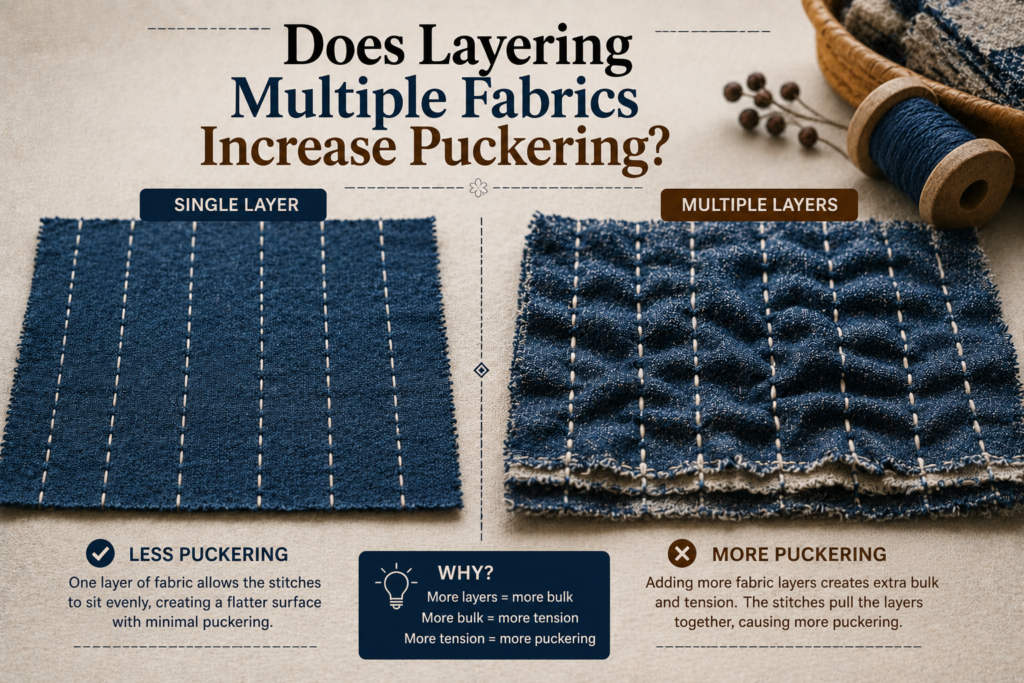
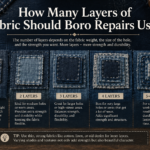
Does Layering Multiple Fabrics Increase Puckering?
Yes, layering multiple fabrics significantly increases the chance of puckering during boro stitching. Each layer responds differently to stitch tension depending on fabric thickness, weave density, age, and flexibility. When several layers move differently under compression, wrinkles and distortion become more noticeable.
For example, thin cotton stretches much faster than heavy denim. If these fabrics are stitched together without proper stabilization, the softer material begins gathering around the heavier patch. This creates rippling and uneven fabric movement.
Large patches also increase distortion risk because oversized fabric sections shift more during stitching and washing. Smaller reinforcement patches usually remain more stable because tension distributes evenly across a smaller surface area.
Fabric grain direction plays another major role. When grain alignment differs between layers, the fabrics pull against each other under stitch tension. This creates twisting and structural imbalance over time.
Traditional Japanese boro garments often used similar recycled indigo fabrics because compatible material behavior reduced tension problems naturally.
Common layering problems:
- Mixing very different fabric weights
- Misaligned grain direction
- Oversized patches
- Unsecured patch corners
- Uneven stitching across layers
Best practices for stable layered stitching:
- Use similar fabric weights together
- Pin or baste layers securely
- Iron fabrics before sewing
- Stitch gradually outward from the center
- Avoid bulky overlapping seams
Real-world observation shows that controlled layering produces better long-term durability and smoother visual texture in boro projects.
Balanced fabric interaction is one of the most important skills advanced boro artists learn through experience. This creates twisting and structural imbalance over time.
Why Fabric Grain Direction Changes Boro Stitching Behavior

Fabric grain direction strongly affects how boro stitching behaves after sewing and washing. Straight-grain fabric remains relatively stable, while bias-cut fabric stretches more easily under tension. When different grain directions are stitched together, the fabrics pull against each other unevenly during movement and shrinkage.
This is especially noticeable when attaching diagonal patches onto straight cotton or denim surfaces. Even if the repair initially appears flat, the fabric may twist later after washing because each layer contracts differently.
Traditional boro garments often used similarly aligned recycled fabric pieces because matching grain direction reduced distortion naturally over time.
Common grain-related problems include:
- Twisting after washing
- Warped patch corners
- Uneven fabric stretching
- Diagonal wrinkling
- Distorted stitch patterns
A denim patch stitched diagonally onto straight-grain cotton frequently develops directional puckering because the tension distributes unevenly across the layered fibers.
Can Washing and Shrinkage Make Boro Stitching Pucker More?
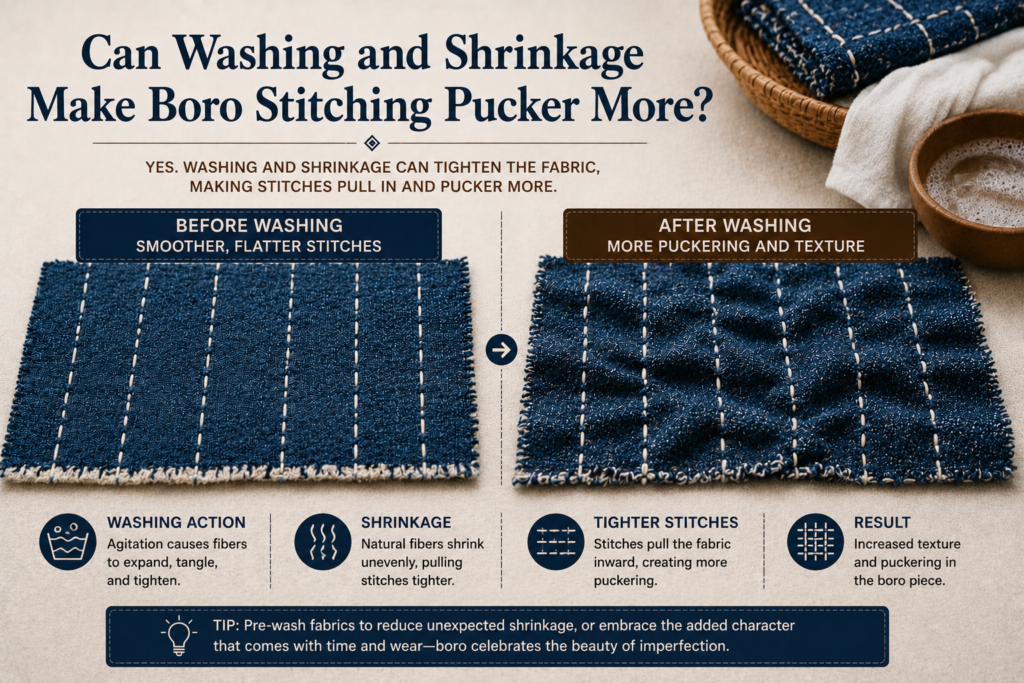
washing and shrinkage can make boro stitching pucker much more after the project is completed. Different fabrics shrink at different rates when exposed to water and heat. If patches and base fabric react differently during washing, tension imbalance increases and wrinkles become more visible.
This problem commonly appears when combining new fabric with old recycled cloth. Fresh cotton often shrinks differently than aged vintage textiles. Linen and denim also react differently to moisture exposure.
Thread behavior matters as well. Some threads tighten slightly after washing, which increases compression around stitched areas. Heat drying can intensify this effect even further.
Many beginners become confused when a project looks flat during sewing but develops wrinkles after the first wash. In most cases, unwashed fabric and uneven shrinkage are the primary causes.
Professional makers usually prewash all fabric before starting a boro repair project. This removes most shrinkage before stitching begins and creates more predictable long-term results.
Signs shrinkage is causing puckering:
- New wrinkles after washing
- Twisted patch edges
- Tightened stitch lines
- Increased fabric stiffness
- Distorted stitching patterns
Ways to reduce shrinkage problems:
- Prewash all materials first
- Avoid aggressive hot drying
- Let fabric air dry naturally
- Steam press fabric before assembly
- Wash completed projects gently
Traditional boro textiles often softened over time because repeated washing gradually relaxed fabric tension and created a more natural handmade appearance.
Some mild puckering after washing is still considered normal in authentic visible mending work
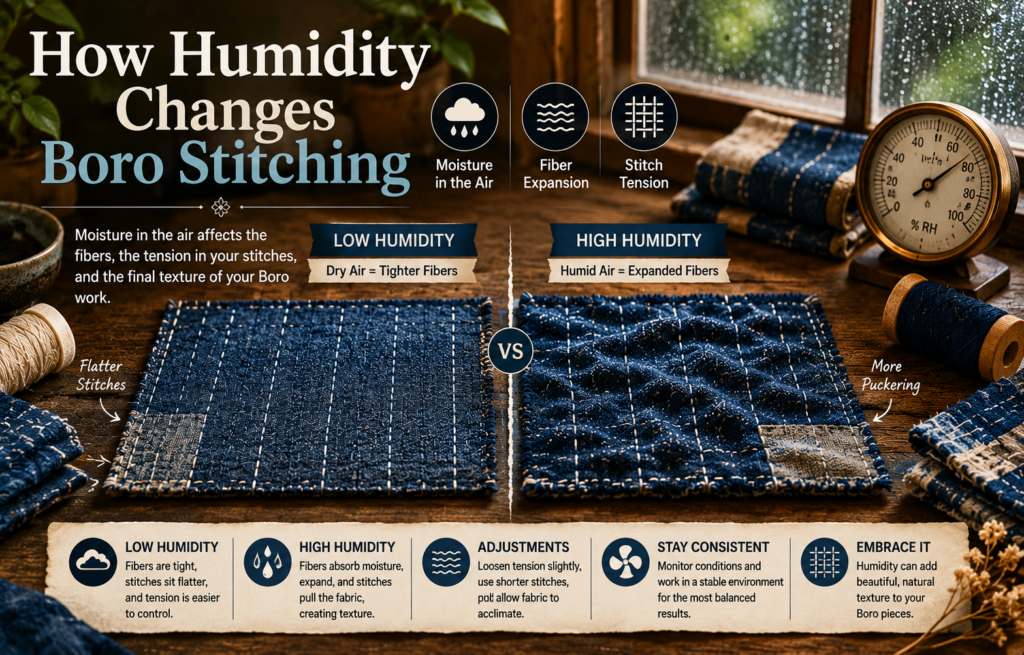
How Humidity Changes Boro Stitching Tension
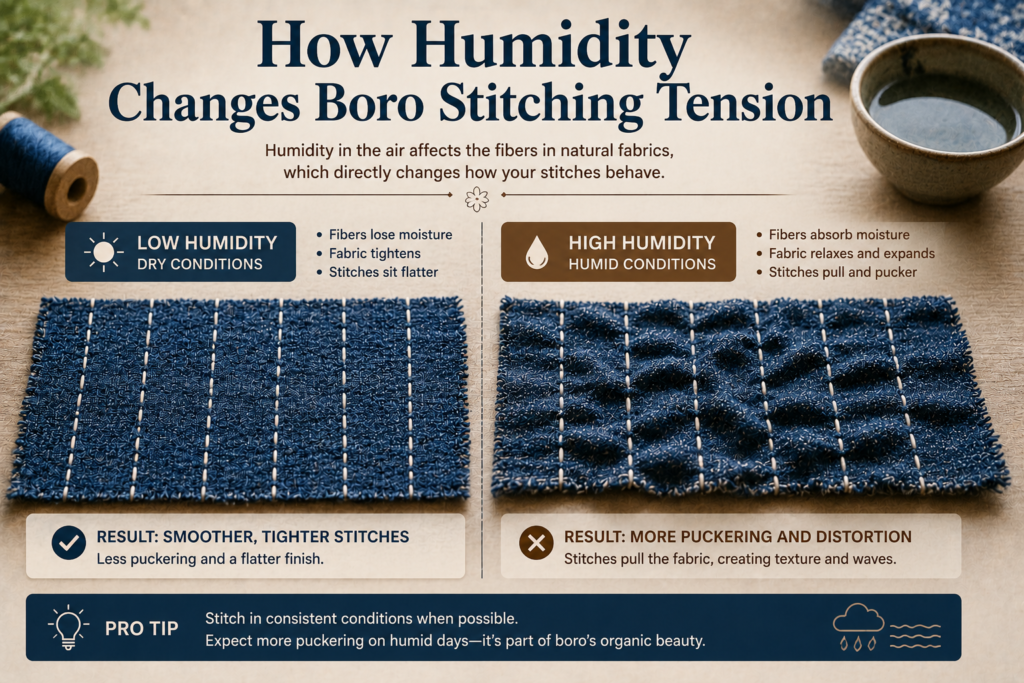
Environmental humidity affects how fabric fibers respond to stitching tension. Dry conditions make cotton fibers stiffer, which increases visible wrinkling during sewing. Slightly humid conditions soften the fibers and allow stitches to settle more naturally into the fabric surface.
This is one reason fabric sometimes behaves differently during winter compared to summer sewing conditions.
Steam pressing also temporarily softens fibers, helping reduce aggressive puckering after stitching. Traditional textile workers often used moisture and pressing techniques to relax tension gradually instead of forcing the fabric flat immediately.
Environmental factors that affect puckering include:
- Dry indoor air
- Heat exposure
- Steam ironing
- Fabric storage conditions
- Seasonal humidity changes
Some experienced makers lightly steam fabric during stitching sessions because softened fibers respond more evenly to running stitches.Thread behavior matters as well.
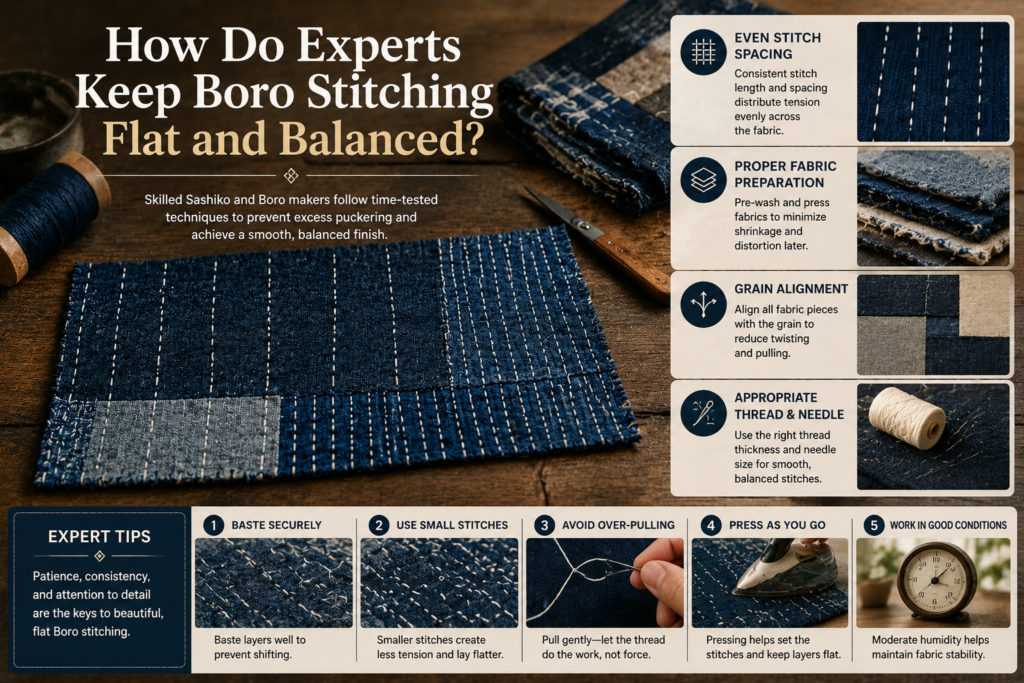
How Do Experts Keep Boro Stitching Flat and Balanced?
Experienced boro artists keep stitching balanced by controlling tension, choosing compatible fabrics, maintaining consistent stitch rhythm, and allowing the textile to move naturally during sewing. Instead of forcing the fabric flat, they focus on flexibility and structural harmony.
Professional makers usually stitch gradually outward from the center of a repair area. This prevents excessive tension from concentrating in one location. They also avoid pulling the thread tightly after every stitch.
Needle selection can improve control as well. Long sashiko needles help create smoother running stitches because multiple stitches can be loaded onto the needle at once. This improves rhythm and reduces uneven compression.
Fabric stabilization techniques are also common. Some artists temporarily baste layers together before sewing permanently. Others use lightweight stabilizers for delicate fabric.
Experienced makers understand that boro stitching should remain flexible rather than rigid. Balanced texture is preferred over perfect flatness.
Expert techniques for reducing puckering:
- Relax thread tension
- Maintain consistent stitch spacing
- Use similar fabric weights
- Prewash materials first
- Stitch gradually outward
- Rotate fabric smoothly while sewing
Helpful tools professionals use:
- Long sashiko needles
- Fine cotton thread
- Fabric clips or pins
- Temporary basting thread
- Steam iron for pressing
Real-world observation shows that advanced boro stitching often appears balanced because experienced artists understand how fabric behaves under long-term tension and repeated movement.
Good boro work combines durability, texture, flexibility, and visual rhythm together. They also avoid pulling the thread tightly after every stitch.
How Humidity Changes Boro Stitching
Hand position affects stitch tension more than many beginners realize. Pulling thread upward aggressively creates stronger compression than guiding the thread gently sideways through the fabric. Unsupported fabric movement can also stretch the textile while sewing, increasing distortion later.
Experienced boro artists usually stabilize the fabric lightly with one hand while guiding stitches smoothly with the other. This helps maintain balanced tension across layered textiles.
Wrist tension also influences stitch consistency. Tight hand movement often creates uneven running stitches and irregular compression patterns.
Common ergonomic mistakes include:
- Pulling thread too forcefully
- Stretching fabric while sewing
- Sewing with unsupported fabric
- Tight wrist movement
- Abrupt stitching direction changes
Relaxed hand control usually produces smoother stitch rhythm and more natural fabric movement over time.
Best Workflow to Prevent Boro Fabric Puckering
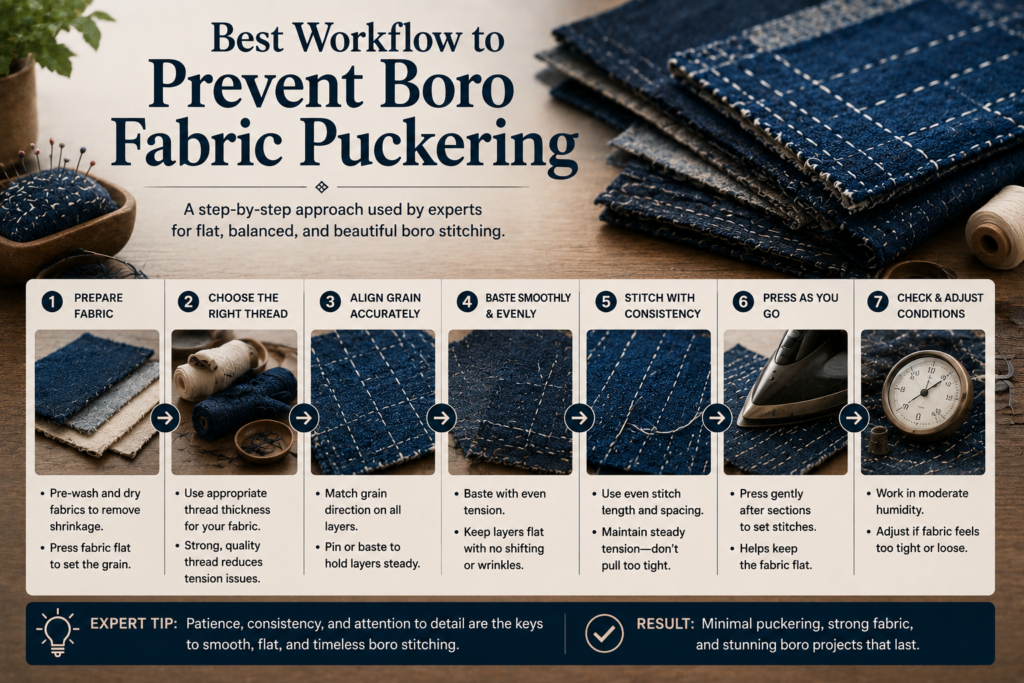
Preventing puckering starts before the first stitch is sewn. Most tension problems develop during fabric preparation and layering rather than during the stitching itself.
Following a structured workflow helps keep tension balanced throughout the entire repair process.
Recommended boro preparation workflow:
Step 1: Prewash all fabric
Remove shrinkage before stitching begins.
Step 2: Match similar fabric weights
Balanced layers move more evenly together.
Step 3: Align grain direction carefully
Proper grain alignment reduces twisting later.
Step 4: Secure layers with basting or clips
Stable fabric shifts less during sewing.
Step 5: Use relaxed running stitches
Avoid pulling thread tightly after every stitch.
Step 6: Steam press the finished repair
Gentle steam helps redistribute tension naturally.
Professional boro artists usually focus on gradual tension control instead of trying to flatten fabric forcefully after distortion already develops.
Quick Fabric Puckering Diagnosis Checklist
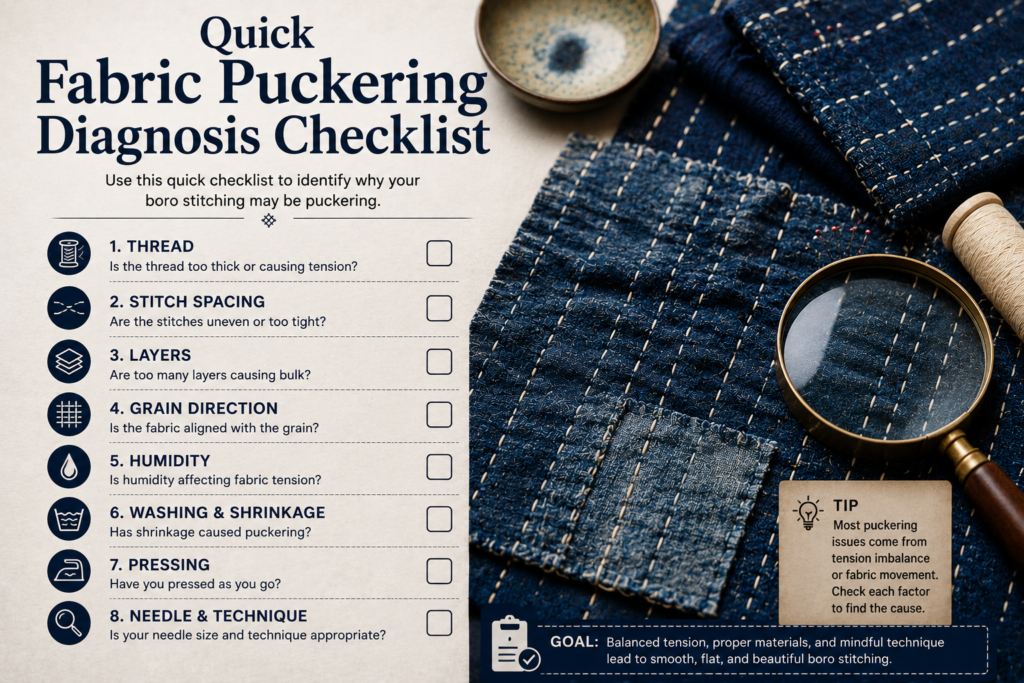
Different types of puckering usually point toward different stitching problems. Learning to identify the visual pattern helps makers correct tension issues more accurately during future repairs.
If your fabric shows these signs:
| Fabric Behavior | Likely Cause |
| Sharp folds | Thread tension too tight |
| Twisting after washing | Grain mismatch |
| Wrinkled patch edges | Oversized patch |
| Dense ridges | Excessive stitch density |
| Uneven rippling | Inconsistent stitch spacing |
| Stiff repair sections | Heavy thread compression |
Most severe puckering problems develop from several small tension mistakes happening together rather than one single issue.
Experienced makers often examine how the fabric drapes naturally after stitching instead of evaluating the repair only while the fabric is stretched flat on a table.
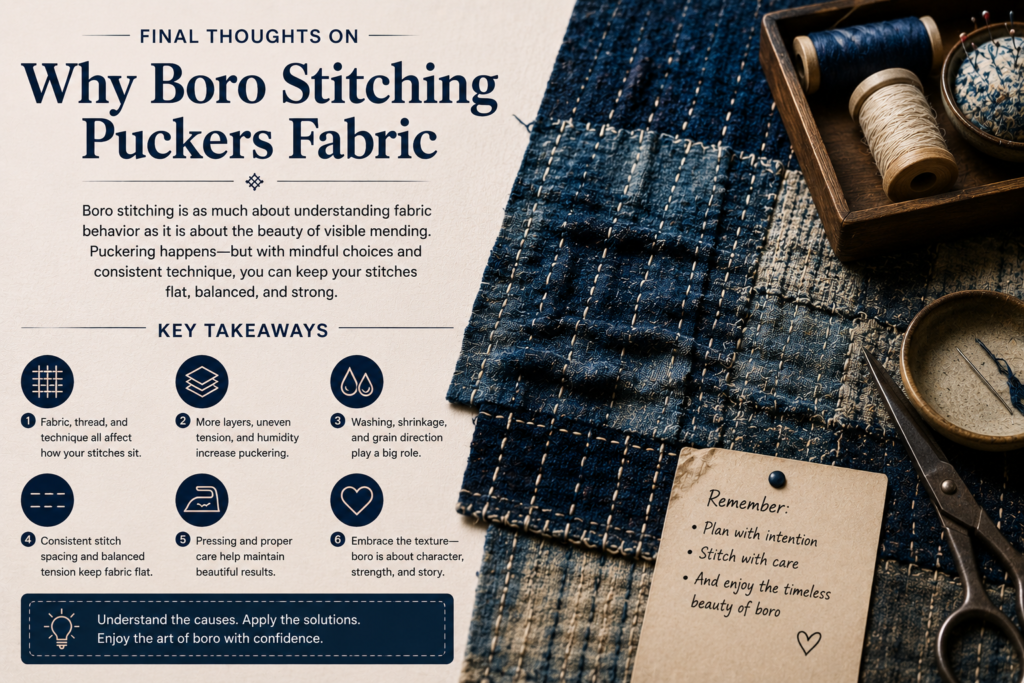
Final Thoughts on Why Boro Stitching Puckers Fabric
Boro stitching puckers fabric because repeated running stitches naturally compress textile fibers and pull layered materials together. Some texture is completely normal in traditional Japanese visible mending because authentic boro was never intended to look perfectly smooth or machine-made.
Severe puckering usually develops from tight thread tension, inconsistent stitch spacing, unstable layering, fabric shrinkage, or mismatched fabric weights. Beginners commonly pull stitches too tightly or use delicate fabrics that distort easily under compression.
Understanding fabric behavior is one of the most important parts of successful boro stitching. The goal is not eliminating every ripple completely. Instead, the goal is creating balanced texture, durable reinforcement, and natural handmade character without damaging the structure of the textile.
Traditional Japanese boro aesthetics embrace visible repair history, layered depth, and organic stitching variation. Controlled puckering often adds warmth and authenticity to the finished piece.
Key lessons to remember:
- Mild puckering is normal
- Tight tension creates severe distortion
- Fabric weight affects stability
- Consistent stitch rhythm matters
- Prewashing reduces shrinkage problems
- Balanced texture improves authenticity
With practice, makers gradually learn how to control thread tension, layering, and stitch spacing to create stronger and visually balanced boro repairs that maintain flexibility over time.
Authentic boro stitching reflects durability, patience, repair culture, and handmade textile tradition rather than factory perfection.
FAQ Section
Is puckering always bad in boro stitching?
No. Mild puckering is often part of authentic handmade boro texture and visible repair aesthetics.
Why do beginners create more puckering?
Beginners usually pull thread too tightly and use inconsistent stitch spacing.
Which fabric puckers the most during boro stitching?
Thin cotton, gauze, lightweight linen, and soft vintage fabric usually pucker the most.
Does thicker thread increase puckering?
Yes. Thick thread compresses lightweight fabric more aggressively.
Can ironing remove puckering completely?
Steam pressing may reduce mild puckering, but severe distortion sometimes remains permanent.
Should boro stitching look perfectly flat?
Not necessarily. Authentic boro often contains slight texture and layered dimension.
Does washing increase puckering?
Yes. Uneven shrinkage after washing can create additional wrinkles.