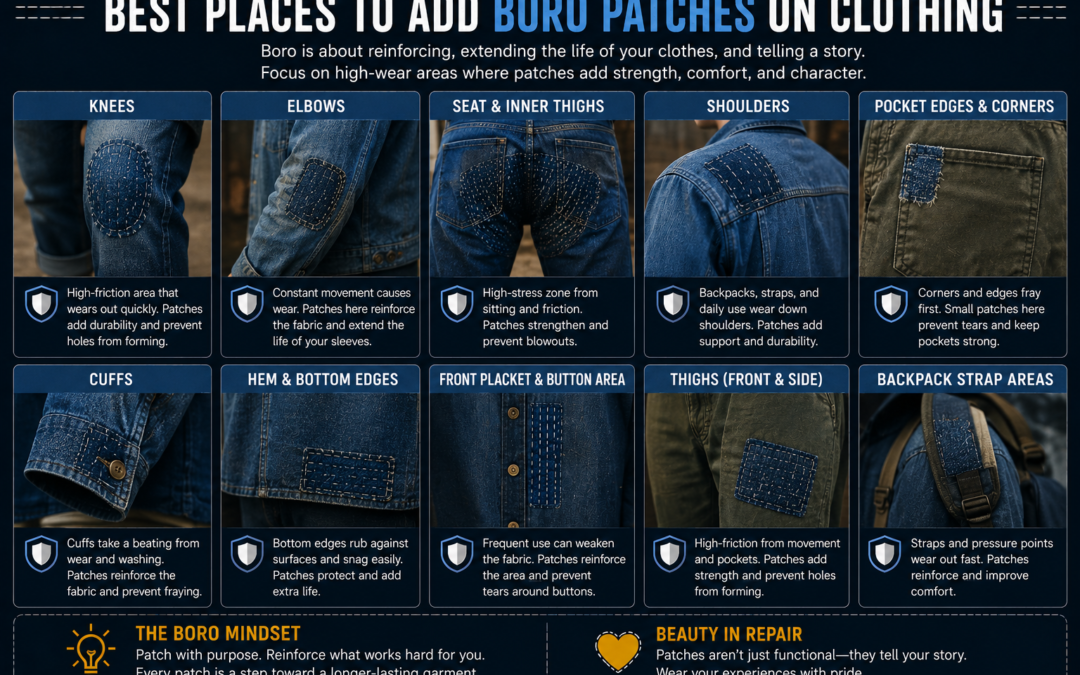
Traditional Japanese Boro Stitching repairs were never random. Every patch placement served a practical purpose. Farmers, fishermen, and laborers reinforced clothing in areas exposed to constant friction, pressure, bending, and abrasion. Today, visible mending enthusiasts still follow the same logic because strategic patch placement extends garment lifespan while adding texture, depth, and authentic character. The best areas for boro patches are usually knees, elbows, inner thighs, cuffs, pocket corners, shoulders, and seat panels because these sections wear down first. Understanding why fabric fails helps create stronger repairs that last longer and look more intentional.
Where Should You Place Boro Patches First?

The best place to add a boro patch is always the area experiencing the highest amount of friction and repeated stress. Fabric rarely tears randomly. Most clothing weakens gradually in predictable zones where movement, stretching, and abrasion continuously break down fibers over time. Traditional Japanese repair culture focused on maintaining garments for decades, so repairs were added strategically instead of purely for decoration.
For jeans, the first weak zones are usually the knees and inner thighs because walking and sitting repeatedly strain those sections. Jackets often fail around elbows, cuffs, and shoulders because those areas fold constantly and rub against desks, bags, and work surfaces. Pocket corners also weaken quickly due to repeated hand movement and heavy objects such as wallets or tools.
Good patch placement improves both durability and aesthetics. A properly placed patch distributes stress across a wider fabric area instead of concentrating force on one damaged point. This prevents small holes from expanding into large tears.
The most effective beginner-friendly locations include:
- Jean knees
- Jacket elbows
- Back pockets
- Shirt forearms
- Canvas tote bag corners
- Workwear thigh panels
Why Rounded Boro Patches Often Last Longer
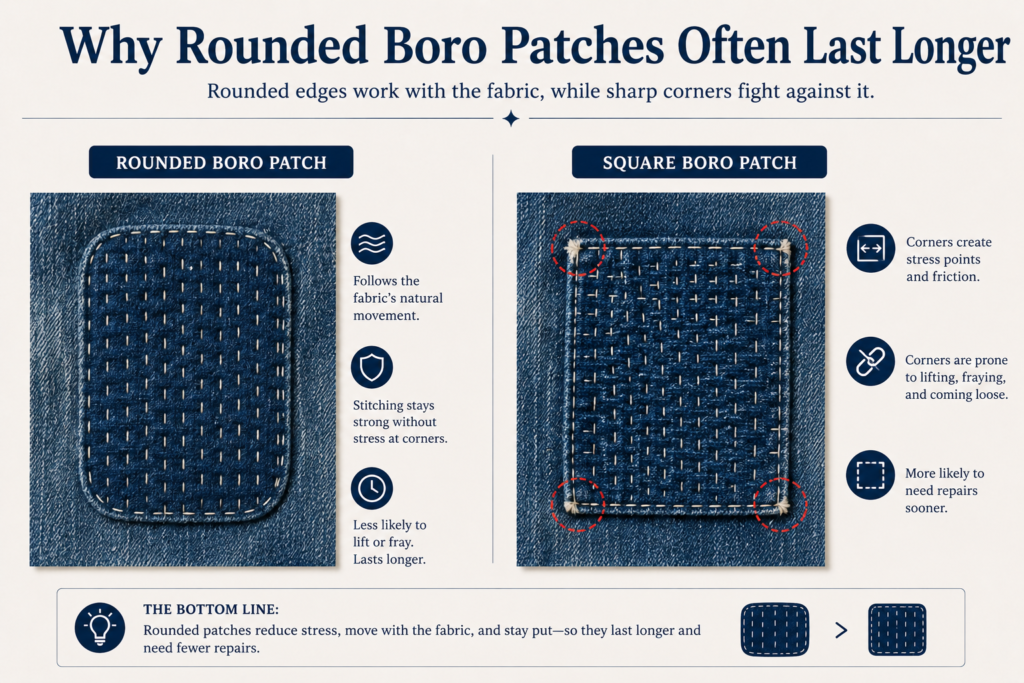
Patch shape affects repair durability more than many beginners realize. Square and rectangular patches are common because they are easier to cut, but sharp corners tend to concentrate stress during movement and washing. Over time, tension builds around those corners, increasing the likelihood of edge lifting or nearby fabric tearing.
Rounded or oval patches distribute force more evenly across the garment. Curved edges reduce abrupt tension transitions between the patch and surrounding fabric, which helps repairs flex more naturally during bending and stretching.
Traditional boro repairs often developed organically through overlapping irregular patch shapes instead of perfectly measured geometric forms. This layering method improved flexibility while minimizing rigid stress points.
Rounded patches work especially well for:
- Knee repairs
- Elbow reinforcement
- Inner thigh patching
- Seat panel reinforcement
Square patches may still work effectively on flat low-flex areas such as:
- Tote bags
- Aprons
- Jacket backs
- Utility pockets
For stronger long-term repairs:
- Avoid extremely sharp corners
- Extend patches beyond weak fabric
- Use multiple stitch directions
- Match patch flexibility to garment movement
Patch geometry influences both durability and comfort, making shape selection an important part of structural visible mending.
Preventive patching is often more effective than repairing a fully torn garment.
How Fabric Weakens Before Holes Appear
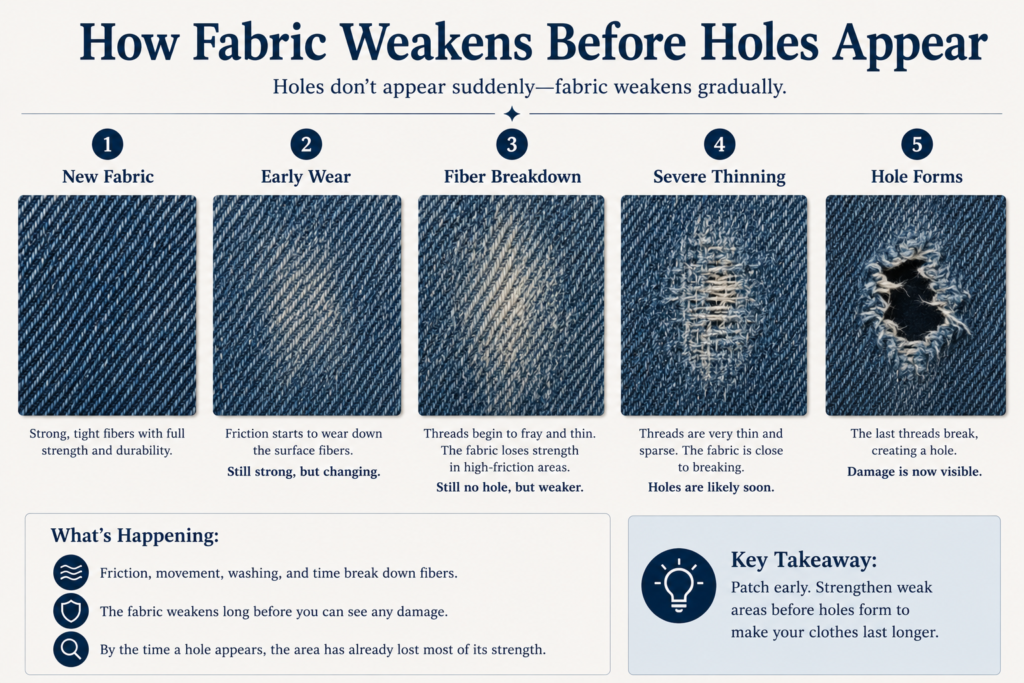
Fabric damage usually develops gradually rather than suddenly. Cotton fibers first lose surface strength through repeated abrasion, especially in high-friction zones like knees, thighs, and cuffs. As the outer fibers wear down, the weave becomes thinner and softer. Over time, small stress lines appear where tension repeatedly concentrates during movement.
One of the earliest warning signs is increased light penetration through the fabric. Thin denim often appears slightly translucent before tearing fully. Minor fuzzing, loose threads, and seam distortion also indicate weakening structural integrity. Once fibers begin separating unevenly, small micro-tears form inside the weave long before a visible hole appears.
Traditional Japanese workwear repairs often targeted these early-stage weaknesses instead of waiting for catastrophic tearing. Reinforcing fabric during the thinning phase distributes stress more evenly and slows further deterioration significantly.
Common fabric failure stages include:
- Surface fading and abrasion
- Fiber softening
- Weave thinning
- Increased flexibility in weak areas
- Micro-tear formation
- Seam stress distortion
- Full rupture or hole formation
Understanding this progression helps place boro patches more strategically and improves long-term repair durability.
Adding reinforcement while the fabric is only thinning can dramatically increase clothing lifespan and
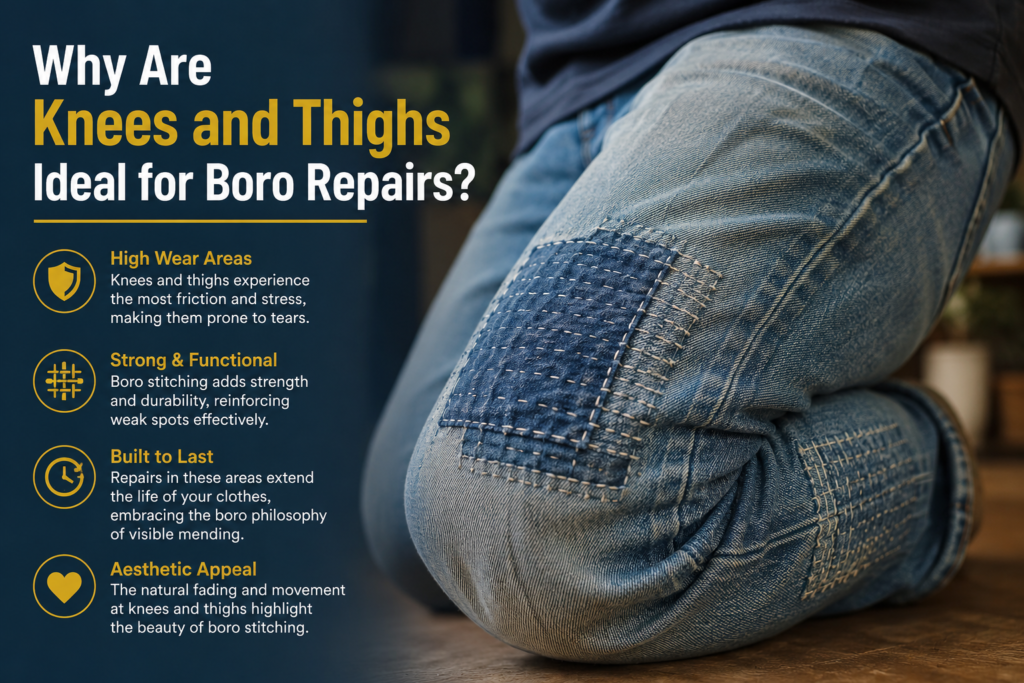
Why Are Knees and Thighs Ideal for Boro Repairs?
Knees and inner thighs are among the most common repair zones in denim because they experience constant movement and friction throughout daily wear. Walking, crouching, cycling, kneeling, and sitting all create repeated stress that slowly weakens cotton fibers. Before a visible hole appears, the fabric usually becomes thin, soft, and faded. This thinning stage is the ideal moment for preventive boro reinforcement.
Traditional workwear repairs often focused heavily on these areas because replacing clothing was expensive and time-consuming. Instead of discarding damaged garments, workers layered indigo fabric over weak zones and secured the patches with sashiko running stitches. These dense stitches distributed tension across multiple fabric layers, helping garments survive much longer.
The knees are particularly suitable for decorative visible mending because the placement naturally draws attention. Large geometric sashiko patterns work well here because the flat surface gives stitch designs room to stand out visually.
Inner thigh repairs are usually more structural than decorative because the goal is durability rather than appearance. Strong repairs typically extend beyond the weak area by at least one or two inches.
Important considerations for thigh and knee patching include:
- Use medium or heavyweight cotton patches
- Avoid overly stiff fabric
- Extend patches beyond thin areas
- Reinforce edges carefully
- Stitch densely in high-friction sections
Preventive reinforcement in these locations can extend denim lifespan by several years
High-Friction vs Low-Friction Clothing Zones
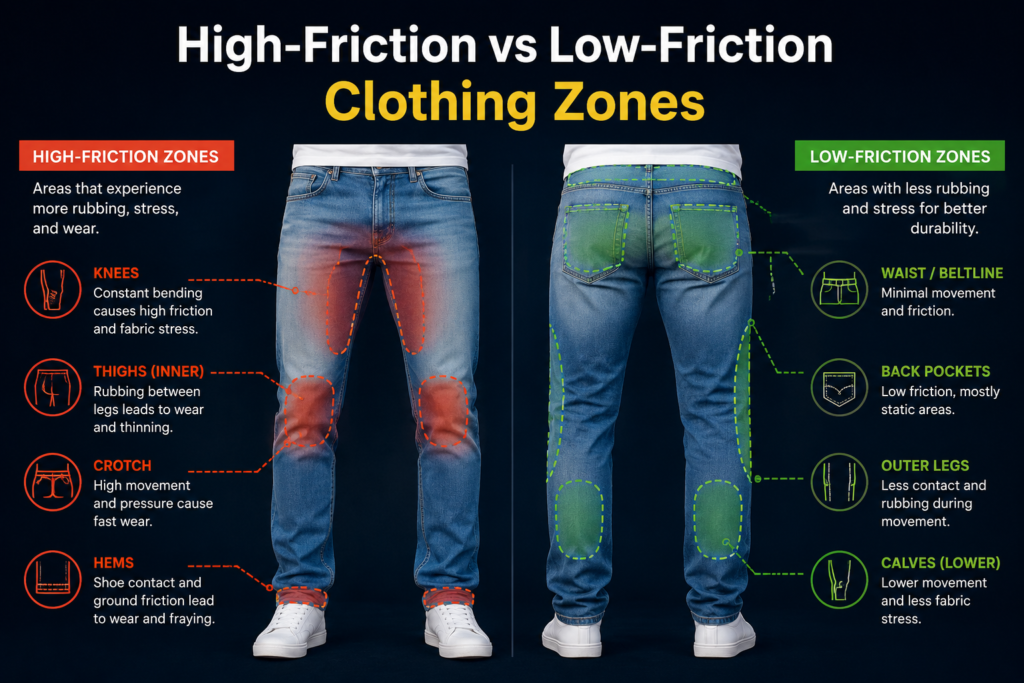
Not all garment areas wear down at the same speed. Some sections experience constant abrasion and movement while others remain relatively stable for years. Understanding friction intensity helps prioritize where reinforcement should happen first.
High-friction zones usually require:
- denser stitching
- stronger fabric
- larger overlap areas
- more frequent maintenance
Lower-friction areas can often use lighter decorative reinforcement instead.
| High Friction Zones | Medium Friction Zones | Low Friction Zones |
| Inner thighs | Knees | Upper back |
| Pocket corners | Elbows | Outer sleeves |
| Cuffs | Seat panels | Chest panels |
| Shoulder straps | Lower jacket front | Side torso |
| Belt line folds | Forearms | Hood panels |
Workwear garments often develop concentrated wear patterns based on repeated body movement, tool placement, and daily labor habits. Mapping friction zones before patching helps create more durable and visually balanced repairs.
Which Jacket Areas Benefit Most From Boro Stitching?

Jackets contain several natural stress points that respond extremely well to boro reinforcement. Elbows are the most obvious because bending the arms repeatedly creates folding pressure that gradually weakens fibers. Over time, fabric around the elbows loses density and becomes more vulnerable to tearing. This makes elbow patches one of the oldest and most recognizable forms of visible reinforcement.
Shoulders also wear down quickly, especially on workwear and utility jackets. Backpack straps, tool belts, and repeated lifting motions create friction concentrated in narrow zones. Cuffs are another common failure point because they rub against desks, machinery, countertops, and daily surfaces constantly.
Heavy canvas and indigo chore coats are ideal for visible mending because the dense weave supports layered stitching well. Boro repairs on jackets often become stronger than the surrounding original fabric after reinforcement.
The best jacket patch locations include:
- Elbows
- Sleeve creases
- Shoulder tops
- Lower front panels
- Pocket openings
- Cuffs
- Side seam stress points
Many traditional Japanese garments used multiple overlapping patches instead of one large repair panel. This layering method improved flexibility while reducing stiffness. It also created the textured visual depth now strongly associated with authentic boro aesthetics.
Decorative stitching patterns work particularly well on jackets because the garment remains highly visible while worn. Contrasting indigo shades and layered cotton textures create .
Are Pocket Corners Good Locations for Boro Patches?

Pocket corners are one of the most overlooked but important areas for reinforcement. Every time a hand enters or exits a pocket, tension pulls against the same small points repeatedly. Carrying heavy objects such as wallets, phones, knives, or tools increases the stress even further. Over time, pocket corners begin to fray, split, or tear completely.
Boro patching works exceptionally well here because small reinforcement patches can prevent large structural damage later. Traditional workwear repairs frequently included layered fabric around pocket openings because these sections failed consistently during hard labor.
Pocket repairs are also ideal for beginners because the repair area is relatively small and manageable. Simple running stitches can dramatically improve strength without requiring advanced sewing techniques.
Effective pocket reinforcement strategies include:
- Reinforcing from inside the garment
- Extending the patch beyond the damaged edge
- Using tightly woven cotton fabric
- Adding dense sashiko stitching near corners
- Combining decorative and structural stitching
Small pocket repairs often create strong visual character because they highlight natural wear patterns instead of hiding them. Uneven fading around repaired pockets gives garments an authentic aged appearance that machine-made distressing rarely replicates convincingly.
Preventive reinforcement works particularly well for back pockets because sitting places additional stress on those sections daily. Many experienced visible mending practitioners reinforce pocket corners before damage becomes visible.
When done correctly, pocket reinforcement blends functionality with aesthetics, which reflects the original philosophy behind Japanese boro repair culture.
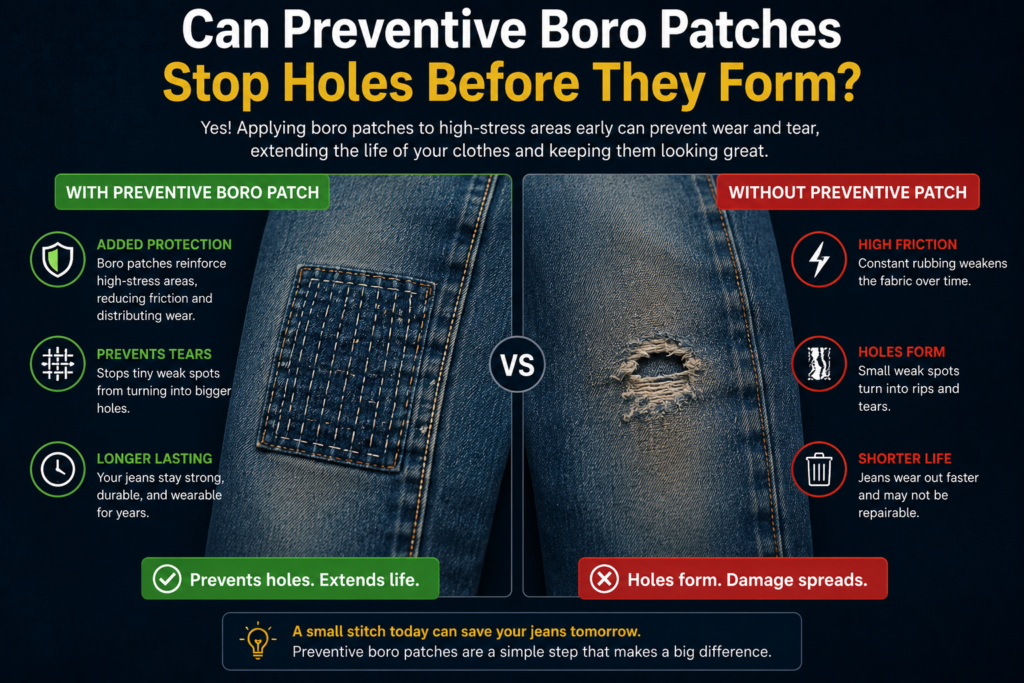
Can Preventive Boro Patches Stop Holes Before They Form?
Preventive patching is one of the smartest and most practical uses of boro stitching. Instead of waiting for fabric to tear completely, reinforcement is added during the thinning stage while the garment still retains structural integrity. This reduces stress concentration and prevents small weaknesses from developing into major holes.
Traditional Japanese textile repair culture treated clothing as a long-term resource rather than a disposable item. Garments were maintained continuously through layering, stitching, and reinforcement. Preventive mending reflects this same philosophy by extending usable lifespan before catastrophic failure occurs.
Thin areas often appear first as:
- Fading
- Softening fabric texture
- Loose weave visibility
- Stretch distortion
- Surface fuzzing
- Minor stitch separation
Adding reinforcement early allows the original fabric to continue supporting itself alongside the patch. Repairs added after full tearing usually require heavier stitching and more structural correction.
Preventive patches work especially well on:
- Raw denim
- Work jackets
- Canvas bags
- Utility pants
- Aprons
- Cotton chore coats
Inside reinforcement combined with visible sashiko stitching creates the strongest long-term results. Many experienced repair artists intentionally use lightweight patches for preventive repairs because they preserve flexibility while still improving strength.
One major advantage of preventive mending is visual integration. Repairs added before major damage often blend more naturally into the garment’s aging process. Over time, the patched sections fade and soften together with the surrounding fabric, producing a more cohesive appearance.
How Long Do Boro Repairs Usually Last?
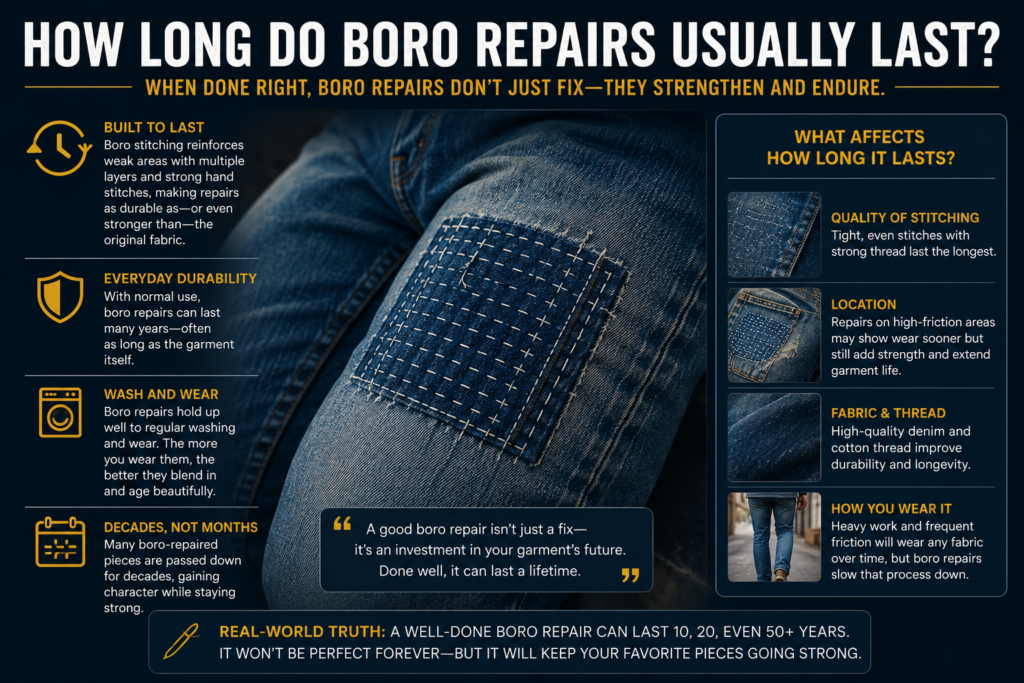
Boro repairs can last anywhere from several months to many years depending on fabric quality, stitch density, friction exposure, and washing frequency. Structural reinforcement patches generally survive much longer than decorative patches because they distribute stress more effectively across larger fabric areas.
Preventive repairs usually outlast emergency hole repairs because the surrounding fabric still retains much of its original strength when reinforcement begins.
Typical lifespan estimates include:
| Repair Type | Estimated Lifespan |
| Decorative surface patch | 3–12 months |
| Preventive denim reinforcement | 2–6 years |
| Heavy sashiko workwear repair | 1–5 years |
| Inner thigh emergency repair | 6–24 months |
| Canvas jacket elbow patch | 2–8 years |
Frequent machine drying, aggressive detergents, and high-friction daily use shorten repair lifespan considerably. Hand washing or gentle cold washing helps preserve both stitching tension and patch flexibility.
Well-maintained boro garments often develop multiple generations of layered reinforcement over time, which reflects the original philosophy of continuous repair rather than permanent restoration.
Should Boro Patches Go Inside or Outside Clothing?
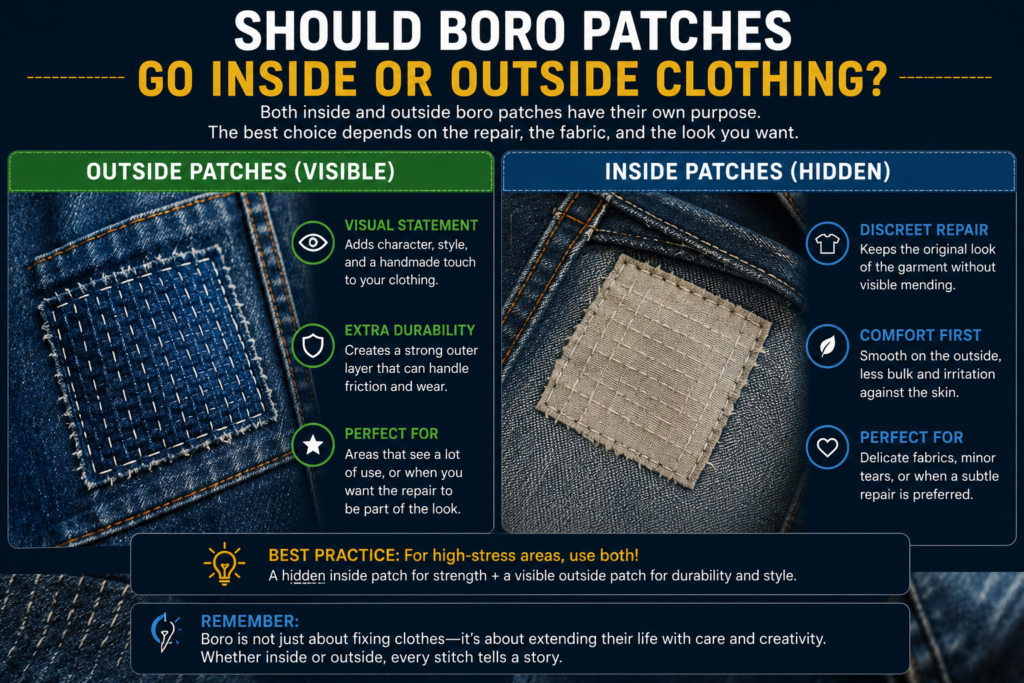
Both internal and external patch placement serve important purposes in boro repair, but each method creates different visual and structural results. Inside patches are generally stronger because they support weakened fibers directly beneath the damaged area. External patches provide a more visible layered appearance associated with traditional boro aesthetics.
Many durable repairs combine both approaches. An internal patch supplies structural reinforcement while visible sashiko stitching secures everything together from the outside. This method balances durability with visual texture.
Internal patches are best for:
- High-friction areas
- Structural support
- Thin fabric reinforcement
- Hidden repairs
- Comfort-sensitive locations
External patches are better for:
- Decorative contrast
- Layered indigo textures
- Artistic stitching visibility
- Traditional visible mending aesthetics
- Statement repair work
Fabric choice also matters significantly. Heavy patches on lightweight garments can create stiffness and new stress points. Flexible cotton fabrics usually integrate better than rigid synthetic materials.
The original Japanese boro tradition focused primarily on practicality. Repairs were added wherever necessary regardless of appearance. Over time, the layered textures and visible stitches became appreciated as a unique visual style connected to craftsmanship and sustainability.
Modern visible mending often intentionally emphasizes the repair instead of hiding it. Contrasting fabrics, uneven stitching, and layered patch edges celebrate the history of the garment rather than disguising wear.
Choosing inside or outside placement depends on whether the repair goal is structural durability, visual impact, or a balance between both.
How Stitch Density Affects Boro Patch Strength

Stitch density plays a major role in how long a repair survives under repeated friction and movement. Sparse decorative stitching may look visually appealing, but structural reinforcement usually requires closer stitch spacing to distribute tension evenly across the patch.
High-friction zones such as inner thighs and knees benefit from denser sashiko stitching because the repeated motion places constant strain on both the patch and surrounding fabric. Wider stitch spacing works better for low-stress decorative repairs where flexibility matters more than reinforcement strength.
General stitch density guidelines include:
| Repair Type | Stitch Density |
| Decorative patch | Wide spacing |
| Preventive reinforcement | Medium spacing |
| Heavy structural repair | Dense spacing |
| High-flex areas | Balanced flexible spacing |
| Thick canvas repairs | Medium-to-dense spacing |
Overly dense stitching can sometimes reduce flexibility and create stiffness in lightweight garments. Traditional boro repairs balanced durability with movement by adjusting stitch spacing according to fabric weight and stress exposure.
Consistent running stitch tension also improves repair longevity because uneven stitching concentrates force in isolated sections of the fabric.
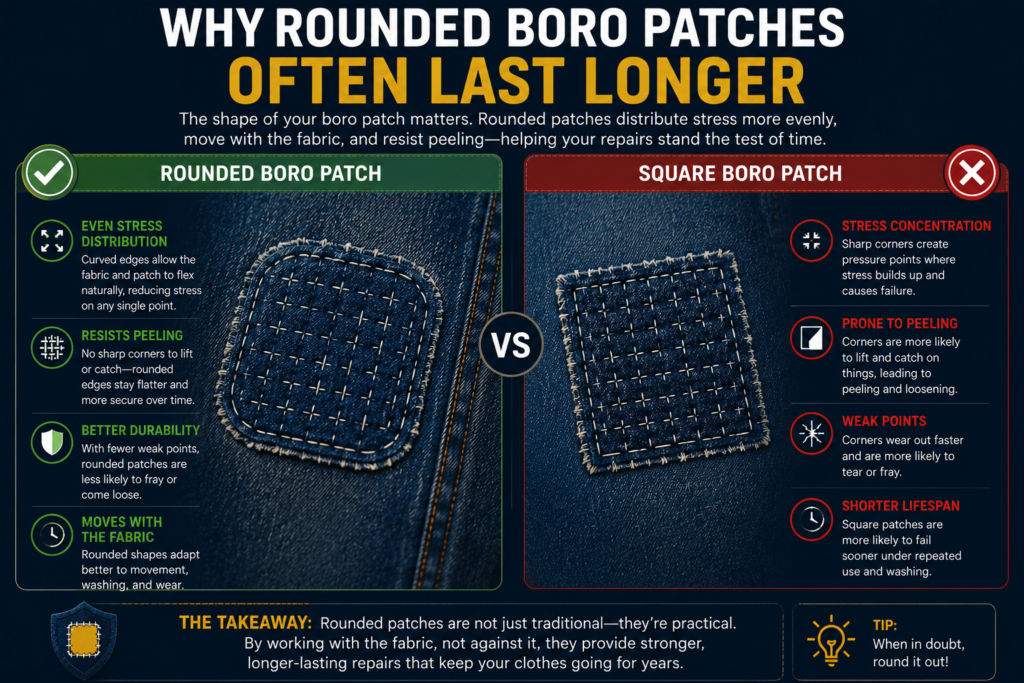
Why Rounded Boro Patches Often Last Longer
Patch shape affects repair durability more than many beginners realize. Square and rectangular patches are common because they are easier to cut, but sharp corners tend to concentrate stress during movement and washing. Over time, tension builds around those corners, increasing the likelihood of edge lifting or nearby fabric tearing.
Rounded or oval patches distribute force more evenly across the garment. Curved edges reduce abrupt tension transitions between the patch and surrounding fabric, which helps repairs flex more naturally during bending and stretching.
Traditional boro repairs often developed organically through overlapping irregular patch shapes instead of perfectly measured geometric forms. This layering method improved flexibility while minimizing rigid stress points.
Rounded patches work especially well for:
- Knee repairs
- Elbow reinforcement
- Inner thigh patching
- Seat panel reinforcement
Square patches may still work effectively on flat low-flex areas such as:
- Tote bags
- Aprons
- Jacket backs
- Utility pockets
For stronger long-term repairs:
- Avoid extremely sharp corners
- Extend patches beyond weak fabric
- Use multiple stitch directions
- Match patch flexibility to garment movement
Patch geometry influences both durability and comfort, making shape selection an important part of structural visible mending.
Which Clothes Work Best With Boro Patch Placement?

Not every garment responds equally well to boro patching. The best candidates are sturdy woven fabrics capable of supporting layered stitching without excessive stretching or distortion. Denim remains the most popular option because its dense cotton weave handles reinforcement extremely well while developing attractive fading around repaired sections.
Canvas workwear, chore coats, utility pants, aprons, and heavy cotton overshirts also perform exceptionally well. These garments naturally develop visible wear patterns that complement the rustic texture of boro stitching.
Ideal fabrics for visible mending include:
- Denim
- Canvas
- Heavy cotton twill
- Indigo-dyed fabric
- Duck cloth
- Workwear cotton blends
Clothing with natural abrasion zones usually benefits most because repairs become integrated into the garment’s aging process. This creates a more authentic appearance compared to decorative patching on lightly worn fashion items.
Poor candidates for boro patching include:
- Thin synthetic leggings
- Stretch activewear
- Lightweight silk
- Delicate knitwear
- Elastic-heavy garments
Highly elastic fabrics place constant strain on stitches, causing repairs to distort or fail prematurely. Loose knits are particularly difficult because the fabric shifts excessively during movement.
Traditional Japanese workwear often used indigo cotton because the material aged beautifully while remaining strong enough for repeated reinforcement. Over decades, garments accumulated multiple layers of patches, creating the textured surfaces now associated with antique boro textiles.
Modern visible mending still follows these same principles.
Why Traditional Japanese Workwear Used Repeated Patch Placement
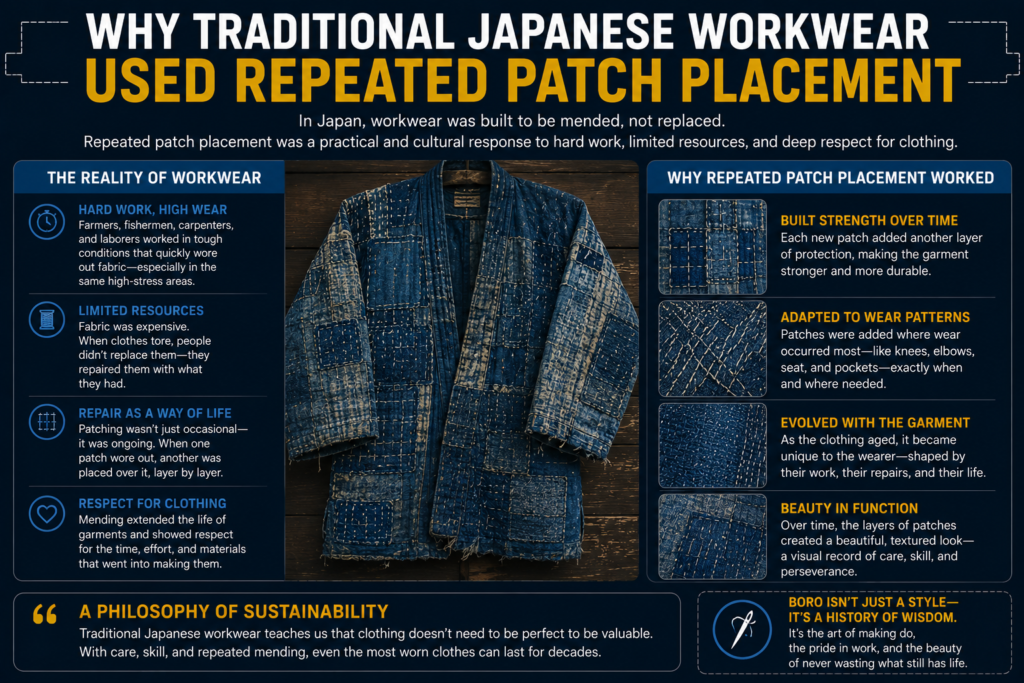
Boro stitching developed from necessity rather than fashion. During Japan’s Edo and Meiji periods, rural families often repaired garments repeatedly because fabric was expensive and difficult to replace. Indigo-dyed cotton workwear became especially valuable, leading people to reinforce the same garments for decades across multiple generations.
Farmers, fishermen, and laborers patched areas exposed to constant physical stress, including knees, elbows, shoulders, and seat panels. Instead of discarding worn clothing, they layered additional fabric over weakened sections and secured the repairs with running stitches that distributed tension more evenly.
Over time, garments accumulated multiple overlapping repairs that created the textured visual appearance now associated with antique boro textiles.
Traditional repairs commonly featured:
- Indigo cotton patches
- Layered reinforcement
- Uneven stitching patterns
- Reused textile fragments
- Functional rather than decorative placement
The goal was durability and survival rather than aesthetic perfection. Modern visible mending still follows many of these same principles, especially when repairs emphasize garment longevity instead of hiding wear completely.
Understanding the historical function behind patch placement helps modern repairs feel more authentic and structurally intentional.
How Many Layers Should a Boro Patch Have?
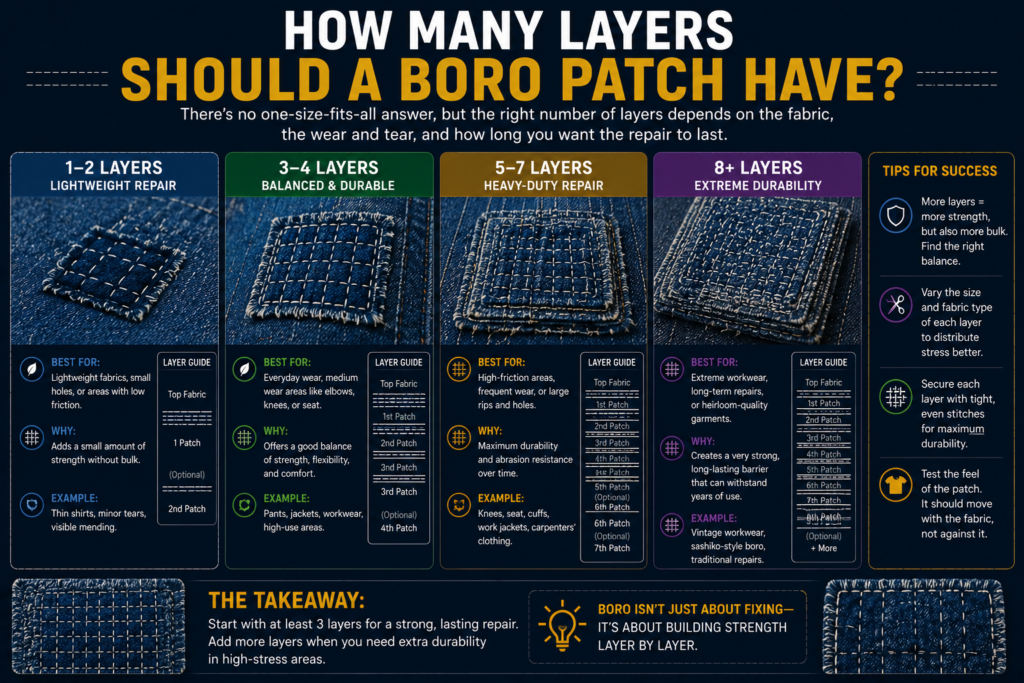
The ideal number of patch layers depends on fabric thickness, garment flexibility, and how much stress the repaired area experiences daily. Traditional boro garments often accumulated multiple generations of layered repairs over many years, but modern visible mending usually works best with controlled reinforcement rather than excessive bulk.
For lightweight repairs, a single patch layer may provide enough support while maintaining comfort and flexibility. Medium-stress zones such as elbows or knees often benefit from two layers because the additional reinforcement distributes tension more effectively without becoming too rigid.
Heavy workwear repairs sometimes use:
- one internal structural patch
- one external reinforcement layer
- visible sashiko stitching across both
Excessive layering can create stiffness, rubbing, and uneven fabric tension, especially in fitted garments.
General layering recommendations include:
| Garment Type | Recommended Layers |
| Lightweight shirts | 1 layer |
| Denim knees | 1–2 layers |
| Heavy workwear | 2–3 layers |
| Canvas bags | 2+ layers |
| Decorative visible mending | 1 layer |
The strongest repairs balance reinforcement with natural garment movement instead of simply adding maximum fabric thickness.
Durable woven fabrics provide the best balance between repair strength, comfort, flexibility, and long-term visual appeal.
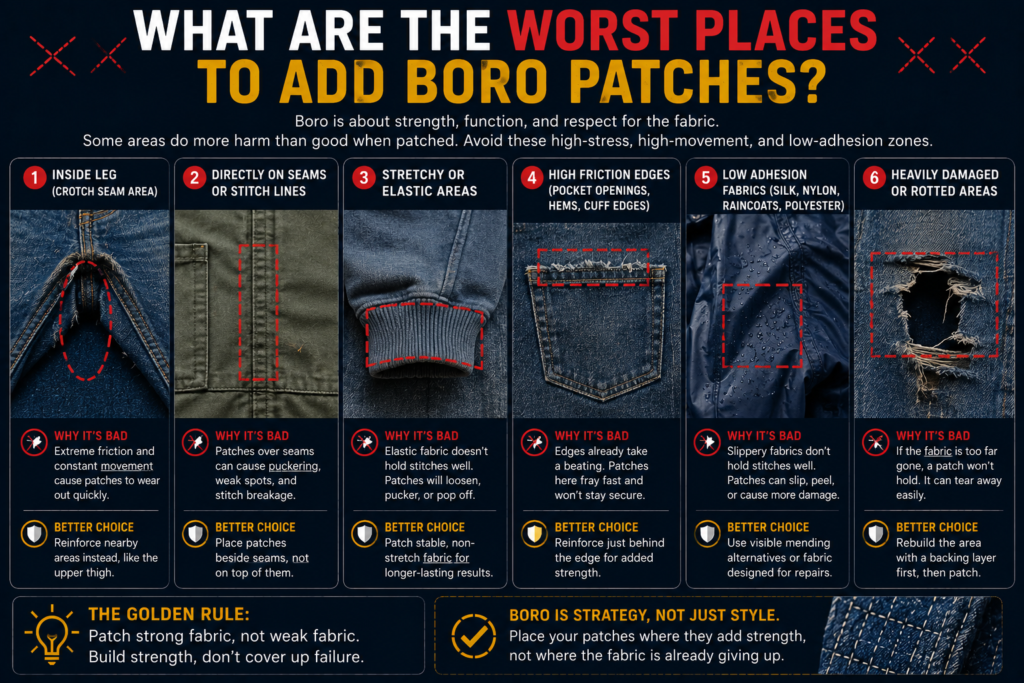
What Are the Worst Places to Add Boro Patches?
Some areas simply do not support boro stitching effectively because the fabric moves too much or lacks sufficient structural stability. Patching these zones can sometimes create additional stress instead of improving durability.
Elastic waistbands are difficult because constant stretching strains both the patch and the stitching. Thin synthetic leggings and activewear fabrics also perform poorly since the material expands and contracts aggressively during movement. Heavy reinforcement on lightweight fabric may cause nearby tearing where stress shifts beyond the patch edges.
Poor patch locations include:
- Elastic waistbands
- Thin stretch fabric
- Tight seam intersections
- Lightweight silk
- High-flex knitwear
- Compression clothing
Curved seam intersections are another challenging area for beginners because multiple fabric layers and directional tensions make consistent stitching difficult. Poorly aligned reinforcement can create puckering or uneven strain distribution.
Decorative patching without structural planning may also reduce comfort. Thick overlapping layers inside fitted garments can create stiffness, rubbing, or restricted movement. This is why traditional repairs usually balanced reinforcement with flexibility.
Another common mistake is using patches that are too small. Tiny reinforcement pieces concentrate tension near the edges instead of distributing it properly. Strong repairs require enough overlap beyond the weak zone to spread stress gradually.
Understanding fabric behavior is essential for successful visible mending. Durable repairs work with the garment’s natural movement instead of fighting against it. Choosing the right placement often matters more than the complexity of the stitching itself.
FAQ SECTION
What is the best place to add a boro patch?
Knees, inner thighs, elbows, and pocket corners are the best locations because they experience the most friction and stress.
Can boro patches prevent holes?
Yes. Preventive reinforcement is one of the most effective traditional uses of boro stitching.
Should boro patches be inside or outside?
Inside patches strengthen fabric best, while outside patches create a more visible traditional aesthetic.
Do boro patches work on stretchy fabric?
They work poorly on highly elastic fabrics because the constant movement stresses the stitches.
Which clothes are best for boro stitching?
Denim, canvas, cotton workwear, and indigo garments respond best to boro repairs.
Are sashiko stitches necessary?
Dense running stitches help distribute tension and improve patch durability.
How large should a boro patch be?
A patch should extend beyond the damaged area by at least 1–2 inches for better reinforcement.
Can decorative boro patches still strengthen fabric?
Yes, but structural reinforcement requires stronger fabric overlap and denser stitching.