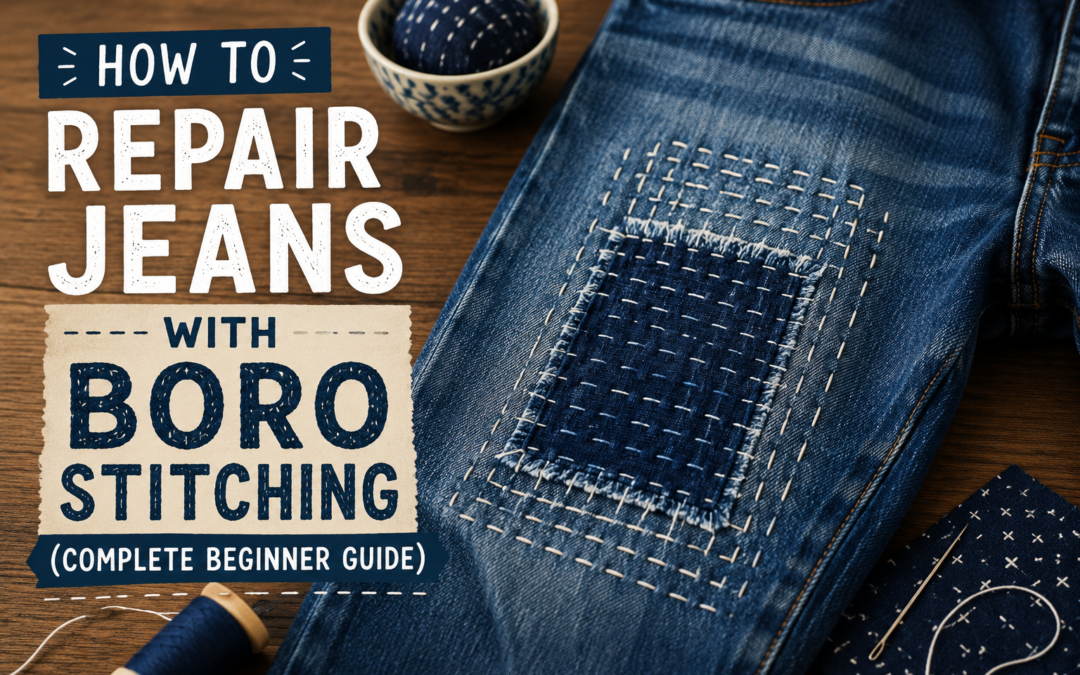
Jeans are one of the most frequently worn clothing items, which means they also wear out faster than many other fabrics. Knees tear, inner thighs thin out, pockets rip, and hems start fraying. Most people either throw them away or use machine patches, but there is a better and more meaningful way to repair them: boro stitching.
Boro stitching is a traditional Japanese repair method built around layering fabric and reinforcing damaged textiles through repeated stitching. Instead of hiding damage, boro makes the repair visible, strong, and artistic. This makes it perfect for denim because denim naturally ages, fades, and carries character over time.
Repairing jeans with boro is not just about fixing holes. It extends garment life, reduces waste, and gives your denim a unique visual identity. Unlike invisible repair methods, boro celebrates wear.
Key reasons people choose boro for jeans:
- Strengthens weak areas
- Adds personality to denim
- Extends clothing lifespan
- Supports sustainable fashion
- Works well for beginners
Decision clarity: If your jeans have sentimental value or high-quality denim, boro repair is often better than replacement because it preserves fabric history while improving durability.
What Is Boro stitching and Why Is It Perfect for Jeans?
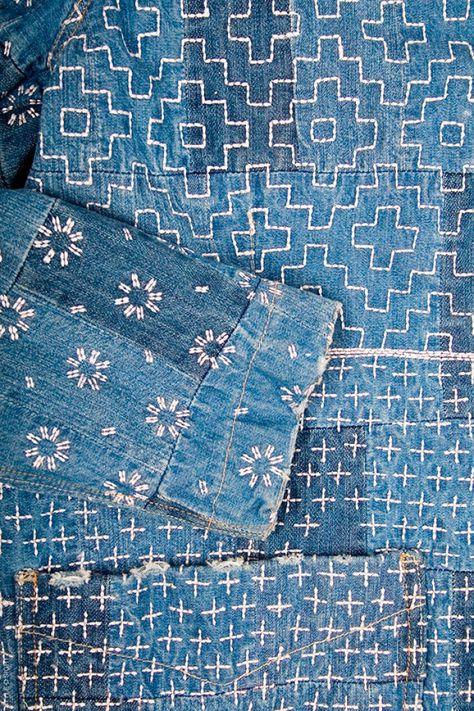
Boro originated in rural Japan as a necessity-based textile repair tradition. Families reused fabric scraps and stitched worn garments repeatedly to extend their usefulness. Over time, these repairs became part of the garment’s story. Today, boro is appreciated globally for both function and design.
Jeans are ideal for boro because denim is thick, strong, and visually compatible with layered patches. Indigo-dyed fabrics age beautifully, and patched denim often looks better over time as wear blends old and new materials together.
Boro works especially well on denim because:
- Denim handles dense stitching well
- Layered patches reinforce stress points
- Indigo fabric creates authentic boro aesthetics
- Visible stitching complements jean texture
- Repairs become stronger than original weak spots
Unlike temporary iron-on patches, boro integrates repair into the fabric structure itself. Every stitch locks fibers together, distributing pressure and preventing future tearing.
Decision clarity: If the damage is structural—not just cosmetic—boro offers a stronger long-term solution than adhesive patches.
For a full historical background on japanese boro stitching, our carefully written history guide is the place to go.
How to Know If Your Jeans Are Worth Repairing
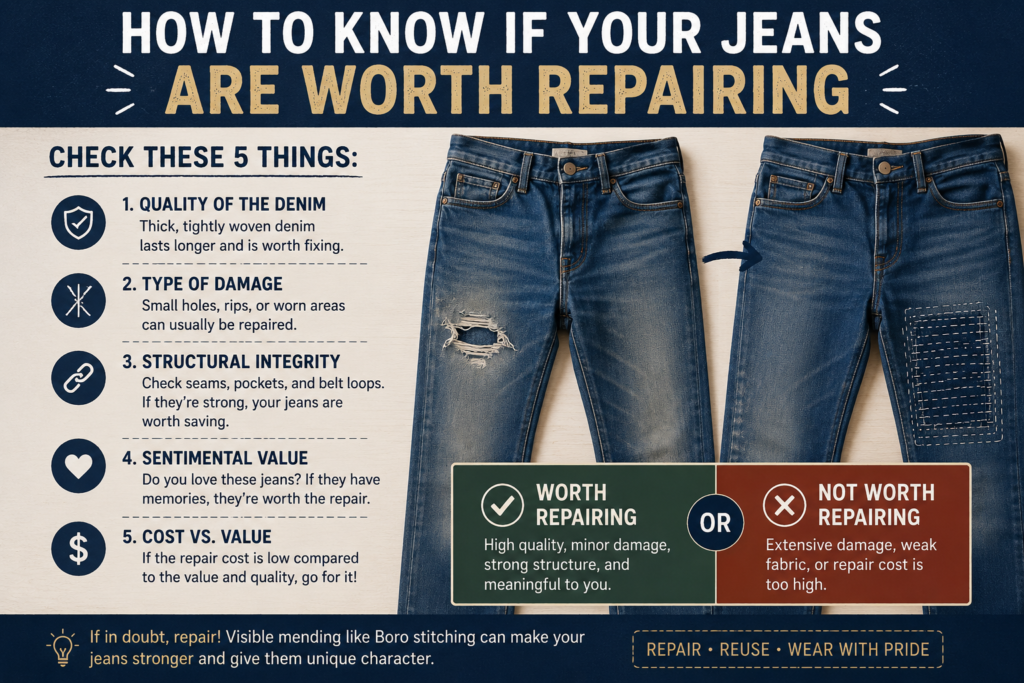
Not every damaged pair of jeans is worth repairing. Before starting a boro repair, it helps to evaluate the denim’s overall structural health. Some jeans have isolated damage—like a knee hole—while the surrounding fabric remains strong. Others may have widespread thinning, weakened seams, or stretched fibers that make long-term repair less practical. Boro works best when there is enough strong fabric left to support new stitching.
A quick assessment can save time and improve repair success. Check the fabric by holding it against light. Thin spots will appear more transparent. Pull gently around the damaged area—if the weave separates easily, reinforcement must extend wider. If multiple zones are failing at once, layered repair may still work, but expect future patching.
Check these before repairing:
- seam strength
- fabric thickness
- stretch loss
- repeated weak spots
- waistband integrity
- pocket corner stress
Decision clarity: If the denim still holds shape and most seams are healthy, boro repair is usually worth doing
When Should You Repair Jeans with Boro?
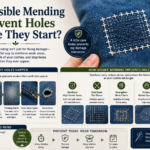
Timing matters in denim repair. Many people wait until holes become large, but boro works best when damage is caught early. Thin spots, loose fibers, and stretched fabric are early warning signs.
The best time to repair jeans is when the fabric first weakens. Reinforcing weak areas prevents larger tears and preserves surrounding material.
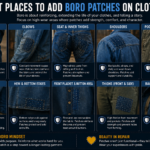
Common repair zones:
- Knee holes
- Inner thigh wear
- Pocket corners
- Seat stress points
- Hem fraying
Each area experiences different types of pressure. Knees bend constantly, thighs rub together, and hems drag against surfaces. Knowing the stress pattern helps you patch correctly.
Signs jeans need repair:
- Visible thinning
- White stress lines in denim
- Small holes forming
- Loose threads
- Stretch distortion
Decision clarity: Repair before a hole expands. Early reinforcement takes less time and creates stronger long-term results.
Tools and Materials Needed for Boro Jean Repair
Good repair starts with the right tools. Boro does not require expensive equipment, but quality materials improve both strength and appearance.
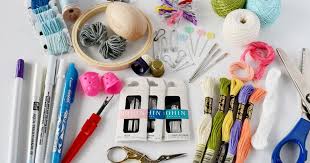
Basic tools include needles, thread, patch fabric, scissors, and marking tools. The goal is precision, not complexity.
Essential tools:
- Sashiko or embroidery needle
- Strong cotton thread
- Denim patch fabric
- Fabric scissors
- Pins or clips
- Chalk or marker
- Thimble
Thread matters more than beginners realize. Weak thread can fail before the fabric does. Cotton sashiko thread works best because it balances strength and flexibility.
Fabric choice matters too. Patch fabric should match denim weight as closely as possible. Too thin, and it wears out quickly. Too thick, and it creates uncomfortable stiffness.
Decision clarity: Invest in quality thread first. It affects durability more than any other tool.
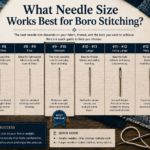
Best Thread Types for Different Denim Weights
Thread choice directly affects how long a boro repair lasts. Heavy denim requires stronger thread to handle pressure, while lighter denim benefits from softer thread that moves with the fabric. Using the wrong thread can cause snapping, stiffness, or uneven wear.
Running stitch strength depends on both thread thickness and stitch spacing. Thick sashiko thread works best for heavyweight jeans because it reinforces without cutting into the denim fibers. Medium-weight cotton thread works better for lighter jeans or flexible repair zones like thighs.
Best thread by denim type:
- heavyweight denim → sashiko thread
- medium denim → embroidery cotton
- lightweight denim → soft cotton thread
- stretch denim → flexible cotton-poly blend
Thread color strategy:
- white for traditional contrast
- indigo for blending
- black for dark denim
- tonal matching for subtle repairs
Decision clarity: Match thread strength to denim weight first, visual style second.
Refer to our self-explanatory guide on what fabrics, threads and needles to use for boro stitching, depending on the occasion along with various proper techniques.
Choosing the Best Fabric for Boro Jean Patches
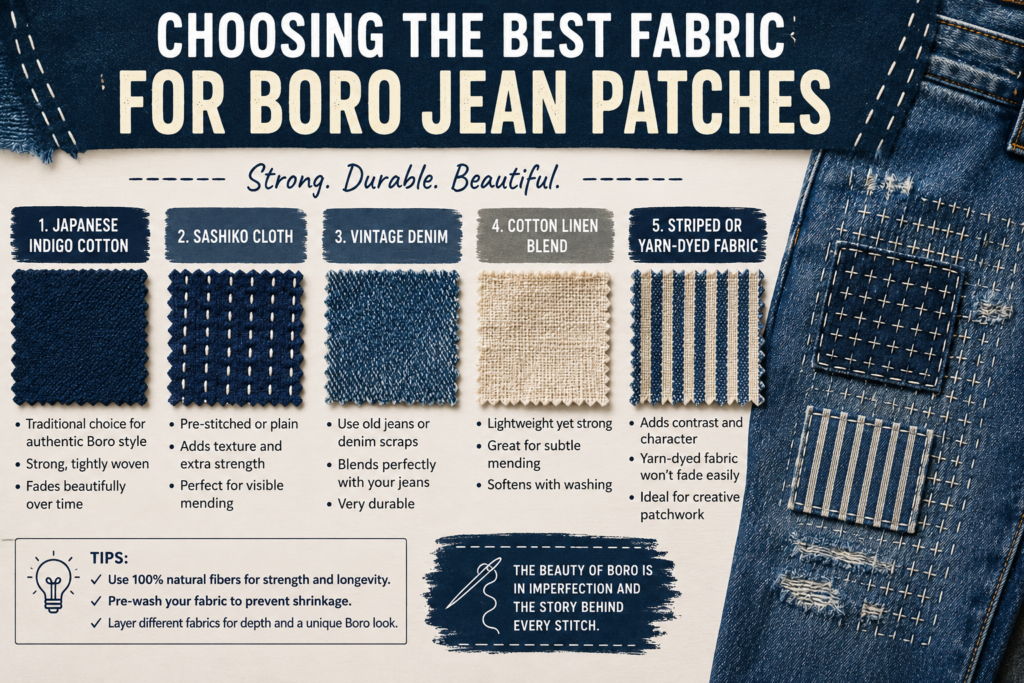
Patch fabric determines how natural and durable your repair becomes. The goal is compatibility—not perfection. Matching weight and flexibility matters more than matching color.
Old denim is often the best patch material because it behaves similarly under stress and washing. Cotton canvas also works well for reinforcement.
Best patch materials:
- Old jeans
- Indigo cotton
- Cotton canvas
- Linen blends
- Heavy shirting cotton
Avoid synthetic-heavy fabrics because they stretch differently and can distort the repaired section.
Things to check:
- Fabric thickness
- Flexibility
- Weave tightness
- Shrink behavior
- Wash compatibility
A good patch should move with the jeans, not fight against them.
Decision clarity: If unsure, cut patches from old denim. It provides the safest structural match.
Patch Placement — Inside or Outside the Jeans?
Patch placement changes both appearance and durability. A patch placed inside the jeans creates a cleaner, smoother exterior look. This works well for subtle visible mending and preserves the original outer texture. Outside patches create stronger visible reinforcement and make the repair part of the jean’s design.
Inside patching works best for:
- small tears
- clean holes
- early thinning
- hidden reinforcement
Outside patching works best for:
- large holes
- layered boro aesthetics
- high-stress repairs
- repeated patch zones
There is also a hybrid method—an inside structural patch with an outside decorative reinforcement layer. This creates both hidden strength and visible texture.
Factors to consider:
- comfort
- durability
- friction zone
- desired appearance
- patch thickness
Decision clarity: For strength, outside patching wins. For comfort and subtle repair, inside patching is better
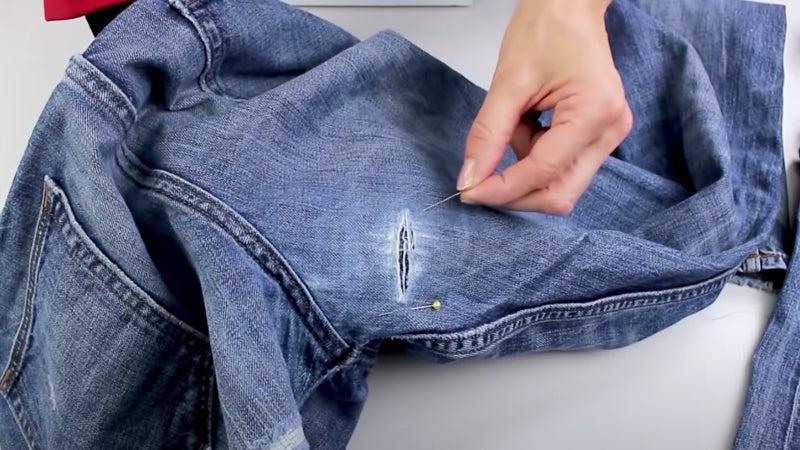
How to Prepare Jeans Before Repairing
Preparation directly affects repair quality. Dirty fabric traps oils and weakens stitching over time. Loose threads can also interfere with patch placement.
Start by washing and drying the jeans. This removes dirt and pre-shrinks fabric. After cleaning, inspect the damage carefully.
Preparation steps:
- Wash jeans
- Dry completely
- Trim loose fibers
- Flatten damaged area
- Mark patch boundaries
- Stabilize weak zones
If the hole edges are unstable, trim only the most damaged fibers. Do not overcut.
Measure beyond visible damage. Weakness often spreads outside the hole.
Rule of thumb:
- Extend patch 1–2 inches beyond damage
- Cover thin fabric zones
- Include surrounding stress points
Decision clarity: Never patch only the visible hole. Always reinforce the weak area around it.
How Big Should a Boro Patch Be?
Patch size is one of the most important decisions in denim repair. Many beginners make the mistake of cutting a patch only slightly larger than the hole. This weakens the repair because surrounding fabric is often already stressed.
A proper patch should extend beyond visible damage into stable fabric. This creates stronger stitch anchoring and spreads tension more evenly across the repair area. The larger the movement zone, the larger the patch should be.
Patch sizing guide:
- small holes → 1 inch beyond tear
- knee holes → 2 inches beyond tear
- thigh wear → 2–3 inches beyond thinning
- seat repairs → wide structural coverage
When to go bigger:
- thin surrounding fabric
- repeated tearing
- high-friction zones
- stretch denim damage
Think beyond the hole. The goal is reinforcing the weak zone, not just covering damage.
Decision clarity: If you can see damage, there is usually more weakness around it than you think
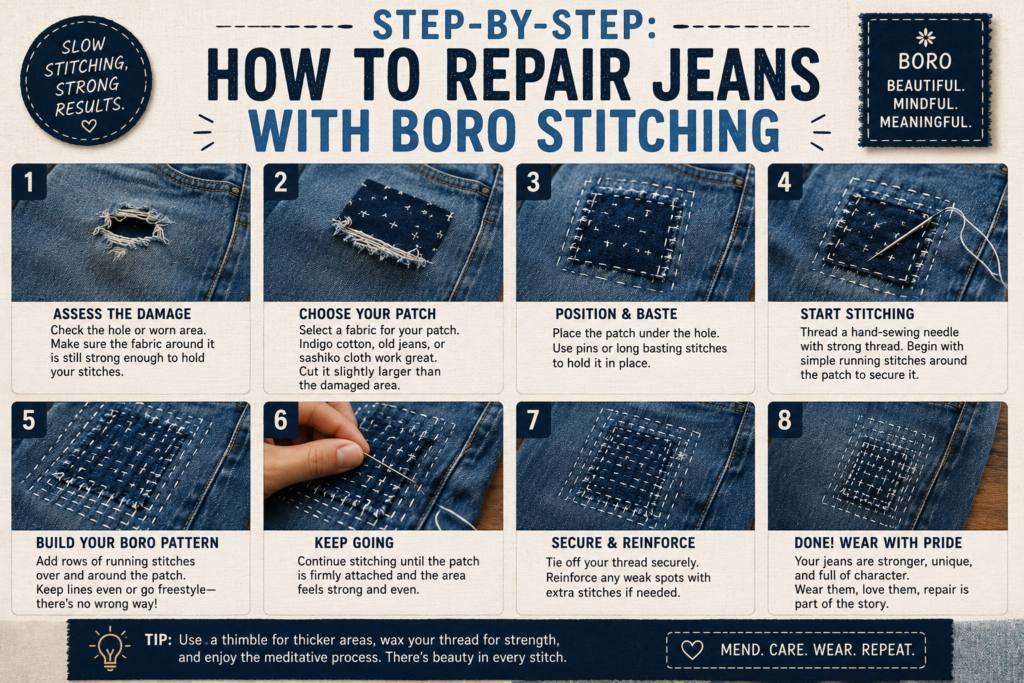
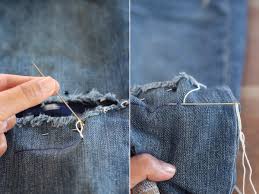
Step-by-Step: How to Repair Jeans with Boro stitching
Boro repair is simple in structure but powerful in durability. The process is based on layering, anchoring, and reinforcing. The strength of the repair does not come from one stitch—it comes from repeated stitches working together.
Start by cutting a patch larger than the damaged area. Place it behind the hole if you want a cleaner look, or on top if you want stronger reinforcement and visible layering. Pin it securely so it does not shift while sewing.
Follow these steps:
- Cut patch larger than damage
- Position patch properly
- Secure with pins
- Thread the needle
- Start running stitches
- Work in rows
- Reinforce edges
- Tie secure knots
The stitching pattern should move evenly across the patch. Keep spacing consistent but do not stress about perfection. Traditional boro values practical repair over visual precision.
Important stitching tips:
- Keep stitches medium length
- Avoid pulling thread too tight
- Anchor corners carefully
- Reinforce high-pressure zones
Decision clarity: Your first goal is structural stability. Aesthetic beauty comes naturally through repetition.
Refer to out Step-by-Step Guide on How to do Boro Stitching for better technical know-how and clarification of the inside and outside of Japanese Boro Stitching.
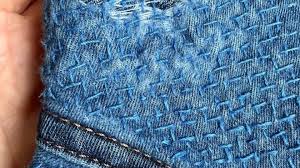
Best Boro Stitch Patterns for Jean Repair
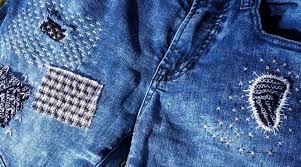
Not every stitch pattern works equally well for denim. Some patterns distribute pressure better, while others are more decorative. Choosing the right stitch depends on damage location and stress level.
Straight running stitches are the most beginner-friendly and practical. They create clean tension distribution and are easy to maintain.
Common boro stitch styles:
- Straight rows
- Grid patterns
- Cross reinforcement
- Layered overlapping stitches
- Directional stitching
Grid stitching works especially well for larger damaged zones because it locks fabric from multiple angles. Cross stitching can reinforce corners and tear edges.
Pattern selection by damage:
- Knee holes → grid stitching
- Thigh wear → directional rows
- Pocket tears → cross reinforcement
- Hem repair → parallel stitching
Each pattern changes how pressure spreads across the repaired area.
Decision clarity: Use straight running lines for small repairs and grids for larger structural damage.
How to Repair Inner Thigh Jeans Damage with Boro?
Inner thigh damage is one of the most common jean failures. Constant friction weakens fibers gradually, often before visible holes appear. This makes it one of the best areas for preventive boro reinforcement.
Unlike knee holes, inner thigh wear requires flexibility because the area moves constantly. Thick patching can create stiffness and discomfort, so patch placement and stitch density must be balanced.
Repair strategy:
- Use soft but durable denim patch
- Extend patch wider than worn zone
- Use flexible running stitches
- Reinforce surrounding thin fabric
- Avoid bulky seam buildup
The patch should extend beyond the visible thinning area because friction weakens surrounding fibers too.
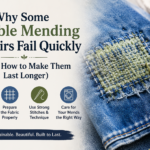
Why thigh repairs fail:
- Patch too small
- Thread too weak
- Stitching too tight
- Ignoring adjacent thinning
Wash and wear patterns matter here. If one thigh is damaged, inspect the other side too.
Decision clarity: Repair both thighs if wear patterns are similar. Preventive patching saves future repair work.
How to Repair Stretch Jeans with Boro
Stretch jeans are harder to repair because their elasticity changes how patches behave. Standard denim patches can create stiffness, and rigid stitching may snap when the fabric stretches.
Stretch denim requires flexible repair logic. The patch should support the damaged zone without completely stopping movement. Lightweight denim or cotton blends work best because they bend more naturally.
Best repair practices:
- use softer patch fabric
- avoid overly dense stitching
- use flexible thread
- reinforce wider than normal
- allow natural movement
Stretch denim repair mistakes:
- patch too thick
- stitches too tight
- rigid thread choice
- patch too small
Because stretch fibers degrade over time, repaired stretch jeans may need maintenance sooner than non-stretch denim.
Decision clarity: Repair stretch jeans for function, not perfection. Flexibility matters more than visual neatness.
How to Repair Knee Holes with Boro Stitching
Knee holes are high-stress damage zones because knees bend, stretch, and pull fabric constantly. This means the repair must flex repeatedly without tearing.
Knee repairs often look best with visible patch layering because the area naturally becomes a visual focal point on jeans.
Best repair approach:
- Use larger patch coverage
- Stitch in grid formation
- Reinforce outer edges
- Add secondary patch if needed
- Check movement flexibility
The patch should move naturally when bending. If it feels too stiff, the fabric may be too heavy or stitches too dense.
Knee repair advantages:
- Easy access for stitching
- High visual appeal
- Strong patch anchoring
- Good beginner practice
Because knees receive impact and bending pressure, larger reinforcement zones improve durability.
Decision clarity: Make knee patches wider than you think necessary. Movement spreads stress beyond the visible hole.
Can You Combine Sashiko with Boro stitching for Jeans?
Yes—and many experienced repairers do. Boro and sashiko are closely related but serve different roles. Boro is the repair philosophy, while sashiko is often the stitch language used to execute it.
Sashiko adds stronger geometric stitching and can improve both aesthetics and durability.
Head on to our practical guide on Boro vs Sashiko for deep understanding of the differences between the two stitching techniques.
Differences:
- Boro = patching philosophy
- Sashiko = stitching method
- Boro = layered repair
- Sashiko = structured reinforcement
Best combined use:
- Patch with boro layering
- Stitch with sashiko patterns
- Reinforce edges with decorative geometry
- Add multiple visible layers
This combination creates highly durable and visually striking denim.
Why combine them:
- Better stitch strength
- Cleaner visual patterns
- More traditional Japanese look
- Better fabric anchoring
Decision clarity: If appearance matters as much as strength, combining sashiko and boro gives the best balance.
Machine Stitching vs Hand Boro Repair
Some people wonder if a sewing machine can replace hand boro stitching. Technically yes—but the outcome is different. Machine stitching is faster and often stronger in straight-line reinforcement, but hand stitching offers greater control, flexibility, and traditional texture.
Hand stitching allows you to work around damaged fabric more precisely. It also lets you adjust stitch density based on pressure zones. Machine stitching can sometimes flatten the repair too much and reduce the layered character of boro.
Hand stitching advantages:
- more control
- better patch positioning
- easier layered repair
- traditional appearance
Machine stitching advantages:
- faster repair
- stronger uniform tension
- easier long seams
Best hybrid approach:
- machine anchor patch
- hand stitch visible boro layers
Decision clarity: If authenticity and flexibility matter, hand stitching is better. If speed matters, machine support helps.
Common Mistakes When Repairing Jeans with Boro

Boro is forgiving, but mistakes can reduce repair life. Most problems come from poor preparation or wrong material choices.
The biggest mistake is using a patch that only covers the hole. Damage spreads into surrounding fabric, so visible tears are only part of the problem.
Common mistakes:
- Patch too small
- Thread too weak
- Stitches too tight
- Fabric mismatch
- Poor edge anchoring
- Skipping preparation
Tight stitches create tension and can distort denim shape. Loose stitches reduce strength.
How to avoid failure:
- Use bigger patches
- Check surrounding weakness
- Use strong thread
- Keep tension even
- Reinforce pressure points
Good repair is preventive, not reactive.
Decision clarity: If the repair feels stiff, tight, or uneven, adjust before finishing. Small corrections improve long-term wear.
How to Blend New Patch Fabric with Old Denim
Fresh patch fabric can look too new against worn jeans. One of the best boro repair techniques is visual blending—making the patch feel like part of the jean’s history.
Indigo dyeing naturally fades over time, so new indigo patches often appear darker. Washing patch fabric before use softens the contrast and helps match texture.
Ways to blend patches:
- prewash fabric
- fade with repeated washing
- use old denim scraps
- lightly distress patch edges
- match denim grain direction
Visual blending matters most for:
- vintage jeans
- faded denim
- visible front-facing repairs
- layered boro aesthetics
Over time, wear naturally merges the patch into the original garment.
Decision clarity: If visual harmony matters, always prewash patch fabric first.
How Durable Is Boro stitching Repaired Denim?
One of the biggest questions beginners ask is whether boro repair can actually survive daily wear. The answer is yes—when done correctly, boro-repaired jeans can last for years. In many cases, the repaired section becomes stronger than the original damaged fabric because multiple layers distribute pressure more evenly.
Durability depends on three major factors: patch quality, stitch density, and repair placement. A properly sized patch anchored with consistent stitching creates a stable reinforced zone. Thin or poorly attached patches, however, can fail quickly under stress.
What affects durability most:
- Patch fabric strength
- Stitch consistency
- Repair area movement
- Thread quality
- Washing frequency
- Daily wear habits
Inner thigh repairs usually wear faster because of constant friction, while knee repairs often last longer due to lower abrasion.
Signs of a strong repair:
- Patch stays flat
- Stitch tension remains even
- No thread loosening
- Fabric moves naturally
- Edges remain secure
The beauty of boro is that repairs are layered over time. If one patch weakens, another patch can be added directly over it.
Decision clarity: Think of boro as an evolving repair system, not a one-time fix. The strongest denim often has multiple repair generations.
Washing and Caring for Boro-Repaired Jeans

Repairing jeans is only half the process. Proper care determines how long that repair lasts. Denim and stitched patches react differently under washing stress, so care habits matter.
Washing too aggressively can weaken thread and distort patches. The safest method is gentle washing with minimal agitation.
Best care practices:
- Wash inside out
- Use cold water
- Choose mild detergent
- Avoid bleach
- Air dry when possible
- Avoid excessive heat
Turning jeans inside out reduces direct friction on stitched surfaces. Air drying protects thread tension better than machine drying.
Things to avoid:
- High heat drying
- Heavy spin cycles
- Harsh chemical detergents
- Overwashing
Boro repairs often soften beautifully with repeated wear and careful washing. The patch and original denim begin blending visually over time.
Maintenance checks:
- Inspect loose threads
- Watch edge lifting
- Check thin neighboring areas
- Reinforce early
Decision clarity: Wash less often. Spot cleaning and airing out jeans can significantly extend both denim life and repair strength.
Can Beginners Repair Jeans with Boro Successfully?
Boro is one of the best textile repair methods for beginners because it does not demand technical perfection. Unlike machine sewing, boro allows flexibility, adjustment, and gradual improvement through practice.
The learning curve is simple: patch placement, running stitch, tension control, and patience. Most beginners can complete a basic jean repair within a few hours.
Why beginners succeed with boro:
- Simple running stitch
- Minimal tools required
- Easy patch placement
- Mistakes are fixable
- Visible style hides imperfection
Unlike invisible mending, boro does not punish uneven stitching. In fact, slight irregularity often adds authenticity.
Beginner-friendly repair zones:
- Knee holes
- Pocket tears
- Small outer leg rips
- Hem fraying
Harder beginner areas:
- Inner thigh repairs
- Crotch stress zones
- Heavy seam intersections
Starting with low-pressure repair areas helps build confidence before tackling harder zones.
Decision clarity: Start with visible, easy-access tears first. Build skill before repairing high-stress denim zones.
If you want to become an expert on boro stitching, we suggest taking a look at our expert analysis on Boro Stitching Patterns for Beginners.
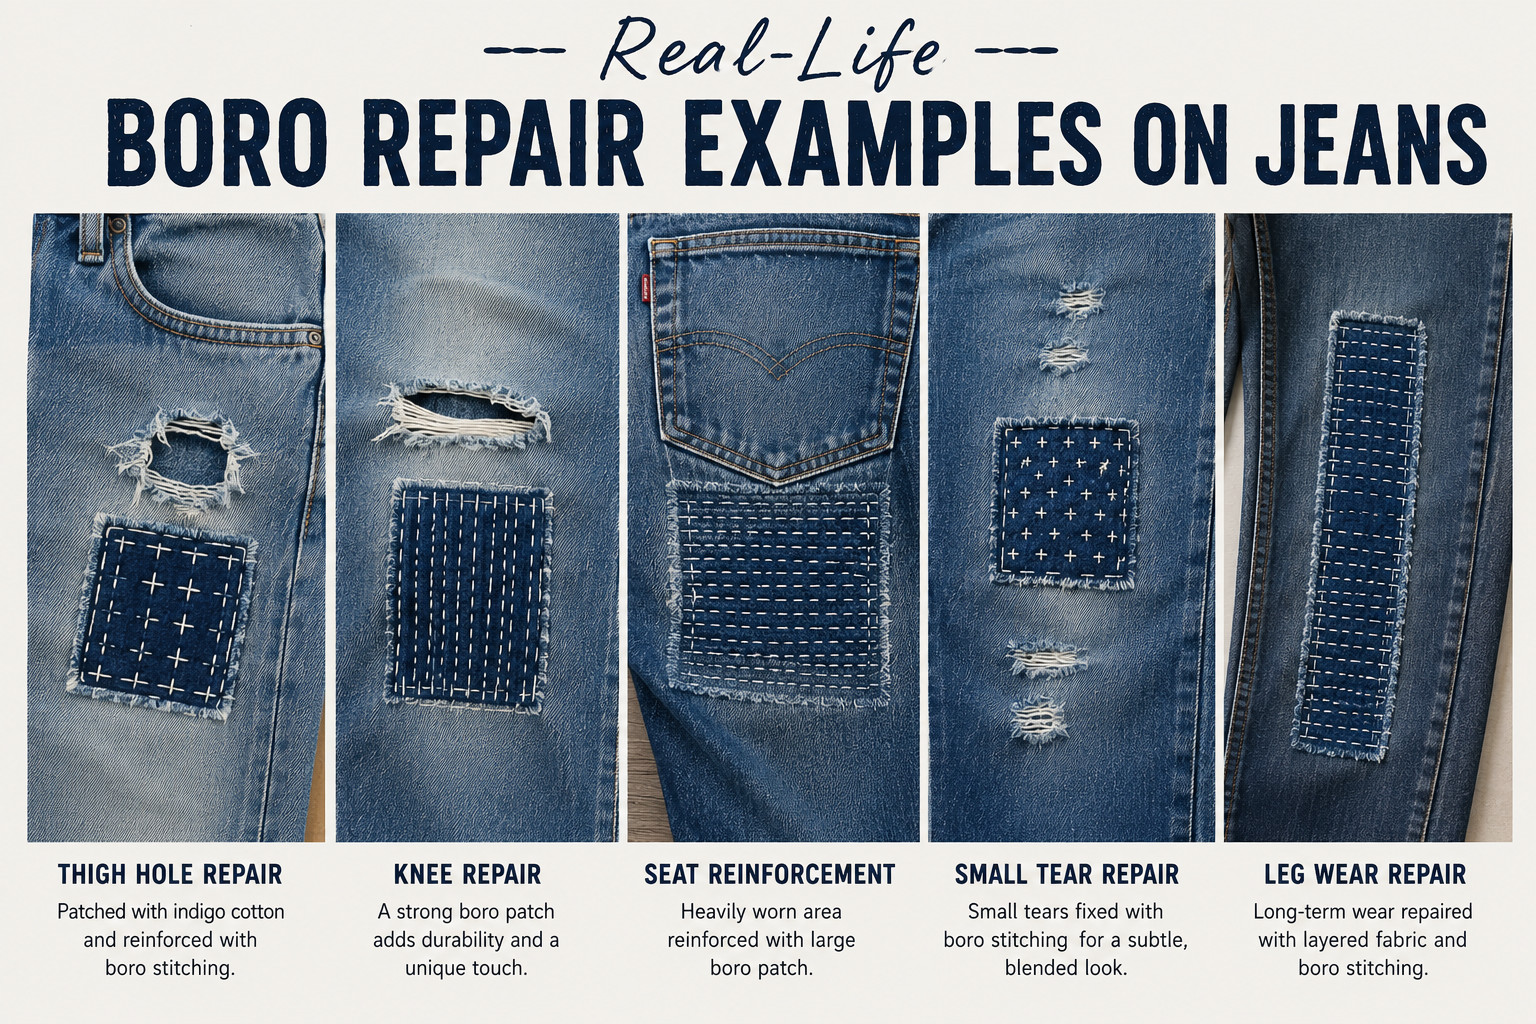
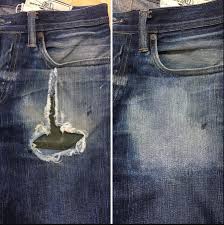
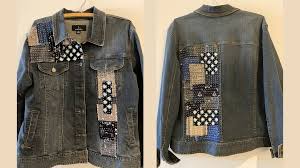
Real-Life Boro Repair Examples on Jeans
Real repair examples help show how boro adapts to different types of denim damage. Not every repair follows the same pattern because stress points behave differently.
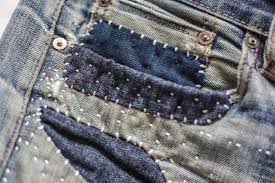
A ripped knee repair often uses large visible patches because the area bends constantly. Inner thigh blowouts need flexible layered repair with wider reinforcement zones. Pocket corner tears need tighter stitch concentration because they carry pull tension.
Common examples:
- ripped knee patch repair
- crotch blowout reinforcement
- hem rebuild repair
- pocket edge stabilization
- seat patch layering
What these repairs teach:
- bigger patches last longer
- tension zones need wider stitching
- layered repair improves durability
- repeated maintenance is normal
Boro is not about restoring jeans to “new.” It is about extending their useful life while making them stronger and more personal.
Decision clarity: Study the stress pattern before stitching. The damage tells you how the repair should be built.
Final Thoughts:
Why Boro stitching Makes Jeans Better, Not Just Fixed
Boro changes the way people think about damaged clothing. Instead of seeing wear as failure, it treats wear as history. Every tear, patch, and stitch becomes part of the garment’s identity.
Modern fashion often pushes replacement, but boro supports preservation. It extends fabric life, reduces waste, and creates something unique. A repaired jean becomes more personal than a new one.
Why boro matters:
- Reduces clothing waste
- Saves money
- Builds sewing skill
- Creates unique denim
- Preserves sentimental clothing
Many people find that repaired jeans become their favorite pair because the repair itself adds personality and history.
Boro teaches patience and craftsmanship. Every stitch slows the process and reconnects the wearer with the garment.
Long-term benefits:
- Stronger denim structure
- Better sustainability
- Personal design expression
- Repeatable repair system
Decision clarity: If your jeans still fit well, repairing them with boro is almost always a better choice than replacing them.
FAQ:
How to Repair Jeans with Boro stitching
How do you repair ripped jeans with boro stitching?
Place a patch behind or over the damaged area and secure it with repeated running stitches. Extend beyond the visible tear for stronger reinforcement.
Is boro stitching strong enough for denim?
Yes. Layered patching combined with dense stitching creates strong reinforcement, especially for high-stress areas like knees and thighs.
What thread is best for boro jean repair?
Strong cotton sashiko thread is best because it balances durability and flexibility while maintaining the traditional repair look.
Can I repair jeans without a sewing machine?
Yes. Boro is traditionally done by hand, making it ideal for beginners without machine access.
What is the difference between Boro stitching and Sashiko?
Boro is the repair philosophy using layered patches, while sashiko is the stitching technique often used to secure those patches.
How long does boro-repaired denim last?
With proper patching and maintenance, repairs can last months or years depending on wear intensity and washing habits.