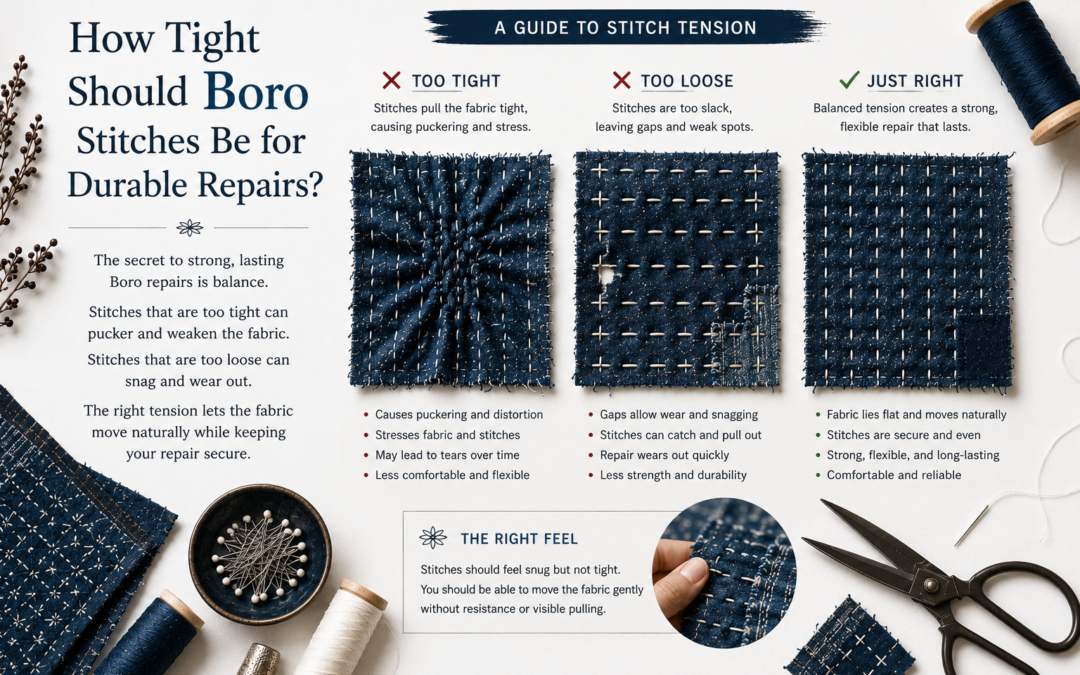
Boro stitching durability depends heavily on balanced stitch tension rather than aggressive pulling force. Many beginners mistakenly assume tighter stitches automatically create stronger repairs, but authentic Boro Stitching traditionally focused on flexibility, movement, and long-term fabric survival. Repairs that are too tight often create puckering, stiffness, and stress concentration that eventually weakens the surrounding fabric. This guide expands on the major complicating question for people which is: “How tight should boro stitches be for durable repairs”.
Traditional Japanese farmers and laborers repeatedly repaired garments using layered running stitches that allowed fabric to bend naturally during daily work. Instead of rigid reinforcement, durable boro relied on distributed stress and adaptable stitching patterns. The goal was to preserve clothing for many years without making repaired areas uncomfortable or brittle.
This guide explains how stitch tension affects durability, flexibility, washing performance, patch stability, and long-term visible mending success. It also covers common beginner mistakes, fabric-specific tension adjustments, and practical techniques that help repairs survive repeated wear.
Why Are Overly Tight Boro Stitches a Problem?
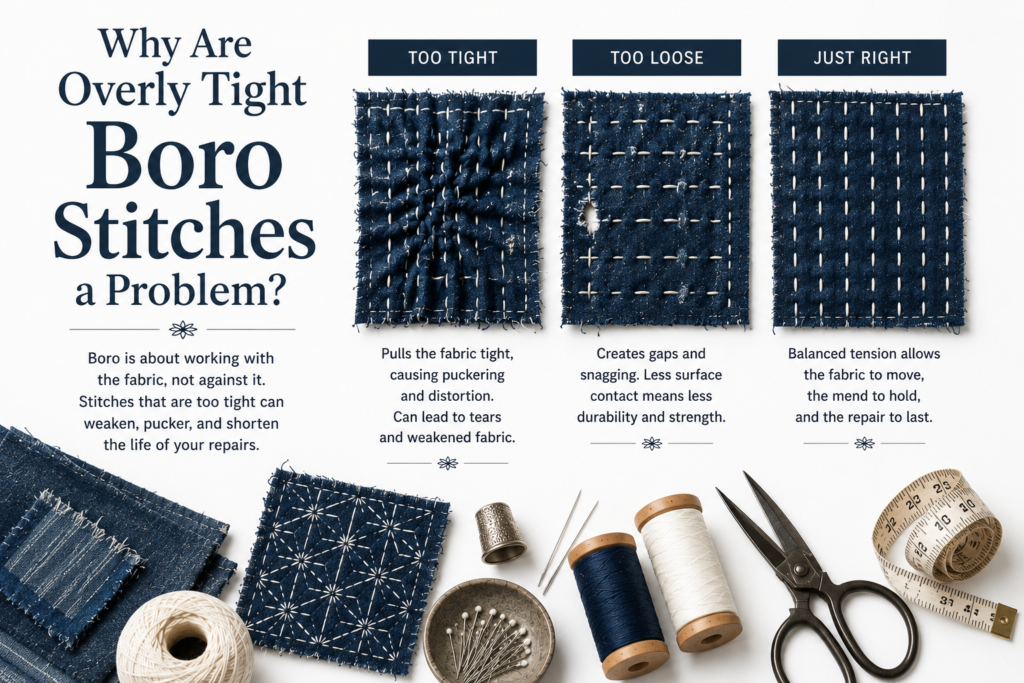
Overly tight boro stitches often create more damage than protection because they compress fabric layers too aggressively. Durable repairs need movement tolerance. When stitches pull fabric inward too firmly, the repaired section loses flexibility and begins concentrating stress around needle holes instead of distributing pressure naturally across the textile surface. This eventually weakens both the repair and the original garment.
Traditional Japanese repair methods evolved around repeated wear, washing, labor, and seasonal climate changes. Garments constantly expanded and contracted during movement. Tight stitching prevented that natural flexibility and caused repaired sections to warp over time. Authentic boro therefore prioritized balanced tension rather than rigid stitching precision.
One of the most common signs of excessive tension is puckering. Fabric begins wrinkling around stitch lines because the thread contracts more tightly than the surrounding material. This becomes even more visible after washing because cotton thread and fabric shrink differently. Overly tight repairs can also feel stiff and uncomfortable, especially on jackets, denim knees, elbows, and high-movement areas.
Another hidden problem is fabric tearing around stitch holes. Tight tension increases stress at every puncture point. Older or thinner textiles become especially vulnerable because repeated movement slowly enlarges those holes until the repair weakens.
Common problems caused by overly tight stitching include:
- Fabric puckering
- Curved or distorted repair sections
- Reduced flexibility
- Increased stress around needle holes
- Thread strain after washing
- Cracking near patch edges
- Uncomfortable stiffness
- Faster fabric fatigue
Authentic durable repairs should feel integrated into the garment instead of acting like rigid surface attachments.
Why Did Traditional Japanese Boro Repairs Avoid Rigid Stitching?
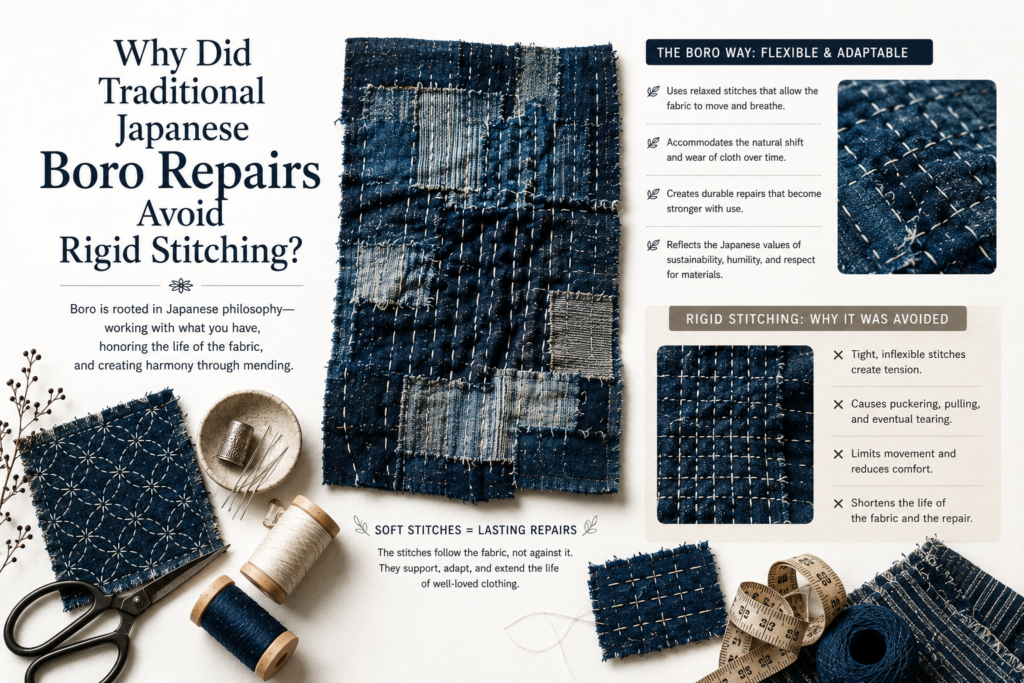
Traditional Japanese repairs avoided rigid stitching because garments needed flexibility for farming labor, repeated washing, layered winter clothing, and long-term textile survival.
Historical boro clothing was worn daily by farmers, fishermen, laborers, and rural families who repaired garments repeatedly instead of replacing them. Clothing needed to remain comfortable and functional during bending, lifting, kneeling, and outdoor work. Tight rigid repairs often failed because they restricted movement and concentrated stress into fragile fabric areas.
Indigo-dyed cotton also softened and changed texture over years of wear and washing. Flexible running stitches allowed garments to adapt naturally as the fabric aged. Instead of trying to create perfectly invisible repairs, traditional boro prioritized practical reinforcement that could evolve gradually through additional patching and stitching.
Historical reasons softer tension worked better:
- Labor-intensive movement
- Repeated washing cycles
- Layered winter clothing flexibility
- Aging handwoven cotton
- Seasonal fabric expansion
- Long-term repair adaptability
This flexibility-first philosophy remains one of the defining characteristics of authentic boro durability today.
What Does Proper Boro Stitch Tension Actually Feel Like?
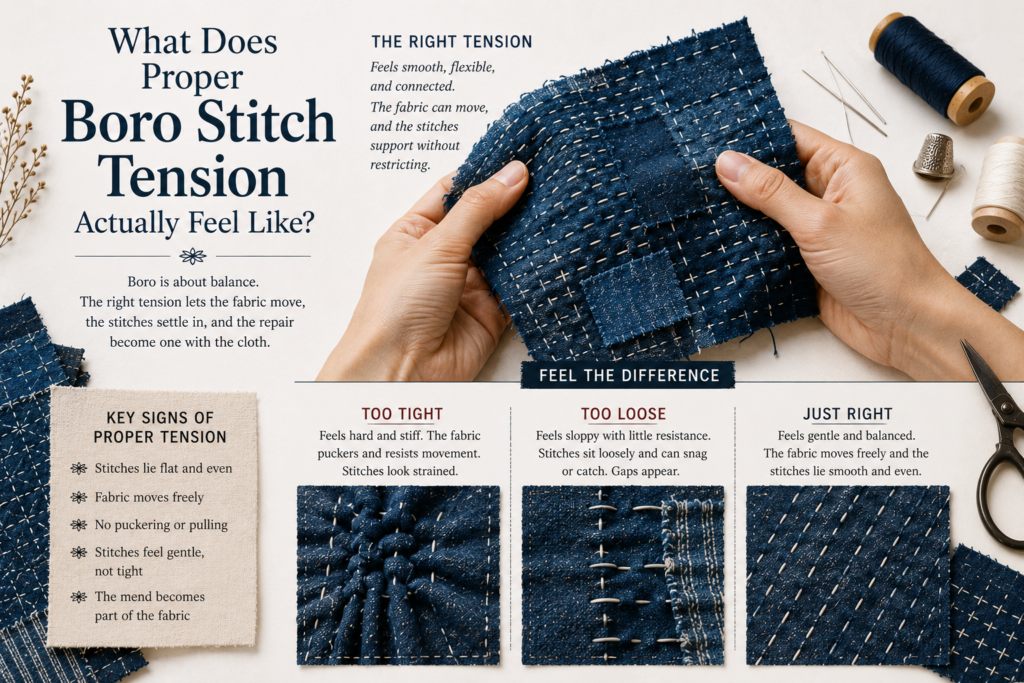
Proper boro stitch tension feels secure while still allowing the fabric to bend naturally during movement. The repaired section should remain flat without appearing compressed, stiff, or distorted. When handled, the repair should move similarly to the surrounding textile rather than feeling like a rigid plate stitched onto the garment.
Many beginners accidentally pull stitches too tightly because they associate tension with durability. In reality, traditional boro repairs depended on controlled flexibility. Slight movement between layered fabrics is completely normal and often improves repair longevity because stress spreads more evenly during bending, stretching, and washing.
A well-balanced repair usually lies flat on a table without heavy wrinkling. When gently stretched, the fabric should flex smoothly instead of resisting movement. Good tension secures patch layers firmly enough to prevent shifting while still preserving softness and drape.
Thread type also affects how proper tension feels. Thick sashiko thread naturally creates more visible texture and does not need aggressive pulling force. Thin cotton thread may require slightly firmer stabilization, but excessive tightening still weakens the repair over time.
Traditional Japanese workwear often showed slightly irregular stitch tension because repairs were designed around functionality rather than machine-like perfection. This irregularity helped garments adapt naturally to body movement and environmental stress.
A simple tension check involves:
- Laying the fabric flat
- Flexing the repaired section gently
- Checking for puckering
- Observing whether stitches pull inward
- Comparing repair flexibility to surrounding fabric
- Testing movement after stitching several rows
The strongest repairs usually feel balanced instead of rigid. Authentic boro durability comes from adaptive reinforcement rather than excessive compression.
What Are Practical Stitch Measurements for Balanced Boro Repairs?
Most durable boro repairs use running stitches around 3–5 mm long with enough flexibility to slightly lift when gently pressed but not enough to create visible gaps or fabric distortion.
Many beginners struggle because “balanced tension” sounds subjective without measurable guidance. Traditional Boro Stitching relied on practical textile behavior rather than mathematical precision, but modern beginners often benefit from physical reference points. In most durable repairs, stitches remain visibly secure while still allowing natural fabric movement during bending and washing.
A simple thumb-pressure test helps identify balanced tension. When gently pressing the repaired area, the fabric should flex slightly instead of feeling rigid or compressed. Small texture variation is completely normal in authentic visible mending. The repair should remain mostly flat without strong ripples or puckering around stitch lines.
Practical beginner guidelines:
- Average stitch length: 3–5 mm
- Stitch spacing: 2–4 mm apart
- Acceptable fabric lift: 1–2 mm
- Flexibility test: fabric should bend naturally
- No strong inward pulling around stitches
- Patch should not curl after stitching
Balanced tension is easier to recognize through movement testing than visual perfection alone
Do Tight Boro Stitches Make Repairs Stronger?
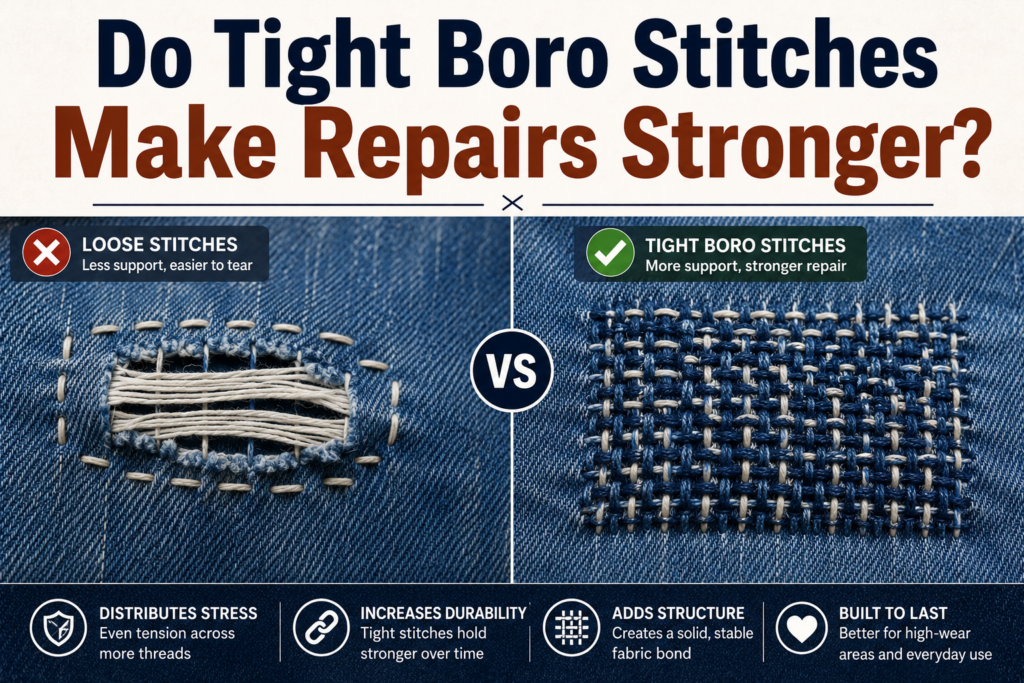
Tight boro stitches do not automatically create stronger repairs. In many situations, excessive tension actually shortens repair lifespan because it forces stress into small concentrated areas. Durable visible mending depends more on flexibility and distributed reinforcement than aggressive thread compression.
Fabric constantly changes shape during wear. Jackets bend at elbows, pants stretch at knees, and bags flex around corners and seams. If stitches are overly tight, the surrounding textile absorbs all that movement pressure directly around the stitch holes. Over time, this repeated stress weakens the fabric until tearing begins around the repair edges.
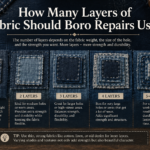
Traditional boro repairs solved this problem by spreading reinforcement across multiple running stitches instead of relying on one rigid stitch line. This distributed pressure more evenly and allowed garments to survive repeated labor and washing cycles.
The strongest repairs typically combine:
- Balanced tension
- Medium stitch density
- Layered patch reinforcement
- Flexible thread movement
- Even stress distribution
Heavy-duty repairs sometimes use denser stitching patterns, but that does not mean each stitch should be pulled tightly. Dense stitching with flexible tension often outperforms rigid stitching because the repair can adapt naturally to movement.
Another important factor is washing durability. Tight stitches frequently shrink unevenly after laundering, especially with cotton fabrics. This creates puckering and long-term distortion that weakens the repair visually and structurally.
Balanced stitching provides several advantages:
- Better flexibility
- Improved comfort
- Lower tearing risk
- Better wash resistance
- Reduced stress concentration
- More authentic traditional appearance
Durable boro repairs behave like part of the original garment rather than a stiff external patch. Flexibility is often the hidden reason why traditional repairs lasted for decades.
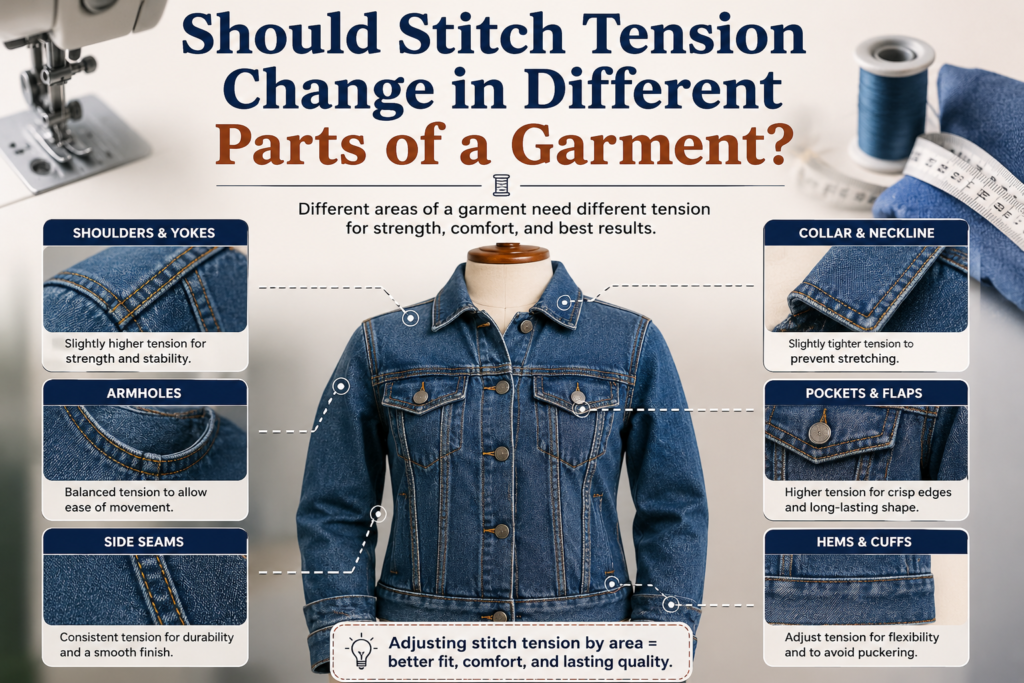
Should Stitch Tension Change in Different Parts of a Garment?
Yes. High-movement areas usually require softer flexible tension, while stress-heavy corners sometimes need slightly firmer stabilization with denser stitch coverage.
Different garment areas experience completely different movement patterns during daily use. Knees, elbows, shoulders, cuffs, and pockets constantly bend and stretch. Tight stitching in these zones often creates cracking or tearing because the repair cannot adapt naturally to body movement. Traditional Japanese workwear repairs typically used broader reinforcement coverage instead of increasing stitch tightness.
Stress concentration matters more than decorative consistency. Pocket corners and bag handles experience concentrated pulling force, so these areas often benefit from denser stitch grids rather than aggressive thread tension. Meanwhile, soft fabric around sleeves or lightweight garments usually requires gentler stitching to prevent distortion.
Recommended tension by repair zone:
| Repair Area | Recommended Tension |
| Knees | Flexible |
| Elbows | Medium-flexible |
| Pocket corners | Slightly firmer |
| Jacket seams | Balanced |
| Thin sleeves | Gentle |
| Bag handles | Dense but flexible |
| Seat repairs | Medium-relaxed |
The best durable repairs adapt to how each part of the garment naturally moves during wear.
How Loose Is Too Loose for Boro Repairs?
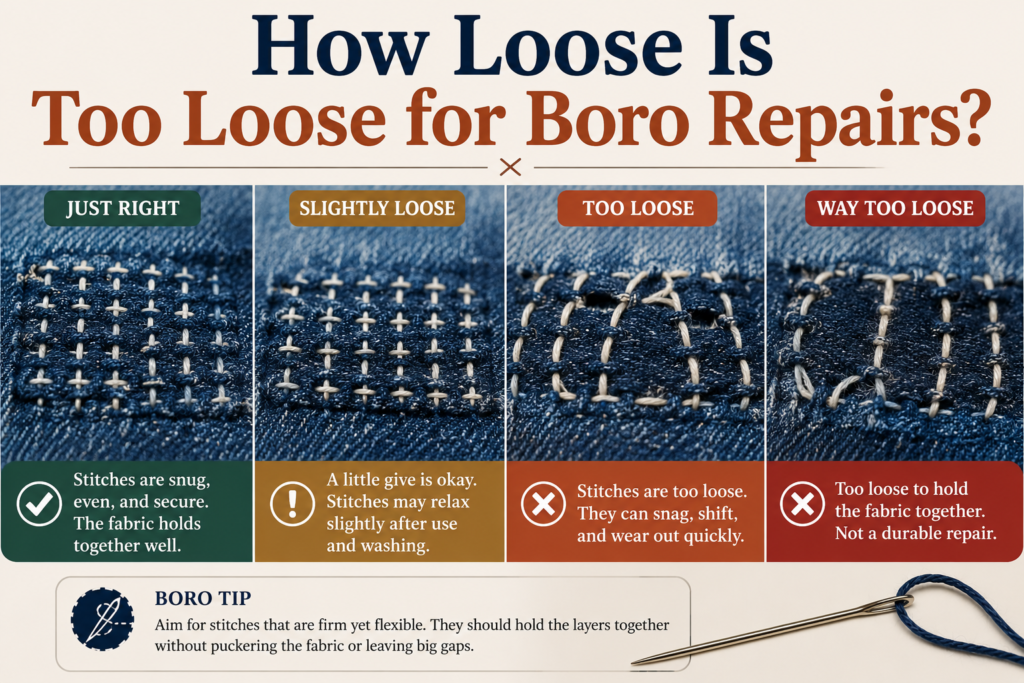
Although tight stitching causes problems, stitches that are excessively loose can also reduce repair durability. Loose repairs may allow patches to shift, snag, separate, or develop uneven wear patterns over time. The goal is controlled stability rather than slack stitching.
A durable repair should keep fabric layers aligned without restricting movement. If stitches are too loose, patches may begin lifting at the edges or forming small gaps between layers. This becomes especially problematic on thicker garments such as denim jackets, work pants, canvas bags, and layered patchwork repairs.
Very loose stitching also increases snagging risk. Exposed thread loops can catch during daily use and gradually weaken the repair. Over time, repeated friction may loosen entire stitch rows.
The correct balance depends heavily on:
- Fabric thickness
- Repair purpose
- Garment movement
- Thread thickness
- Layer count
- Wear intensity
Decorative visible mending sometimes allows slightly looser stitching because aesthetics matter more than structural reinforcement. Functional repairs in stress-heavy areas require more stabilization through denser stitch patterns rather than excessive tension.
Common signs stitches are too loose include:
- Patch corners lifting
- Thread loops catching
- Fabric layers separating
- Uneven shifting during movement
- Gaps between textile layers
- Reduced repair stability
Traditional Japanese repairs often compensated for softer tension by increasing stitch coverage across larger areas. Instead of tightening individual stitches aggressively, they used broader reinforcement grids that distributed stress more evenly.
Beginners often improve durability faster by focusing on consistency rather than trying to maximize tightness. Stable balanced stitching almost always performs better than either extreme.
How Does Fabric Type Change Boro Stitch Tightness?

Different fabrics require different stitch tension because every textile responds differently to compression, movement, and needle stress. Thick denim behaves differently from soft cotton, linen, or fragile vintage fabric. Understanding these differences helps create repairs that remain durable without damaging the material.
Lightweight cotton and linen compress easily. Tight stitches on thin fabric often create immediate puckering and distortion because the thread force overwhelms the textile structure. These materials usually benefit from moderate tension that stabilizes patches gently without pulling aggressively.
Denim and canvas are heavier and more resistant to compression. However, they still require flexibility. Thick fabrics bend repeatedly during wear, especially around knees, elbows, and seams. Slightly relaxed tension allows the repair to move naturally without cracking over time.
Vintage textiles require even more caution. Older fibers weaken with age, washing, sunlight exposure, and repeated friction. Tight stitching may enlarge needle holes or cause tearing around repair lines. Gentle tension helps preserve fragile fibers while still reinforcing the garment.
Layered patchwork repairs introduce another factor: thickness variation. Multiple fabric layers create uneven resistance across the repair area. Pulling stitches tightly through thick layers often creates distortion around thinner surrounding fabric.
Recommended tension by fabric type:
- Lightweight cotton → moderate tension
- Linen → moderate-loose tension
- Denim → balanced relaxed tension
- Canvas → relaxed but dense stitching
- Vintage textiles → gentle tension
- Layered patchwork → flexible stabilization
Fabric movement should always guide tension decisions more than visual perfection. Traditional boro prioritized garment survival and adaptability over uniform appearance.
Choosing the correct tension for the textile dramatically improves repair lifespan, comfort, and wash durability. Strong visible mending depends on harmony between thread behavior and fabric structure.
How Does Thread Thickness Affect Boro Stitch Tightness?
Thicker thread usually requires softer tension because it compresses fabric more aggressively and creates stronger surface pressure around stitch holes.
Thread behavior changes repair durability more than many beginners realize. Thick sashiko thread spreads pressure broadly across the fabric surface, which helps reduce cutting stress around individual stitch holes. However, pulling thick thread too tightly can quickly distort fabric because the larger thread diameter compresses textile fibers more strongly.
Thin thread behaves differently. It may appear softer visually, but under high tension it can cut deeper into fabric over time, especially on delicate or aging textiles. Embroidery floss, cotton sewing thread, and authentic sashiko thread all interact differently with layered repairs depending on softness, twist structure, and friction behavior.
Important thread tension considerations:
- Thick thread = softer pull needed
- Thin thread = avoid cutting tension
- Sashiko thread distributes pressure better
- Waxed thread increases friction stiffness
- Soft cotton thread improves flexibility
- Dense twisted thread may shrink differently
Traditional boro repairs often favored soft cotton thread because it maintained flexibility after repeated washing and wear.
Why Do Boro Repairs Pucker After Washing?
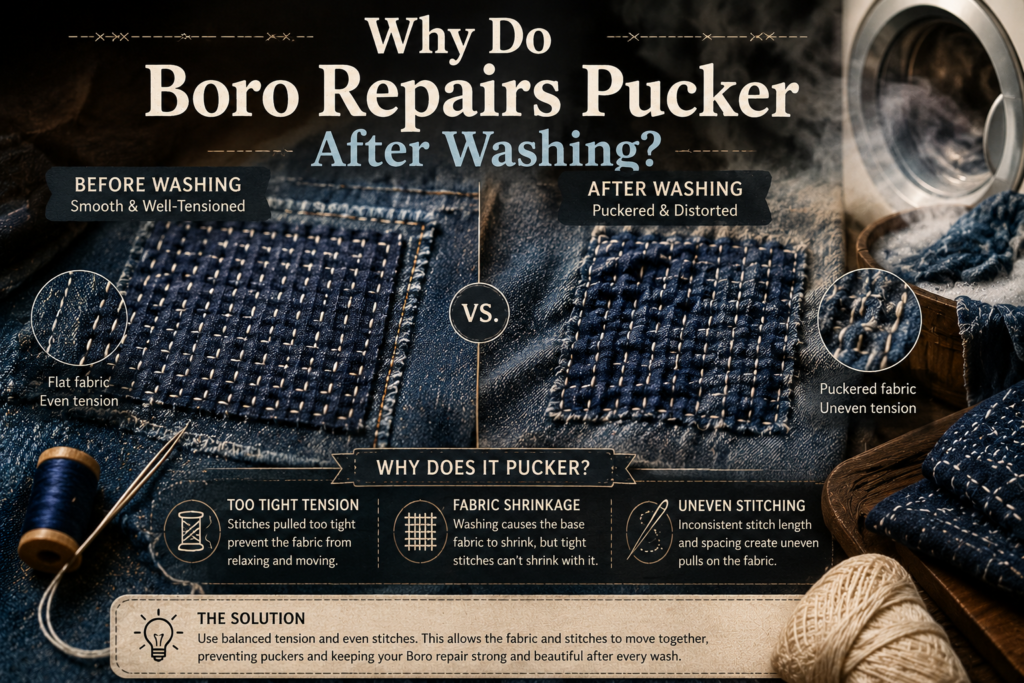
Boro repairs often pucker after washing because thread tension and fabric shrinkage react differently when exposed to water and heat. Even repairs that appear flat initially can become distorted if stitches were pulled too tightly during sewing.
Cotton thread naturally contracts slightly after washing. If the repair already contains excessive tension, laundering increases compression further and pulls the surrounding fabric inward. This creates ripples, wrinkles, and uneven distortion around the stitch lines.
Traditional Japanese repair methods accounted for this behavior by maintaining softer tension and flexible stitch spacing. Garments were expected to endure repeated washing and years of daily labor. Repairs therefore needed enough adaptability to handle fabric movement after moisture exposure.
Another common cause of puckering is mixing fabrics with different shrinkage rates. For example, a denim patch attached to softer cotton may contract differently during washing. Tight stitching prevents the layers from adjusting naturally, forcing distortion into the repair area.
Several factors increase puckering risk:
- Overtight stitching
- Uneven stitch spacing
- Mixed fabric shrinkage
- Thick thread compression
- Aggressive corner reinforcement
- Heat drying after washing
Reducing puckering starts before stitching even begins. Many experienced visible mending artists prewash both fabric and thread to minimize future shrinkage differences.
Helpful prevention strategies include:
- Prewashing patch fabric
- Using balanced tension
- Avoiding aggressive pulling
- Testing flexibility before finishing
- Maintaining even stitch spacing
- Allowing natural fabric movement
Minor texture is normal in authentic boro work because handmade repairs naturally contain subtle irregularity. Severe puckering, however, usually signals excessive tension or uneven reinforcement. Long-lasting repairs should remain flexible and stable even after repeated washing cycles.
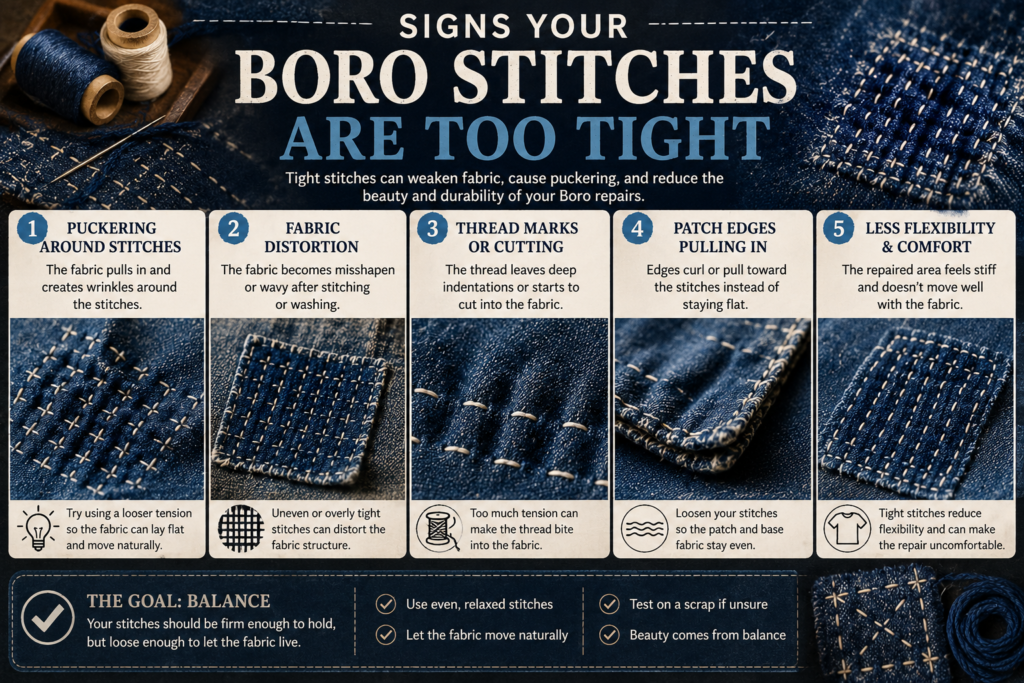
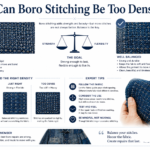
Signs Your Boro Stitches Are Too Tight
Repairs that curl, wrinkle, stiffen, or distort after stitching usually indicate excessive tension somewhere within the repair structure.
Many stitch tension problems become easier to recognize after the repair is worn or washed several times. Tight stitches rarely fail immediately. Instead, tension gradually concentrates around stitch holes until the surrounding fabric begins weakening or warping. This often appears first around patch edges or heavily stitched corners.
One of the clearest warning signs is bowl-shaped distortion where the repaired area curves inward or upward unnaturally. Denim repairs may also feel unusually stiff compared to the surrounding garment. In severe cases, thread tension creates small radiating wrinkles extending outward from the stitch lines.
Common signs of excessive stitch tension:
- Fabric puckering
- Curved repair sections
- Stiff patch movement
- Raised patch corners
- Wrinkles radiating from stitches
- Cracking sounds during flexing
- Tight thread appearance after washing
- Distorted fabric drape
Balanced repairs should move naturally with the garment instead of resisting movement.
How Can Beginners Maintain Consistent Stitch Tension?
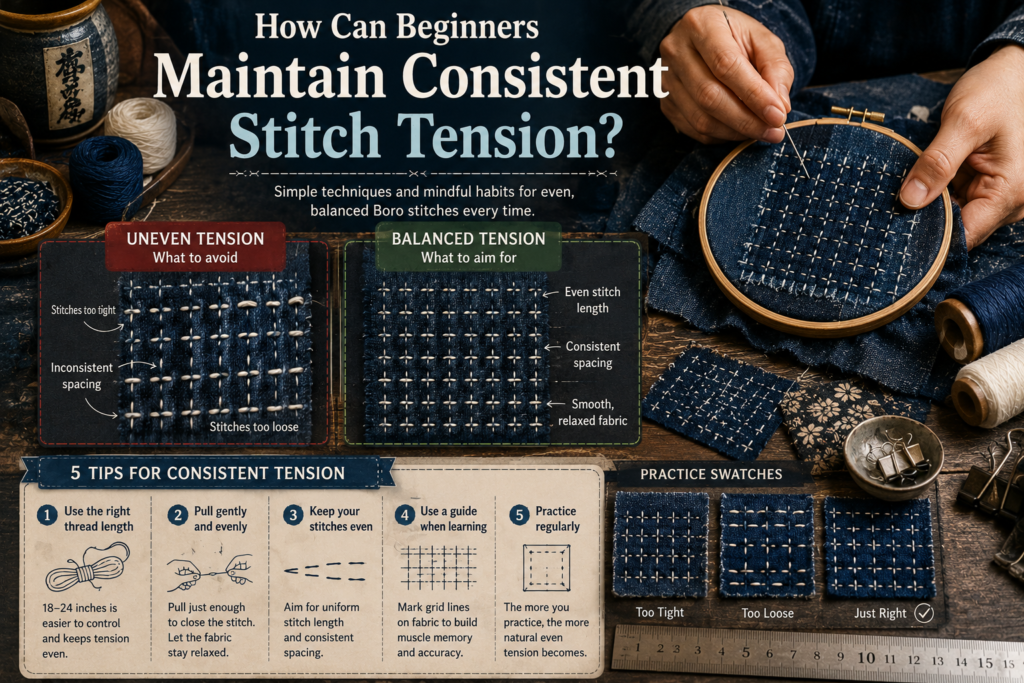
Maintaining consistent stitch tension is one of the most important beginner skills in Boro Stitching because uneven tension often causes distorted repairs, puckering, and poor durability. Fortunately, consistency improves quickly with slower stitching habits and regular fabric checks.
Many beginners unintentionally tighten stitches progressively during long sewing rows. Each pull slightly compresses the fabric until the repair becomes stiff and warped. This usually happens because new stitchers focus more on pulling thread firmly than observing how the fabric behaves.
Traditional boro repairs were handmade under practical working conditions, so perfect uniformity was never the goal. Functional consistency mattered more than decorative precision. The repair needed to remain comfortable, flexible, and structurally stable.
One helpful technique is using shorter thread lengths. Long thread encourages harder pulling because friction increases while sewing. Shorter thread moves more smoothly and allows better tension control.
Beginners should also pause frequently to lay the fabric flat and inspect movement. Small corrections made early prevent major distortion later.
Helpful beginner techniques include:
- Using shorter thread lengths
- Sewing slowly
- Avoiding aggressive pulling
- Checking fabric flatness regularly
- Practicing on scrap denim first
- Watching how the patch bends
- Maintaining even stitch spacing
- Testing flexibility during stitching
Another useful habit is gently flexing the repaired area after completing several rows. If the fabric feels rigid or begins curving inward, the tension is likely too tight.
Consistent balanced tension eventually becomes intuitive through repetition. Traditional visible mending durability comes from controlled adaptability rather than rigid stitching force. Beginners who focus on flexibility usually produce stronger repairs over time.
What Is the Best Stitch Tension for Long-Lasting Boro Repairs?
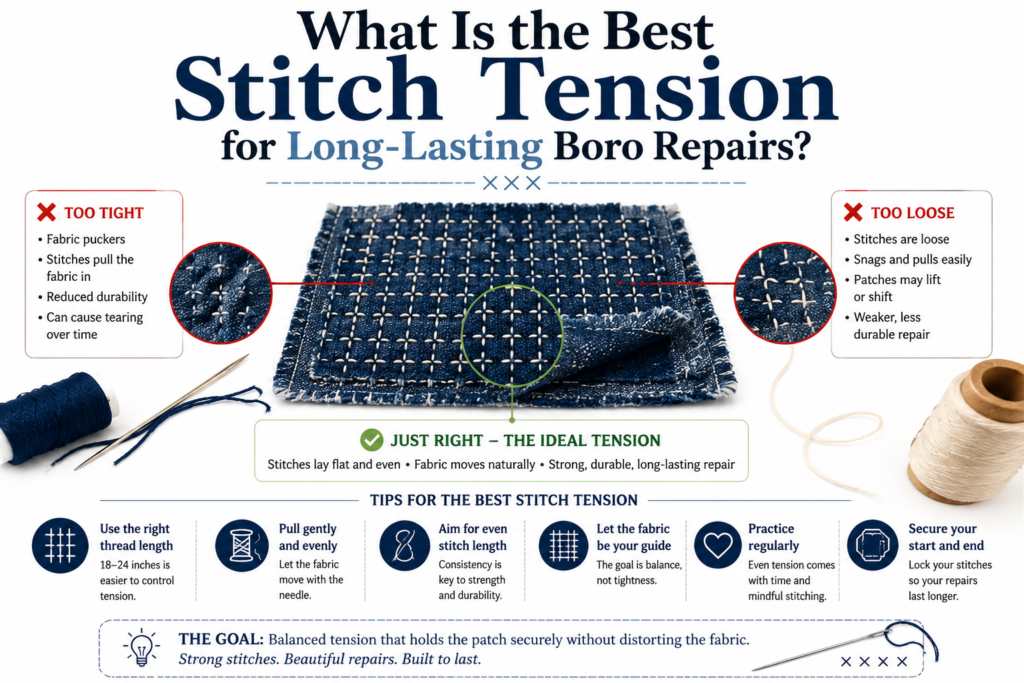
The best stitch tension for durable boro repairs is balanced enough to stabilize layered fabric while still allowing natural movement during wear, bending, and washing. Repairs should feel secure without becoming rigid. Flexibility is one of the hidden reasons traditional Japanese garments survived decades of repeated use.
Long-lasting visible mending depends on harmony between multiple factors:
- Fabric flexibility
- Stitch density
- Thread thickness
- Layer stability
- Movement tolerance
- Stress distribution
No single tension works perfectly for every repair because garments experience different movement patterns. High-stress areas such as knees, elbows, pockets, and bag corners need broader reinforcement coverage rather than tighter pulling force. Medium-density running stitches with controlled flexibility usually perform best.
Traditional boro rarely aimed for decorative perfection alone. Repairs were practical survival techniques designed to preserve clothing as long as possible. This philosophy explains why authentic repairs often appear soft, adaptive, and slightly irregular rather than perfectly compressed.
Balanced tension creates several long-term advantages:
- Improved comfort
- Better movement flexibility
- Reduced tearing risk
- Better wash durability
- Lower fabric stress
- More natural garment drape
The strongest repairs often feel integrated into the original textile rather than attached on top of it. Durable visible mending should support the garment without overpowering its natural movement.
Beginners frequently improve their results when they stop trying to maximize tightness and instead focus on even reinforcement. Controlled flexibility almost always outperforms rigid stitching in real-world wear conditions.
Authentic boro durability comes from adaptive layered reinforcement, balanced running stitches, and respect for how fabric naturally moves through years of use.
Is Boro Stitch Tension Different From Traditional Sashiko?

Boro repairs usually prioritize adaptive flexibility and layered durability, while traditional sashiko often emphasizes more controlled geometric stitching.
Although Boro Stitching and sashiko are closely related, they historically served somewhat different purposes. Boro developed as a survival-oriented repair method focused on extending garment lifespan through layered reinforcement. Sashiko often evolved into more structured decorative reinforcement with visible geometric consistency.
Because of this difference, stitch tension frequently behaves differently between the two styles. Functional boro repairs usually tolerate softer irregular tension because flexibility improves durability. Decorative sashiko patterns sometimes use slightly firmer control to maintain visual alignment across repeating stitch designs.
Refer to our detailed guide on Boro vs Sashiko for further clarification on the differences between the two as a whole.
Key differences include:
| Boro Repairs | Traditional Sashiko |
| Flexible reinforcement | Geometric consistency |
| Adaptive tension | Controlled tension |
| Layered patch focus | Surface pattern focus |
| Functional irregularity | Decorative structure |
| Stress distribution priority | Symmetry priority |
Modern visible mending often blends both approaches depending on whether the repair prioritizes durability or decorative appearance.
How Long Do Durable Boro Repairs Usually Last?
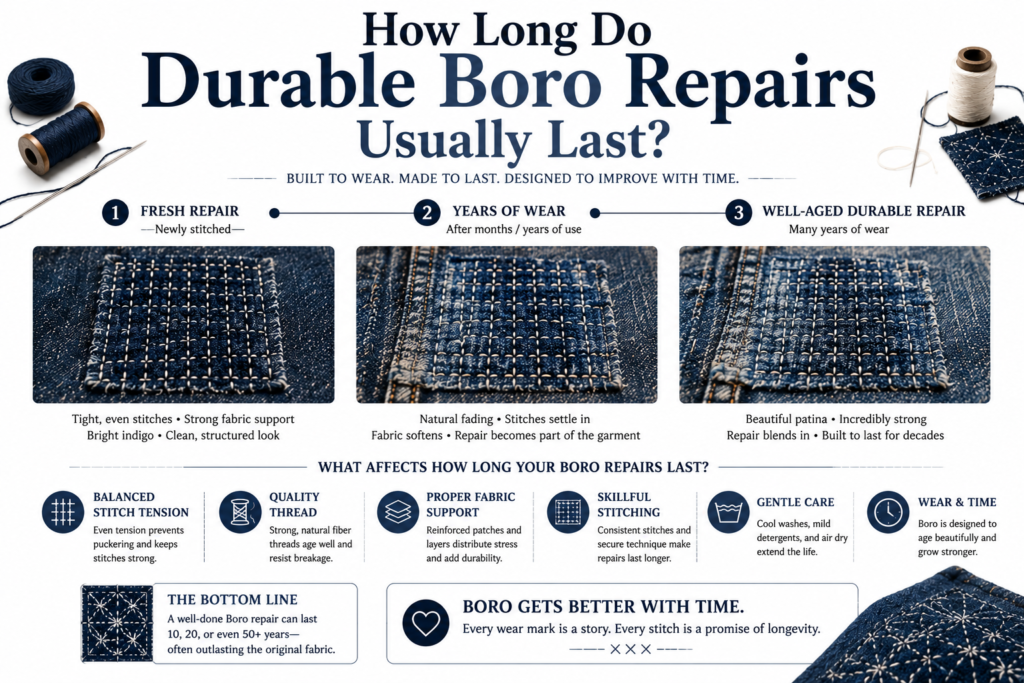
Well-balanced boro repairs can last for many years when stitch tension, fabric flexibility, and reinforcement density work together properly.
Repair lifespan depends heavily on fabric condition, washing frequency, movement stress, and repair quality. Decorative visible mending on lightly used garments may remain stable for decades, while heavy workwear repairs naturally experience faster wear around high-friction areas like knees and elbows.
Traditional Japanese garments were often repaired repeatedly over many years instead of being discarded after one patch failed. Durable repairs were designed to evolve gradually as fabric aged. This layered repair philosophy is one reason authentic boro textiles developed their distinctive appearance over time.
Estimated repair longevity:
- Decorative repairs: 5–15+ years
- Denim knee repairs: 1–5 years
- Jacket elbow repairs: 3–8 years
- Low-stress patchwork: 10+ years
- Heavy labor garments: depends on wear intensity
Balanced flexible tension dramatically improves long-term durability because the repair can absorb movement and washing stress more naturally.
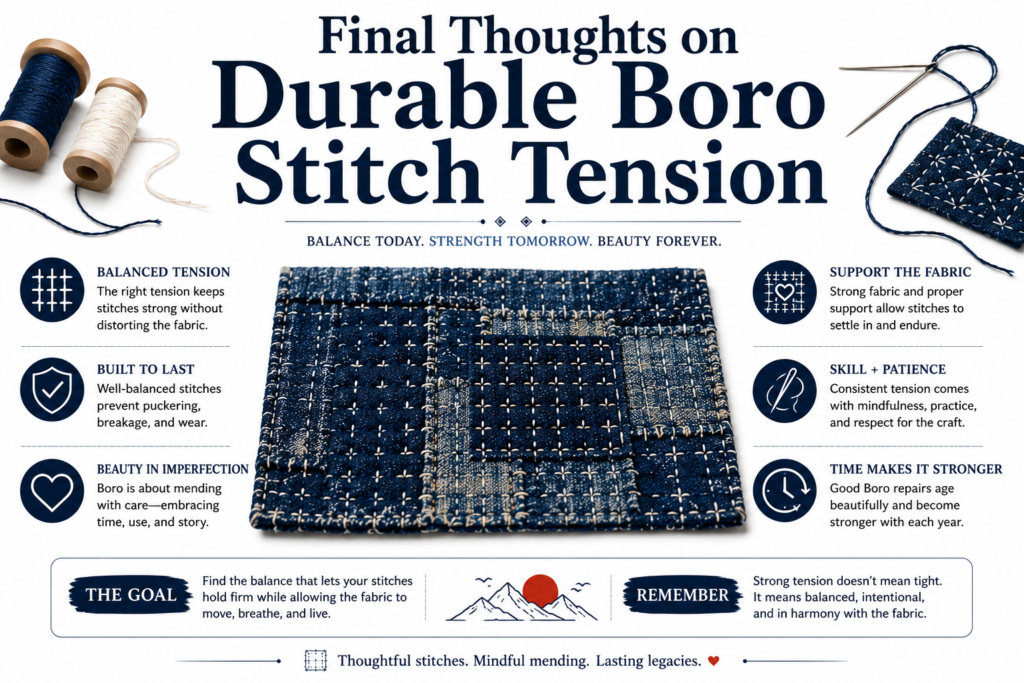
Final Thoughts on Durable Boro Stitch Tension
Durable Boro Stitching repairs depend far more on balanced flexibility than excessive tightness. Traditional visible mending succeeded because it respected fabric movement instead of fighting against it. Repairs that bend naturally usually last longer, feel more comfortable, and resist tearing more effectively over time.
Beginners often improve quickly once they understand that strong repairs come from distributed reinforcement rather than aggressive thread pulling. Balanced stitch tension, medium spacing, layered patch support, and consistent flexibility all work together to create repairs that survive repeated wear and washing.
Authentic boro is not about perfection. It is about adaptive durability, textile preservation, and practical craftsmanship.
FAQs
Should boro stitches lie completely flat?
Slight texture is normal, but major puckering usually means the stitches are too tight.
Are tighter stitches better for denim repairs?
Not necessarily. Denim repairs need flexibility to prevent cracking and fabric stress.
Why do my repairs wrinkle after stitching?
Wrinkling usually happens from excessive thread tension or uneven stitch pulling.
Should beginners use loose stitches?
Beginners should aim for balanced tension rather than intentionally loose stitching.
How long should boro stitches be?
Medium running stitches are most common because they balance flexibility and durability.
Can tight stitches damage old fabric?
Yes. Vintage fabric can tear more easily around tight needle holes.
Does washing affect stitch tension?
Yes. Cotton thread and fabric can shrink differently after washing.
Are decorative stitches less durable?
Sometimes. Decorative repairs may prioritize appearance over structural flexibility.