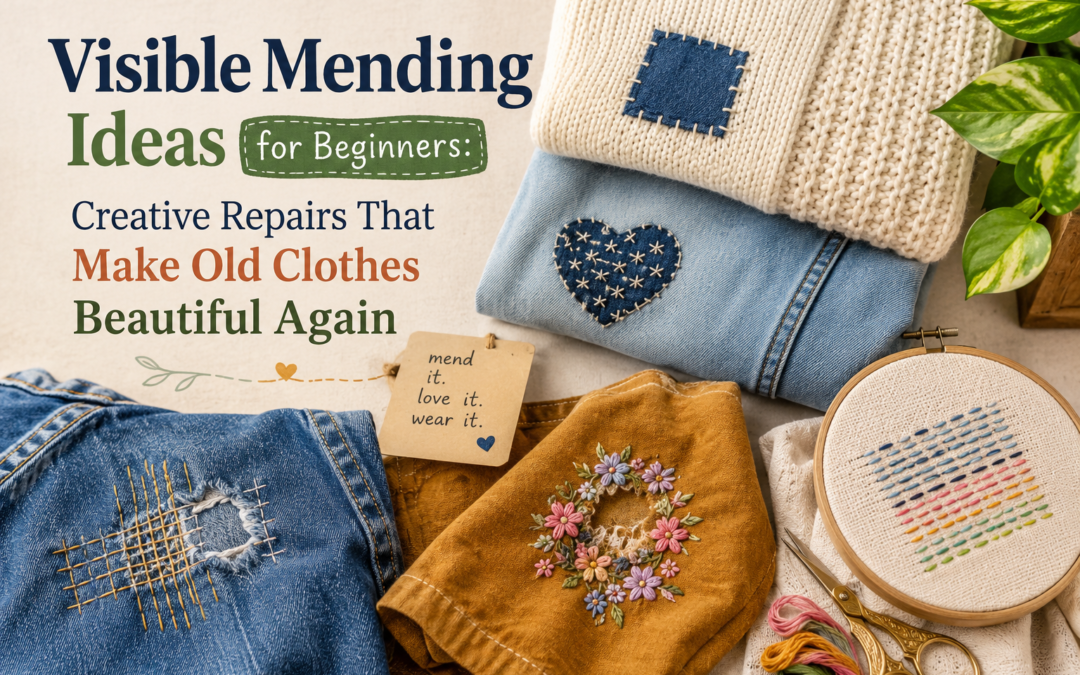
Visible mending allows beginners to repair damaged clothing while transforming tears, holes, and worn fabric into artistic design features. Instead of hiding repairs, visible mending highlights stitching, patchwork, and reinforcement as part of the garment’s personality. This approach combines sustainability, slow fashion, creativity, and practical fabric repair in one process.
Many beginners start visible mending because it requires very little equipment while producing highly personalized results. A simple needle, thread, fabric scraps, and patience are often enough to repair jeans, jackets, hoodies, tote bags, and household textiles. Japanese boro and sashiko traditions strongly influence modern visible mending because both focus on extending textile lifespan through layered reinforcement and repeated stitching.
Visible mending also fits modern sustainable fashion movements where people prefer repairing clothing instead of discarding it. Every repair adds visual texture, history, and individuality that mass-produced garments often lack. Beginners quickly learn that imperfect hand stitching actually adds charm and authenticity to repaired garments.
Visible mending is ideal for:
- repairing jeans and denim
- patching holes creatively
- strengthening weak fabric
- learning beginner sewing skills
- creating sustainable fashion
- personalizing old clothing
- exploring Japanese boro aesthetics
- practicing hand stitching techniques
What Is Visible Mending and Why Is It Becoming So Popular?

Visible mending is a decorative fabric repair method where stitches, patches, and reinforcement remain intentionally visible instead of hidden. Traditional invisible repairs attempt to conceal damage completely, while visible mending embraces the repair itself as part of the clothing’s appearance. This creates garments that feel handmade, unique, and full of character.
The popularity of visible mending has increased dramatically because more people are interested in sustainable fashion, slow crafting, and reducing textile waste. Instead of throwing away damaged clothing, visible mending encourages repairing and extending garment lifespan. Social media platforms, slow fashion communities, and Japanese textile traditions have also helped visible mending become more mainstream worldwide.
Visible mending connects strongly to Japanese boro culture, where repeated repairs and layered reinforcement were necessary for preserving textiles over generations. Modern beginners often use sashiko-inspired stitching patterns to create decorative reinforcement on denim and cotton clothing.
One major reason beginners enjoy visible mending is accessibility. You do not need advanced sewing knowledge to start experimenting with simple running stitches and patches. Even imperfect repairs often look visually appealing because visible mending celebrates handmade texture rather than factory precision.
Visible mending offers beginners several benefits:
- reduces clothing waste
- saves money on replacements
- creates personalized garments
- develops sewing confidence
- encourages creative experimentation
- teaches fabric reinforcement
- supports sustainable fashion habits
- improves clothing durability
Which Clothes Are Best for Beginner Visible Mending Projects?

The best visible mending projects for beginners usually involve medium-weight woven fabrics that are stable and easy to stitch through. Denim is often considered the ideal beginner fabric because it handles reinforcement extremely well and naturally develops attractive wear patterns over time. Jeans with worn knees, torn thighs, or damaged pockets are perfect practice pieces for learning repair techniques.
Cotton jackets, canvas bags, flannel shirts, aprons, and linen garments also work very well because they maintain shape during stitching. These fabrics allow beginners to practice stitch spacing, tension control, and patch placement without fighting excessive stretch or slippage.
Stretchy knit fabrics are usually harder for beginners because uneven tension can distort the repair area. Thin synthetic fabrics may also tear further if stitched incorrectly. Starting with stronger fabrics helps beginners gain confidence before attempting delicate materials.
Good beginner visible mending projects include:
- ripped denim jeans
- canvas tote bags
- cotton work jackets
- flannel shirt elbows
- hoodie sleeves
- apron corners
- shirt pockets
- fabric knee patches
The easiest repairs involve small damaged areas surrounded by healthy fabric. Repairing tiny weak spots early prevents larger tears later and makes reinforcement simpler.
Beginners should also pay attention to fabric compatibility when selecting patches. Similar fabric weights create stronger and more balanced repairs. Denim-on-denim repairs often age beautifully because both layers fade together naturally over time.
A successful beginner repair usually includes:
- stable surrounding fabric
- medium-weight material
- accessible stitching area
- manageable hole size
- enough room for reinforcement
Which Clothing Areas Need the Strongest Visible Mending?
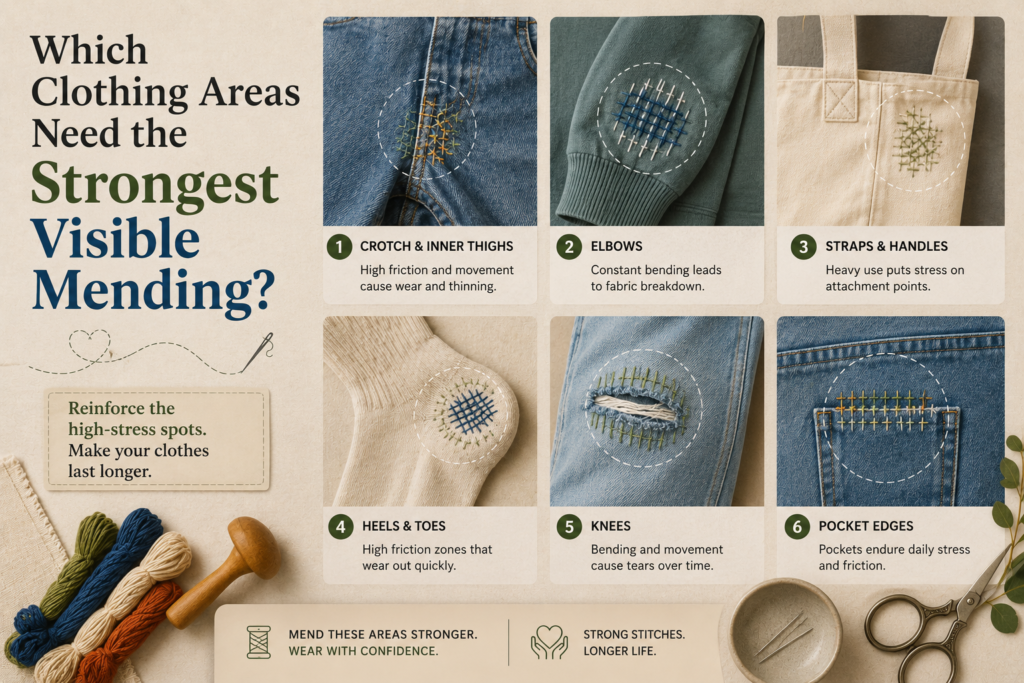
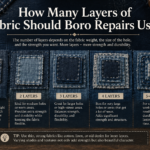
Different parts of clothing wear out for different reasons, which means visible mending strategies should change depending on the repair location. High-friction areas experience repeated movement, stretching, pressure, and abrasion that gradually weaken fabric fibers long before holes fully appear. Beginners often focus only on repairing visible damage, but reinforcing stress points early dramatically increases clothing lifespan and reduces future repair difficulty. Denim jeans commonly fail at the inner thighs and knees because constant movement creates friction that slowly thins the fabric over time.
Repair placement also changes how stitching should behave. Flexible areas like knees and elbows need softer reinforcement that can bend naturally without becoming stiff or uncomfortable. Pocket corners, belt loops, and tote bag straps usually require denser stitching because they experience concentrated pulling force. Layered reinforcement works especially well for heavily stressed areas because multiple fabric layers distribute tension more evenly during daily wear.
High-stress repair zones include:
- inner thigh friction areas
- knee bending points
- elbow creases
- pocket corners
- tote bag handles
- seat wear zones
- cuff edges
- shoulder strap contact areas
Strong visible mending repairs usually extend beyond the damaged fabric itself. Reinforcing surrounding fabric helps prevent new tearing near repair edges. Many experienced visible menders intentionally stitch larger reinforcement zones because stress naturally spreads outward over time.
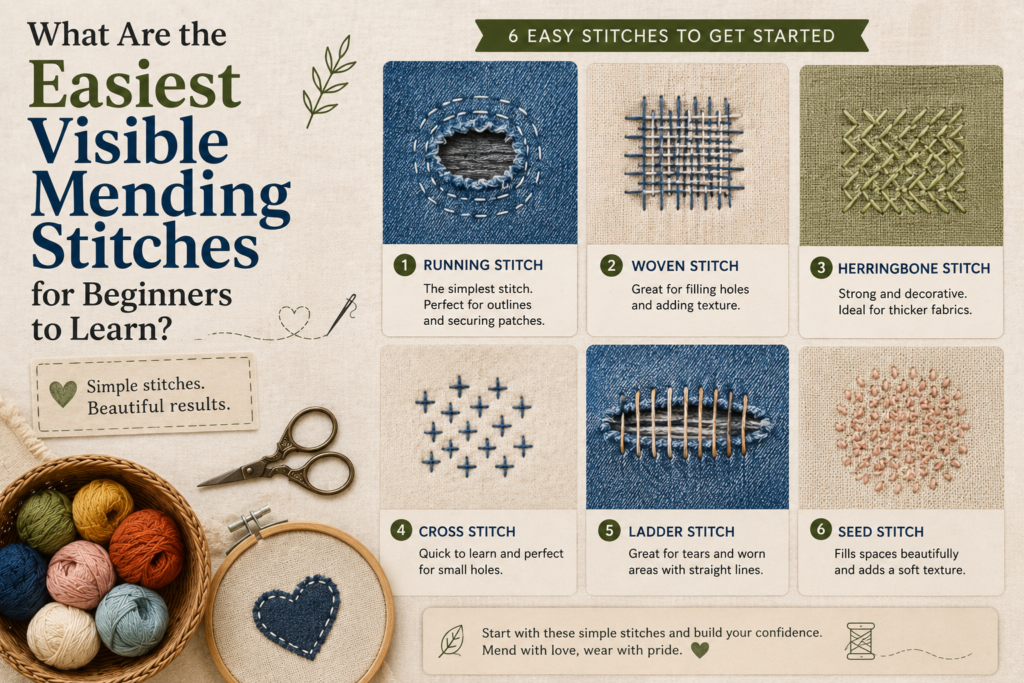
What Are the Easiest Visible Mending Stitches for Beginners to Learn?
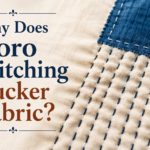
The running stitch is the most important visible mending stitch for beginners because it forms the foundation of sashiko stitching, patch reinforcement, and traditional boro repair. This stitch moves in and out of the fabric in evenly spaced intervals, creating flexible reinforcement lines that stabilize weak areas without making the fabric stiff.
Beginners often start with running stitches because they are forgiving and easy to practice. Even slightly uneven stitch spacing can still look attractive in visible mending because handmade texture is part of the aesthetic. Over time, beginners naturally develop better rhythm, spacing, and tension control.
Other beginner-friendly visible mending stitches include whip stitches, blanket stitches, cross stitches, and seed stitches. These stitches can be used decoratively or structurally depending on the repair style and fabric condition.
Popular beginner stitches include:
- running stitch
- sashiko rows
- whip stitch
- blanket stitch
- cross stitch
- seed stitch
- back stitch
- decorative reinforcement rows
The biggest beginner mistake is pulling thread too tightly. Tight stitches create puckering and fabric distortion, especially around patches. Balanced tension allows the repaired area to remain flexible and wearable.
Practicing stitches on scrap fabric first helps beginners improve control before repairing favorite garments. Small repetitive practice sessions quickly build confidence and muscle memory.
Good beginner stitching habits include:
- maintaining relaxed tension
- using evenly spaced stitches
- reinforcing beyond damaged areas
- securing knots properly
- using strong thread
- avoiding overcrowded stitching
How Can Beginners Use Fabric Patches Creatively in Visible Mending?
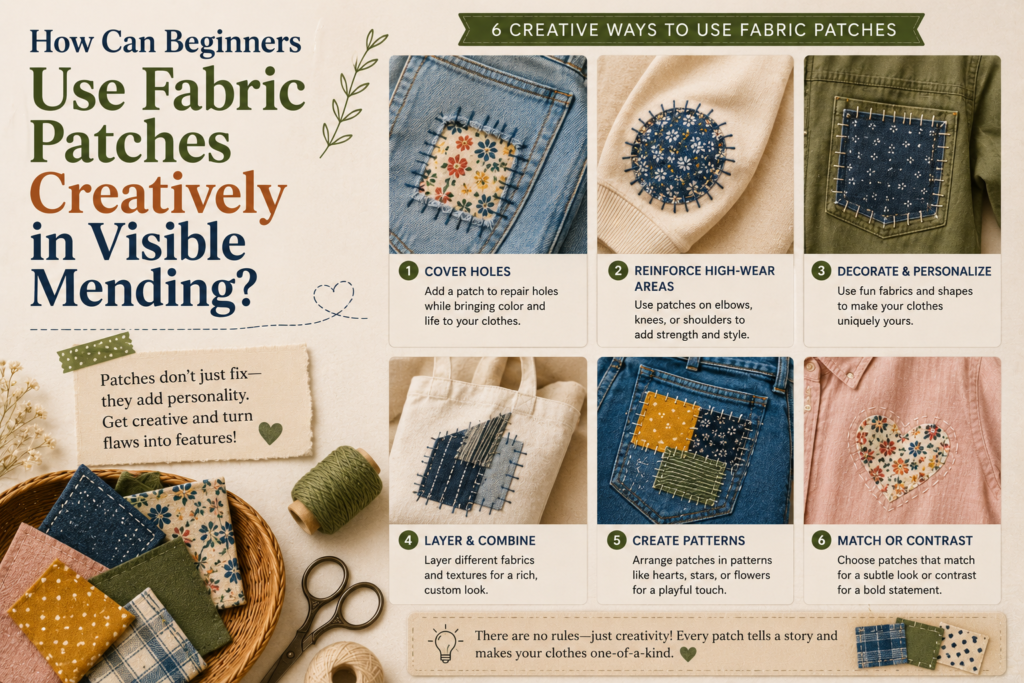
Fabric patches are one of the easiest ways for beginners to strengthen damaged clothing while creating bold decorative contrast. Patching allows worn areas to become design elements instead of flaws. Many visible mending styles intentionally highlight contrasting fabric colors, textures, and stitch patterns to create artistic repairs.
Beginners often start with simple patches placed underneath holes to stabilize weak fabric. Over time, patch layering becomes more creative as stitch patterns, fabric combinations, and repair placement become more intentional.
Denim scraps are especially popular because they are durable, easy to stitch, and naturally compatible with jeans and workwear. Japanese boro-inspired patching often combines multiple indigo fabrics layered together with visible sashiko stitching.
Popular patch ideas include:
- denim knee patches
- elbow reinforcement
- pocket corner repairs
- layered patch stacks
- geometric patch shapes
- contrasting fabric inserts
- floral patch embroidery
- decorative edge stitching
Rounded patch corners usually last longer because sharp corners tend to peel and fray with repeated washing. Stitching slightly beyond the damaged area also prevents future tearing near repair edges.
Beginners should experiment with:
- contrasting thread colors
- layered fabrics
- patch positioning
- visible reinforcement lines
- textured stitching
- asymmetrical repairs
Creative visible mending often looks better as repaired garments age naturally. Fading, washing, and repeated wear soften patch edges and blend repairs more organically into the garment.
What Tools and Materials Do Beginners Need for Visible Mending?
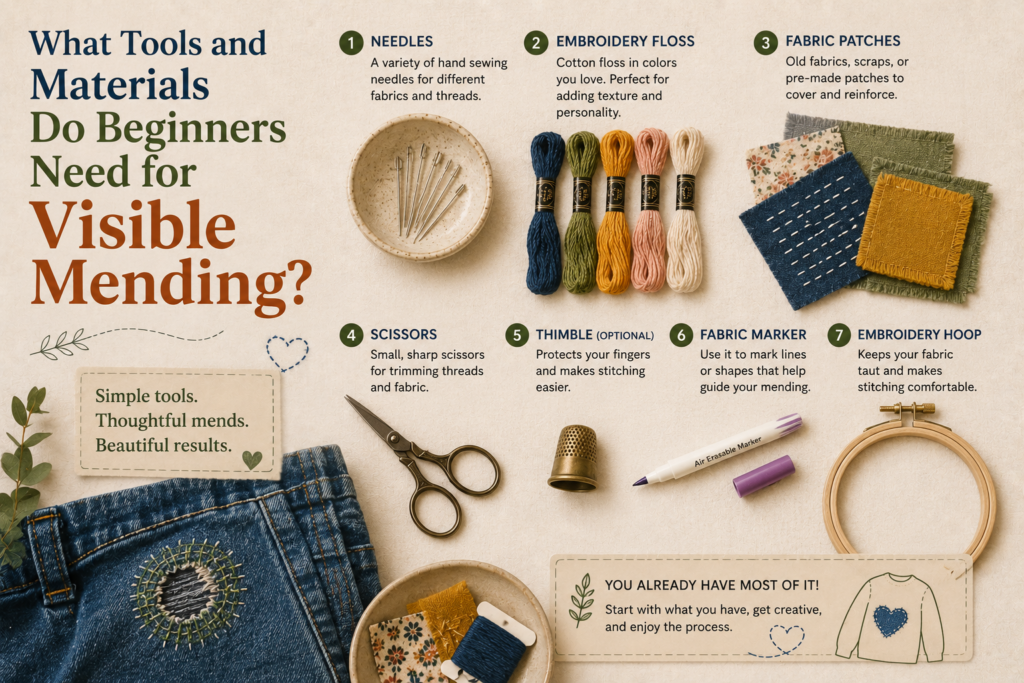
Visible mending is highly beginner-friendly because it requires very few tools compared to many other textile crafts. Most repairs can be completed using simple hand sewing supplies that are inexpensive and easy to find. Many beginners already own several useful tools before starting.
Needles are the most essential tool. Standard hand sewing needles work well for lightweight fabrics, while sashiko needles are ideal for thicker denim and layered repairs because they are longer and stronger.
Thread choice dramatically changes the final appearance of visible mending. Thick sashiko thread creates bold textured repairs, while embroidery floss adds decorative color variation. Cotton thread remains the most beginner-friendly option because it moves smoothly through fabric and maintains balanced tension.
Useful visible mending tools include:
- sashiko needles
- embroidery needles
- hand sewing needles
- embroidery scissors
- sashiko thread
- cotton thread
- embroidery floss
- fabric scraps
- pins or clips
- embroidery hoop
An embroidery hoop is especially helpful for stabilizing thin or flexible fabric during stitching. Stable fabric makes stitch spacing much easier for beginners.
Good beginner materials include:
- denim scraps
- linen patches
- cotton remnants
- old flannel fabric
- canvas scraps
- recycled clothing fabric
Many visible menders gradually build fabric scrap collections specifically for future repairs. Reusing old clothing pieces also strengthens sustainability benefits while creating consistent textile texture across repairs.
Beginners do not need expensive tools to achieve beautiful results. Skill improvement comes mostly from practice, observation, and understanding how different fabrics behave during reinforcement and washing.
How Does Thread Choice Change Visible Mending Results?
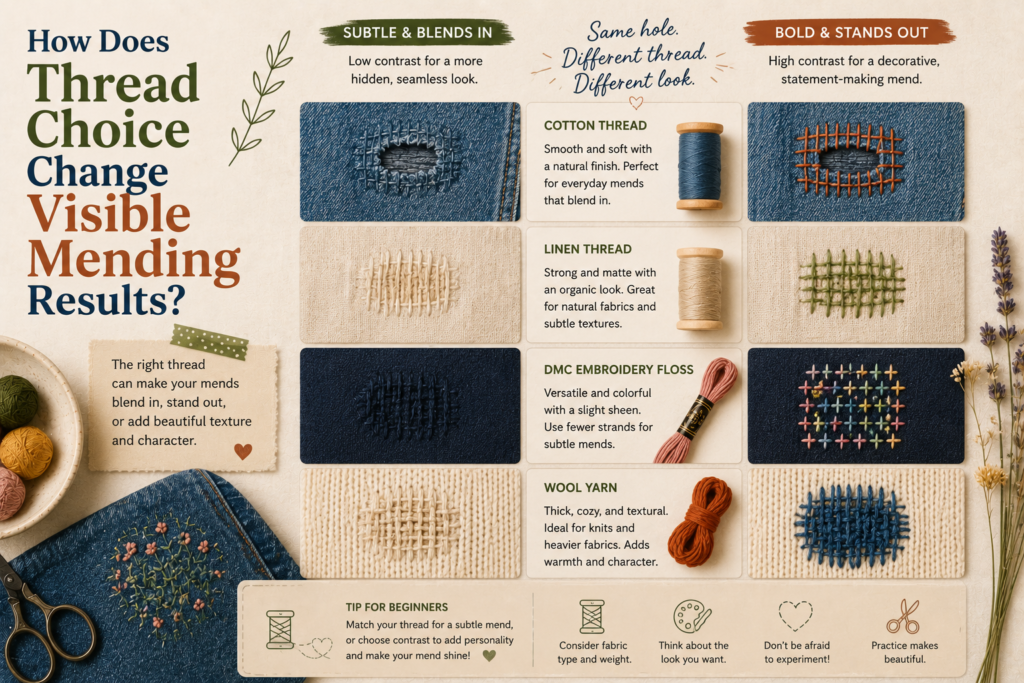
Thread selection changes the durability, texture, flexibility, and visual appearance of visible mending more than many beginners expect. Thick thread creates stronger visual contrast and heavier texture, while thinner thread produces softer, more subtle repairs. Different thread materials also behave differently after repeated washing and daily wear. Beginners often start with basic cotton thread because it balances flexibility, durability, and ease of stitching across many fabric types.
Sashiko thread is especially popular for denim repairs because it creates bold visible lines while resisting abrasion well. Embroidery floss works better for decorative visible mending because it adds color variation and softer texture. Polyester thread is stronger than cotton in some situations, but many visible menders avoid it because it can look overly synthetic and may age differently than natural fabric. Matching thread thickness to fabric weight creates more balanced repairs that feel comfortable during wear.
Common visible mending thread choices include:
- sashiko thread for denim reinforcement
- embroidery floss for decorative stitching
- cotton thread for general repairs
- pearl cotton for textured stitching
- wool thread for soft textile repair
- polyester blends for heavy stress areas
Thread color also affects the overall repair aesthetic. Contrasting white thread on indigo denim creates classic Japanese-inspired visible mending, while tonal thread blends more subtly into fabric. Over time, repeated washing softens thread texture and changes how repairs visually integrate into the garment.
How Does Japanese Boro Influence Modern Visible Mending Techniques?
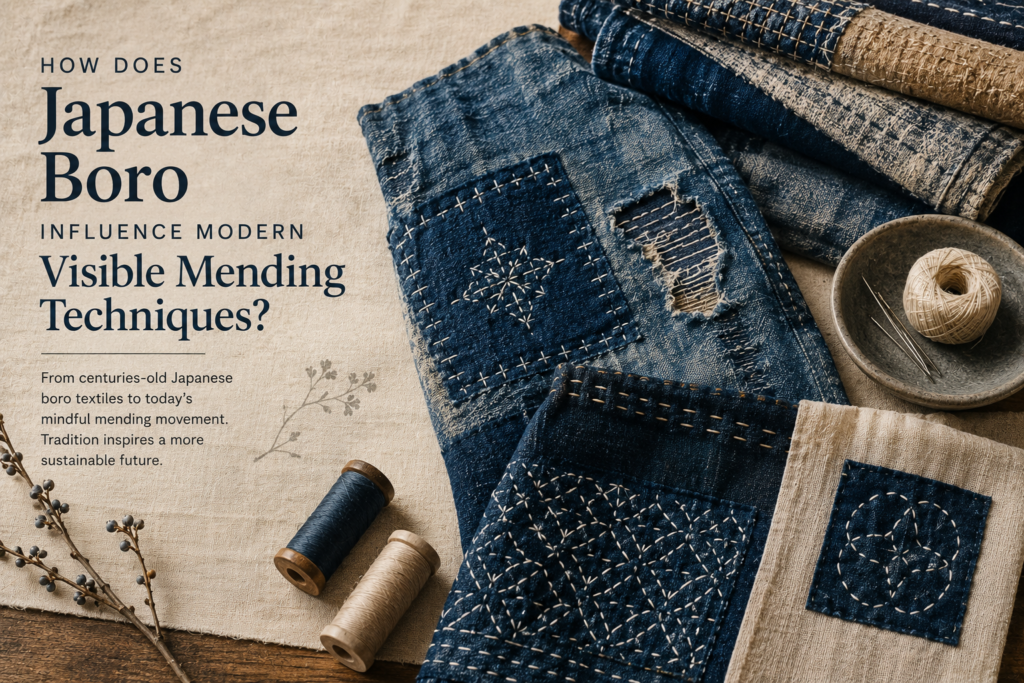
Japanese boro is one of the strongest historical influences behind modern visible mending techniques. Boro developed in rural Japan as a necessity-based repair tradition where families repeatedly patched, layered, and reinforced textiles to extend garment lifespan for generations. Instead of discarding damaged fabric, clothing was continuously repaired using available scraps and simple hand stitching.
Over time, repeated repairs created highly textured garments filled with visible layers, fading, reinforcement rows, and stitched history. Modern visible mending adopts many of these same principles, especially the idea that repair itself can become visually beautiful.
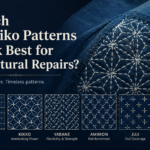
Sashiko stitching also plays a major role in modern visible mending. Traditionally, sashiko stitches reinforced fabric while adding decorative geometric patterns. Today, beginners frequently combine sashiko running stitches with patchwork repair to create strong yet artistic reinforcement.
Modern visible mending influenced by boro often includes:
- layered indigo patches
- visible reinforcement stitching
- repeated fabric repairs
- textured hand stitching
- asymmetrical patch placement
- slow hand-sewn construction
- sustainable repair philosophy
Many modern denim brands now intentionally imitate worn boro aesthetics because layered repairs create rich visual texture impossible to reproduce through mass production alone.
Beginners are often attracted to boro-inspired visible mending because it removes pressure for perfection. Uneven stitching, fading, patch variation, and irregular texture all contribute to authenticity rather than appearing as mistakes.
Important boro principles include:
- preserving usable fabric
- repairing instead of replacing
- layering for durability
- accepting imperfection
- valuing textile history
- reinforcing stress points gradually
Should Visible Mending Blend In or Stand Out?

Visible mending can either blend naturally into clothing or become a bold artistic statement depending on fabric choice, thread contrast, and stitching style. Some people prefer subtle repairs that harmonize with the garment’s original appearance, while others intentionally create highly visible contrast using bright thread, oversized patches, or decorative sashiko patterns. Neither approach is better because visible mending is highly personal and influenced by individual style preferences.
Blended visible mending usually uses similar fabric colors and softer tonal stitching to create repairs that feel naturally integrated into worn clothing. This approach works especially well for vintage garments and minimal clothing styles. High-contrast visible mending creates stronger visual texture and often highlights the repair as wearable textile art. Indigo denim with white sashiko stitching remains one of the most recognizable examples because the contrast creates beautiful geometric texture while preserving traditional Japanese repair aesthetics.
Popular visible mending color approaches include:
- tonal denim-on-denim patching
- white sashiko stitching on indigo
- colorful embroidery repairs
- monochrome patch layering
- neutral linen reinforcement
- asymmetrical contrast patching
- faded vintage fabric combinations
Beginners often achieve the best results by limiting repairs to two or three consistent thread colors across one garment. Repeated visual rhythm creates cohesion and prevents repairs from looking chaotic. Over time, fading and washing naturally soften strong contrasts and help patches blend more organically into surrounding fabric.

What Are the Most Creative Visible Mending Ideas Beginners Can Try?
Creative visible mending allows beginners to transform damaged clothing into personalized wearable art using simple stitches, patches, and decorative reinforcement. Many beginners initially focus on functional repair, but visible mending becomes much more enjoyable once creative experimentation begins.
Color contrast is one of the easiest ways to make repairs stand out visually. White sashiko stitching on dark indigo denim creates classic Japanese-inspired texture, while colorful embroidery floss produces playful artistic repairs. Some beginners intentionally exaggerate repairs using oversized patches and bold geometric stitching patterns.
Popular beginner visible mending ideas include:
- decorative knee patches
- stitched heart repairs
- geometric sashiko grids
- floral embroidery over stains
- denim-on-denim layering
- pocket reinforcement stitching
- colorful visible seams
- asymmetrical patch placement
- tote bag repair art
- hoodie elbow patches
Visible mending also works well for repairing children’s clothing because playful patches and colorful stitching make repaired garments feel intentional instead of damaged.
Many beginners create stronger visual balance by repeating similar repair colors or stitching styles across multiple areas of the same garment. This creates cohesion rather than isolated repairs.
Creative visible mending improves significantly when beginners focus on:
- balanced composition
- stitch consistency
- fabric texture contrast
- controlled color palettes
- layered reinforcement
- repeated visual rhythm
Some visible menders eventually combine embroidery, quilting, patchwork, and sashiko into highly complex textile art. However, simple beginner repairs often remain the most wearable and practical.
Common Beginner Visible Mending Mistakes
Many beginner visible mending problems come from rushing repairs before understanding fabric tension, reinforcement placement, and stitch spacing. Fortunately, most mistakes are easy to correct with practice and do not permanently ruin clothing. Visible mending actually benefits from slight irregularity because handmade texture is part of the repair aesthetic. However, certain repair habits can weaken fabric or make garments uncomfortable during wear if ignored repeatedly.
One of the most common mistakes is pulling stitches too tightly. Tight stitching causes puckering and restricts natural fabric movement, especially around knees and elbows. Beginners also sometimes place patches directly over damaged areas without reinforcing the surrounding weakened fabric. This creates new tearing along repair edges after repeated wear. Using extremely thin decorative fabric for high-stress repairs is another major issue because weak patches fail quickly under friction and movement.
Common beginner visible mending mistakes include:
- pulling thread too tightly
- stitching too close to hole edges
- weak patch fabric selection
- overcrowded decorative stitching
- ignoring fabric grain direction
- poor knot anchoring
- uneven reinforcement spacing
- using thread that is too thin
Practicing repairs on scrap fabric helps beginners improve stitch rhythm and tension control before working on favorite garments. Most experienced visible menders improve gradually through repetition rather than perfection. Small repair adjustments usually create much stronger long-term results than overly complicated decorative stitching.
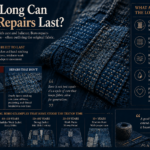
How Visible Mending Changes After Repeated Washing and Wear
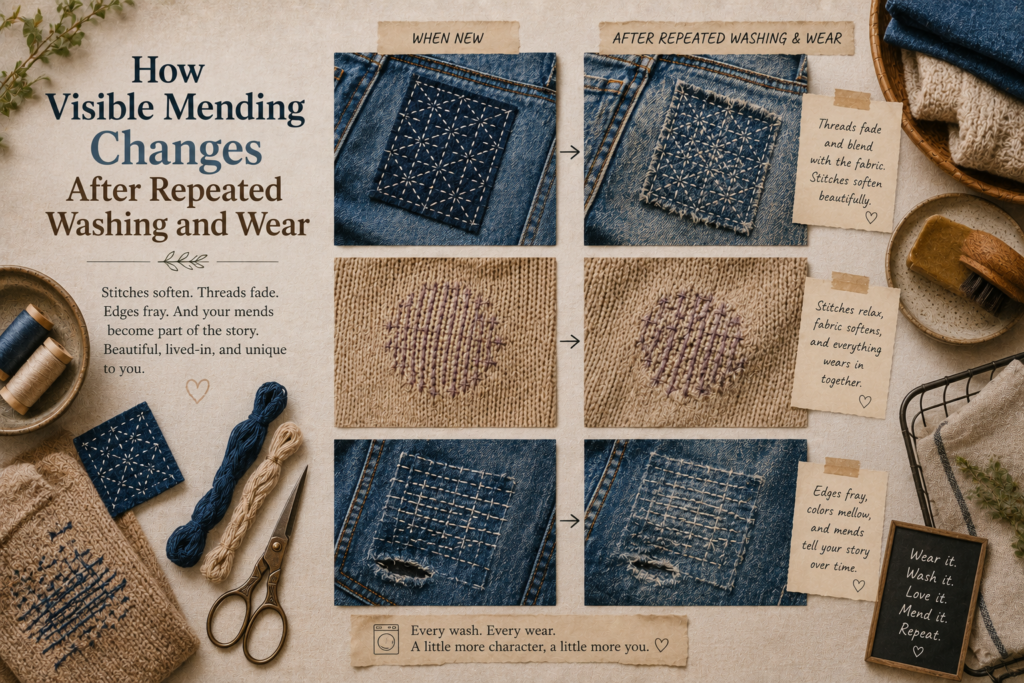
Visible mending repairs continue evolving long after the stitching is finished. Repeated washing, friction, body movement, and fabric softening gradually change how repairs look and feel over time. This aging process is actually one of the reasons many people love visible mending. Patches soften, stitching settles deeper into fabric texture, and repaired areas begin blending naturally into the garment’s wear patterns. Denim visible mending becomes especially attractive because indigo fading creates layered contrast around stitched areas.
Thread texture also changes with wear. Cotton sashiko thread softens significantly after repeated washing, while thick embroidery thread may flatten slightly against the fabric surface. Small amounts of edge fraying around patches are normal and often contribute to a more authentic boro-inspired appearance. Well-made repairs usually become more comfortable after several washes because the fabric relaxes and adapts to movement.
Visible mending maintenance tips include:
- wash garments gently when possible
- avoid excessive heat drying
- inspect stress points regularly
- reinforce thinning areas early
- trim loose threads carefully
- repair small damage before expansion
Many experienced visible menders intentionally allow slight fading and natural wear because it creates richer texture and visual depth. Some repairs eventually become almost impossible to separate from the original garment because repeated use blends old fabric, new stitching, and layered reinforcement together naturally. This evolving appearance gives visible mending a unique long-term character that factory-made distressing cannot realistically replicate.
When Does Visible Mending Not Work Well?
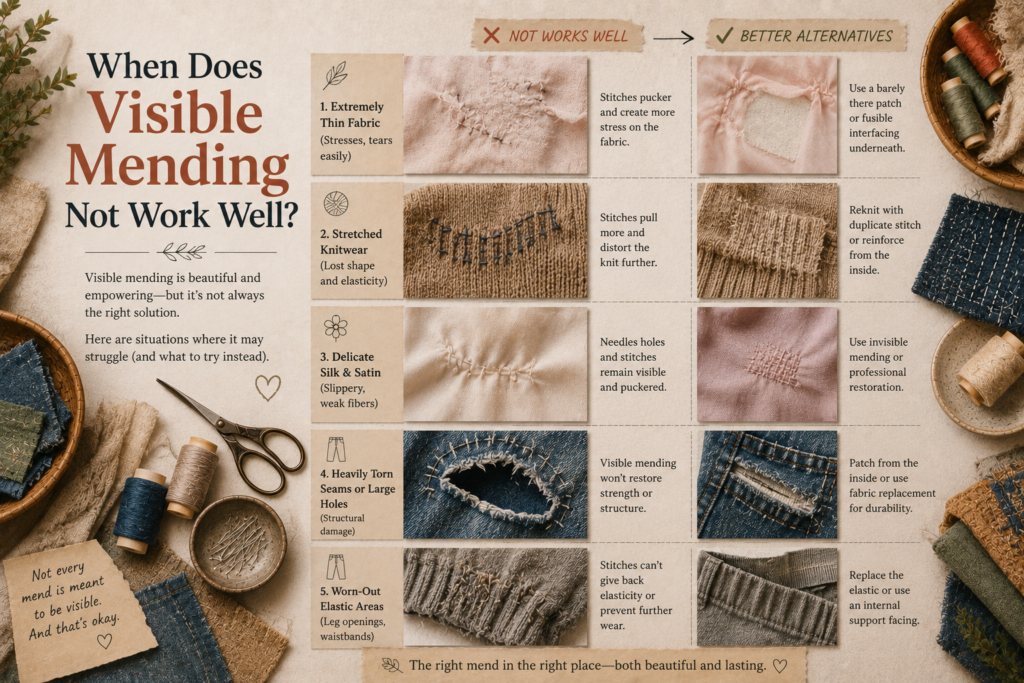
Visible mending works extremely well for many fabric repairs, but some damage types and fabric conditions are difficult to repair successfully by hand. Understanding repair limitations helps beginners avoid frustration and make better decisions about whether clothing should be repaired, repurposed, or replaced entirely. Fabric condition matters more than hole size alone because some textiles lose structural integrity long before visible tearing appears.
Thin fabric weakened by years of abrasion may continue tearing even after patching because surrounding fibers are already fragile. Stretch fabrics with high elastic content can also be difficult for beginners because stitches may distort during movement and washing. Heat-damaged synthetic fabric sometimes becomes brittle or melted, making stable reinforcement nearly impossible. Extremely large tears near major seams may require machine sewing or advanced reconstruction rather than decorative visible mending alone.
Visible mending becomes less effective when:
- fabric is severely dry-rotted
- elastic material is overstretched
- damage crosses structural seams
- fabric has become paper-thin
- synthetic fibers are melted
- surrounding fabric is unstable
- repairs create excessive stiffness
Even when clothing cannot be fully restored, damaged fabric can often still be reused creatively for patches, quilting, or future visible mending projects. Many experienced visible menders keep worn garments specifically for fabric harvesting because aged denim and naturally faded cotton create beautiful repair materials. Understanding repair limits is part of developing realistic textile repair skills and long-term fabric awareness.

Final Thoughts on Visible Mending Ideas for Beginners
Visible mending gives beginners an accessible way to repair damaged clothing while developing sewing skills, sustainability habits, and creative confidence. Simple stitches and patches can completely transform old garments into personalized pieces with strong texture and character. Unlike invisible repair methods, visible mending celebrates wear, repair, and handmade craftsmanship.
The best beginner projects focus on durable fabrics like denim, cotton, canvas, and linen because these materials handle reinforcement stitching very well. Running stitches, sashiko-inspired rows, and layered patchwork create strong structural repairs while adding decorative detail.
Visible mending continues growing in popularity because it combines multiple modern interests at once:
- sustainable fashion
- slow crafting
- textile preservation
- handmade aesthetics
- creative personalization
- mindful consumption
- Japanese repair traditions
- clothing longevity
Beginners should remember that visible mending improves naturally with practice. Slightly uneven stitches, irregular texture, and patch variation often add authenticity rather than reducing quality. Over time, repaired garments soften, fade, and develop even more visual depth through wear.
Many people eventually value visibly repaired clothing more than new factory-made garments because each repair reflects real experience, time, and craftsmanship.
Visible mending is ultimately about extending the life of fabric while creating something unique and functional. A simple repaired pair of jeans or patched jacket can become more meaningful and visually interesting than clothing purchased brand new.
FAQs
What is the easiest visible mending method for beginners?
Running stitch patching is usually the easiest method because it requires minimal sewing skill while reinforcing damaged fabric effectively.
Can visible mending be done without a sewing machine?
Yes. Most visible mending techniques are done entirely by hand using basic needles and thread.
What fabric is easiest for visible mending?
Denim, cotton, canvas, and linen are easiest because they hold stitches well and resist puckering.
Is sashiko the same as visible mending?
No. Sashiko is a traditional Japanese stitching technique often used within visible mending repairs.
Can visible mending make clothes stronger?
Yes. Proper patching and reinforcement stitching can significantly strengthen worn fabric areas.
What thread works best for visible mending?
Cotton thread, sashiko thread, and embroidery floss are the most common beginner-friendly choices.
Does visible mending work on jeans?
Yes. Jeans are one of the best beginner projects because denim handles reinforcement stitching extremely well.
Why is visible mending becoming popular again?
People are increasingly interested in sustainability, slow fashion, handmade crafts, and repairing clothing instead of replacing it.